Table of Contents [expand]
- Provisioning the add-on
- Local setup
- Connect PostgreSQL with your favorite language
- Connect PostgreSQL with Node.js
- Connect PostgreSQL with Node.js/TypeORM
- Connect PostgreSQL with Django
- Use the PostgreSQL psql CLI
- Connect to Stackhero dashboard
- Connect to pgAdmin
- How to create a user and database in PostgreSQL using the psql CLI
- How to create a user and database in PostgreSQL using pgAdmin web UI
- Import pgsql data from your computer to PostgreSQL
- Export data from PostgreSQL to your computer
- Activate PostgreSQL PostGIS extension
- Deactivate PostgreSQL PostGIS extension
- Activating PgVector extension
- Activating TimescaleDB extension
- Upgrading your plan
- Removing the add-on
- Support
- Additional resources
Last updated November 03, 2025
This add-on is operated by Stackhero
PostgreSQL on dedicated instances, up-to-date versions and attractive prices.
Stackhero for PostgreSQL provides a managed PostgreSQL instance running on a fully dedicated instance.
With your Stackhero for PostgreSQL add-on you will get:
- A private instance (dedicated VM) for high performances and security
- TLS encryption (aka SSL)
- A full access to pgAdmin
- An automatic backup every 24 hours
- One click to update to new PostgreSQL versions
All PostgreSQL clients can connect to Stackhero for PostgreSQL and there is a PostgreSQL client library for almost every language out there, including Ruby, Node.js, Java, Python, Clojure and Erlang.
Provisioning the add-on
Stackhero for PostgreSQL can be attached to an Heroku application via the CLI:
A list of all plans available can be found here.
$ heroku addons:create --wait ah-postgresql-stackhero --app <your app name>
Creating ah-postgresql-stackhero...
Your add-on is being provisioned on Stackhero. It will be available in around 2 minutes.
After you provision Stackhero for PostgreSQL, the STACKHERO_POSTGRESQL_HOST, STACKHERO_POSTGRESQL_PORT and STACKHERO_POSTGRESQL_ADMIN_PASSWORD config variables are available in your app’s configuration. They contain the URLs to your PostgreSQL instance as its admin password.
You can see the content of those variables via the heroku config:get command:
$ heroku config:get STACKHERO_POSTGRESQL_HOST
$ heroku config:get STACKHERO_POSTGRESQL_PORT
$ heroku config:get STACKHERO_POSTGRESQL_ADMIN_PASSWORD
After you install Stackhero for PostgreSQL, your application should be configured to fully integrate with the add-on.
Local setup
After you provision the add-on, it’s necessary to locally replicate its config variables so your development environment can operate against the service.
Use the Heroku Local command-line tool to configure, run and manage process types specified in your app’s Procfile. Heroku Local reads configuration variables from a .env file. To view all of your app’s config variables, type heroku config. Use the following command for each value that you want to add to your .env file:
$ heroku config:get STACKHERO_POSTGRESQL_HOST -s  >> .env
$ heroku config:get STACKHERO_POSTGRESQL_PORT -s  >> .env
$ heroku config:get STACKHERO_POSTGRESQL_ADMIN_PASSWORD -s  >> .env
Credentials and other sensitive configuration values should not be committed to source-control. In Git, exclude the .env file with: echo .env >> .gitignore.
For more information, see the Heroku Local article.
Connect PostgreSQL with your favorite language
You can use almost any client library available for your language that is able to connect to a PostgreSQL server.
We recommend to create a dedicated user (see sections below). If you don’t want to, you can connect to PostgreSQL using the “admin” user and the following environment variables:
- STACKHERO_POSTGRESQL_HOST
- STACKHERO_POSTGRESQL_PORT
- STACKHERO_POSTGRESQL_ADMIN_PASSWORD
Connect PostgreSQL with Node.js
In this example we will use the pg (node-postgres) package.
To install it simply run this command: npm install pg
const { Client } = require('pg');

(async () => {
  // Note: credentials have to be defined in the `.env` file (see the `.env-example` file as an example).
  const pg = new Client({
    host: process.env.STACKHERO_POSTGRESQL_HOST,
    port: process.env.STACKHERO_POSTGRESQL_PORT,
    user: 'admin',
    password: process.env.STACKHERO_POSTGRESQL_ADMIN_PASSWORD,
    database: 'admin'
  });

  await pg.connect();

  // Create table stackherotest-users if not exists yet
  await pg.query('CREATE TABLE IF NOT EXISTS "stackherotest-users" '
    + '('
    + '"userId" SERIAL,'
    + '"name" VARCHAR(128) NOT NULL,'
    + '"address" TEXT NOT NULL,'
    + '"email" VARCHAR(265) NOT NULL'
    + ')');


  // Insert 100 fake users
  for (let i = 0; i < 100; i++) {
    await pg.query(
      'INSERT INTO "stackherotest-users" ("userId", "name", "address", "email") VALUES ($1, $2, $3, $4)',
      [
        Math.round(Math.random() * 100000), // Generate a fake userId
        faker.name.findName(), // "name"
        faker.address.streetName(), // "address"
        faker.internet.email() // "email"
      ]
    );
  }

  console.log('Users have been added 👍');
  console.log('Connect to your pgadmin and see them in database admin, table stackherotest-users');

  // Count number of rows in table users
  const { rows: usersCountRows } = await pg.query('SELECT COUNT(*) AS cpt FROM "stackherotest-users"');
  console.log(`There is now ${usersCountRows[0].cpt} in table "users"`);

  await pg.end();

})().catch(error => {
  console.error('');
  console.error('🐞 An error occurred!');
  console.error(error);
  process.exit(1);
});
Connect PostgreSQL with Node.js/TypeORM
To connect from Node.js/TypeORM, you have to add the ssl flag to true like in this example:
createConnection(
  driver: {
    type: 'postgres',
    host: process.env.STACKHERO_POSTGRESQL_HOST,
    port: process.env.STACKHERO_POSTGRESQL_PORT,
    username: '<USERNAME>',
    password: '<PASSWORD>',
    database: '<DATABASE>',
    extra: {
      ssl: true
    }
  }
);
Connect PostgreSQL with Django
If not yet installed, install the psycopg module which will be used to connect to PostgreSQL:
pip install psycopg
Then open your settings.py and put this:
import environ
env = environ.Env()
environ.Env.read_env()

DATABASES = {
  'default': {
    'ENGINE': 'django.db.backends.postgresql',
    'HOST': env('STACKHERO_POSTGRESQL_HOST'),
    'PORT': env('STACKHERO_POSTGRESQL_PORT'),
    'OPTIONS': {
      'sslmode': 'require',
    },
    'NAME': 'admin',
    'USER': 'admin',
    'PASSWORD': env('STACKHERO_POSTGRESQL_ADMIN_PASSWORD')
  }
}
Use the PostgreSQL psql CLI
PostgreSQL can be managed using its official psql CLI.
You can install it on your computer and manage your PostgreSQL service remotely.
You can also use it via Docker on your computer. This is the prefered method as it avoids to install psql directly on your computer and gives you the ability to switch between versions easily.
To get access to psql using Docker, simply run this command:
docker run -it postgres:16-alpine /bin/bash
Don’t forget to replace 16 with the major version number of your current PostgreSQL service.
Then use psql to connect to your service:
$ psql \
  --host=<STACKHERO_POSTGRESQL_HOST> \
  --port=<STACKHERO_POSTGRESQL_PORT> \
  --username=admin \
  --dbname=admin
Connect to Stackhero dashboard
Stackhero dashboard allows you to see your instance usage, restart it, and apply updates. It also gives you the ability to access the pgAdmin UI to consult your PostgreSQL data directly in a graphical way.
You can access the dashboard via the CLI:
$ heroku addons:open ah-postgresql-stackhero
Opening ah-postgresql-stackhero for sharp-mountain-4005
or by visiting the Heroku Dashboard and selecting the application in question. Select Stackhero for PostgreSQL from the Add-ons menu.
Connect to pgAdmin
pgAdmin is a web UI that gives you access to your PostgreSQL in a graphical way.
To connect to your pgAdmin web UI, simply connect to your PostgreSQL domain name using https (example: https://XXXXXX.stackhero-network.com).
Then login using admin as user and the password defined in your service configuration (in your Stackhero dashboard or STACKHERO_POSTGRESQL_ADMIN_PASSWORD).
How to create a user and database in PostgreSQL using the psql CLI
Per default an admin user is created with admin rights.
A good practice is to create a dedicated user and database for each project you want to host.
Create a user
To create a user on PostgreSQL, you can use the psql CLI with the following SQL query:
CREATE ROLE "myProject" WITH
  LOGIN
  NOSUPERUSER
  NOCREATEDB
  NOCREATEROLE
  NOINHERIT
  NOREPLICATION
  CONNECTION LIMIT -1
  PASSWORD 'secretPassword';
Don’t forget to replace myProject with your project name and secretPassword with a secured password.
Also a good practice is to use your project name as login and database name. If your project name is “superWebsite”, we recommend to create a user named “superWebsite” as a database named “superWebsite”.
You can generate a secured password with this command line: < /dev/urandom tr -dc _A-Z-a-z-0-9 | head -c${1:-32};echo;
Create a database
To create a database on PostgreSQL, you can use the psql CLI with the following SQL query:
CREATE DATABASE "myProject"
  WITH
  OWNER = "myProject"
  ENCODING = 'UTF8'
  CONNECTION LIMIT = -1
  IS_TEMPLATE = False;
A good practice is to define the same name for the database and the user. For example, if your project name is “superWebsite”, we recommend to create a user named “superWebsite” as a database named “superWebsite”.
How to create a user and database in PostgreSQL using pgAdmin web UI
Per default an admin user is created with admin rights.
A good practice is to create a dedicated user and database for each project you want to host.
To connect to your pgAdmin web UI, simply connect to your PostgreSQL domain name using https (example: https://xxxxxx.stackhero-network.com).
Then login using admin as user and the password defined in your service configuration (in your Stackhero dashboard).
Create a user
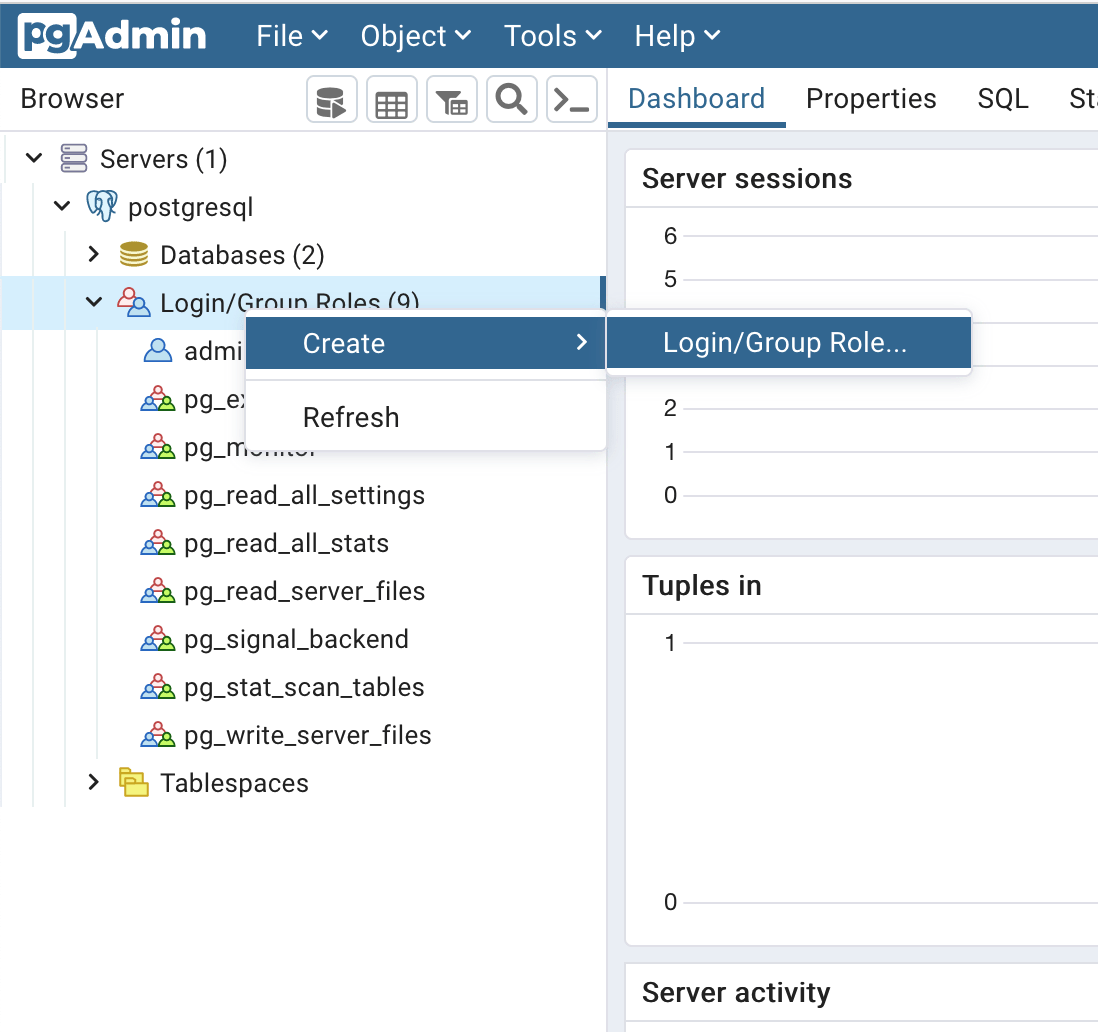
Go to Servers/postgresql, click right on Login/Group Roles and select Create/Login/Group Role:
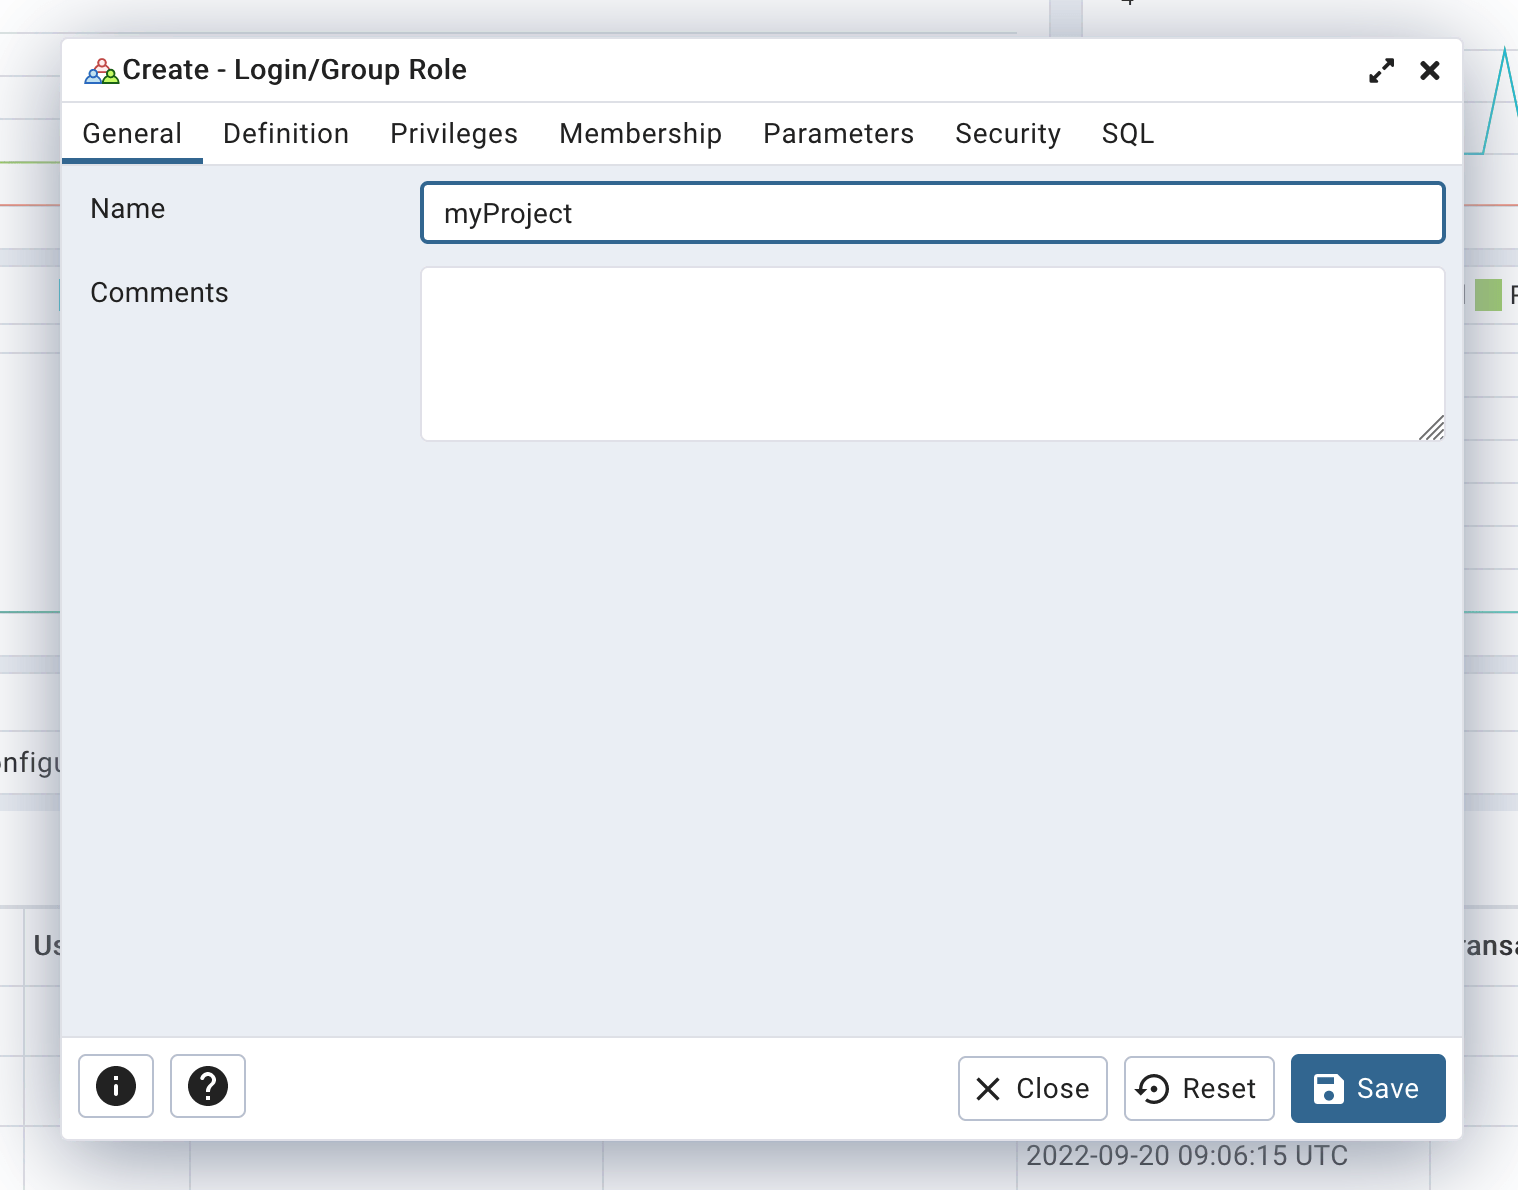
Then set the login name:
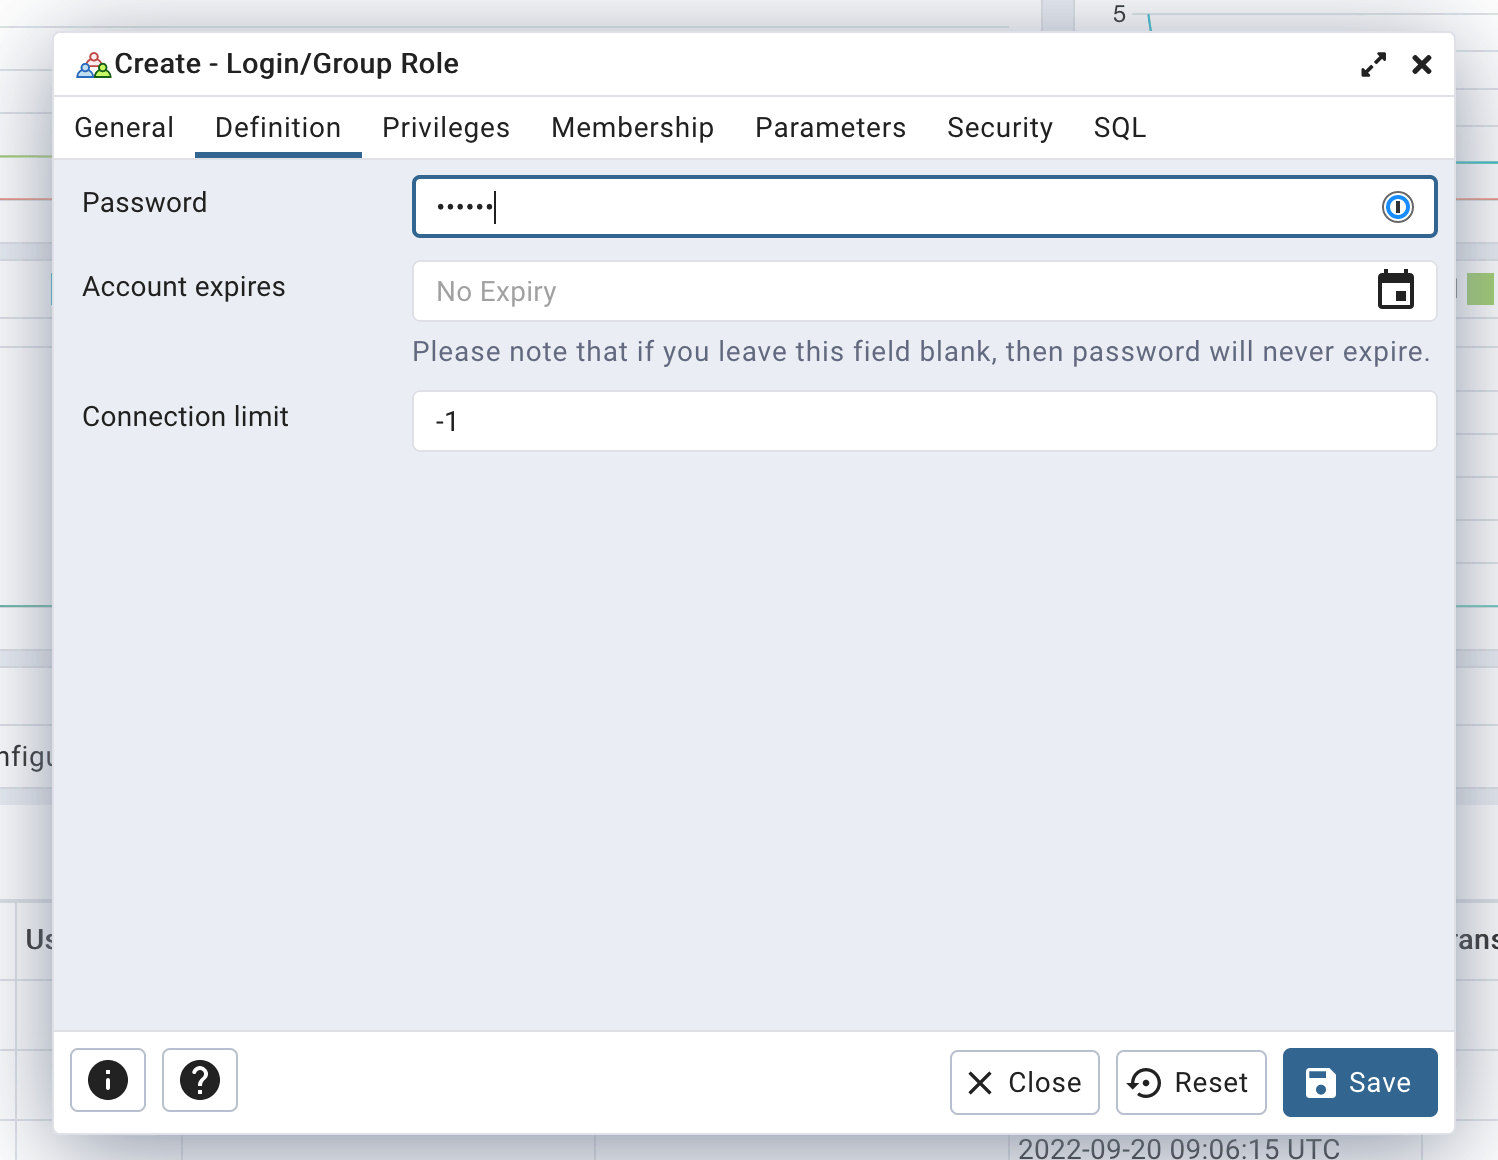
And the password (please create a secured one to avoid bruteforce attacks!):
And finally set the privileges to “Can login” only:
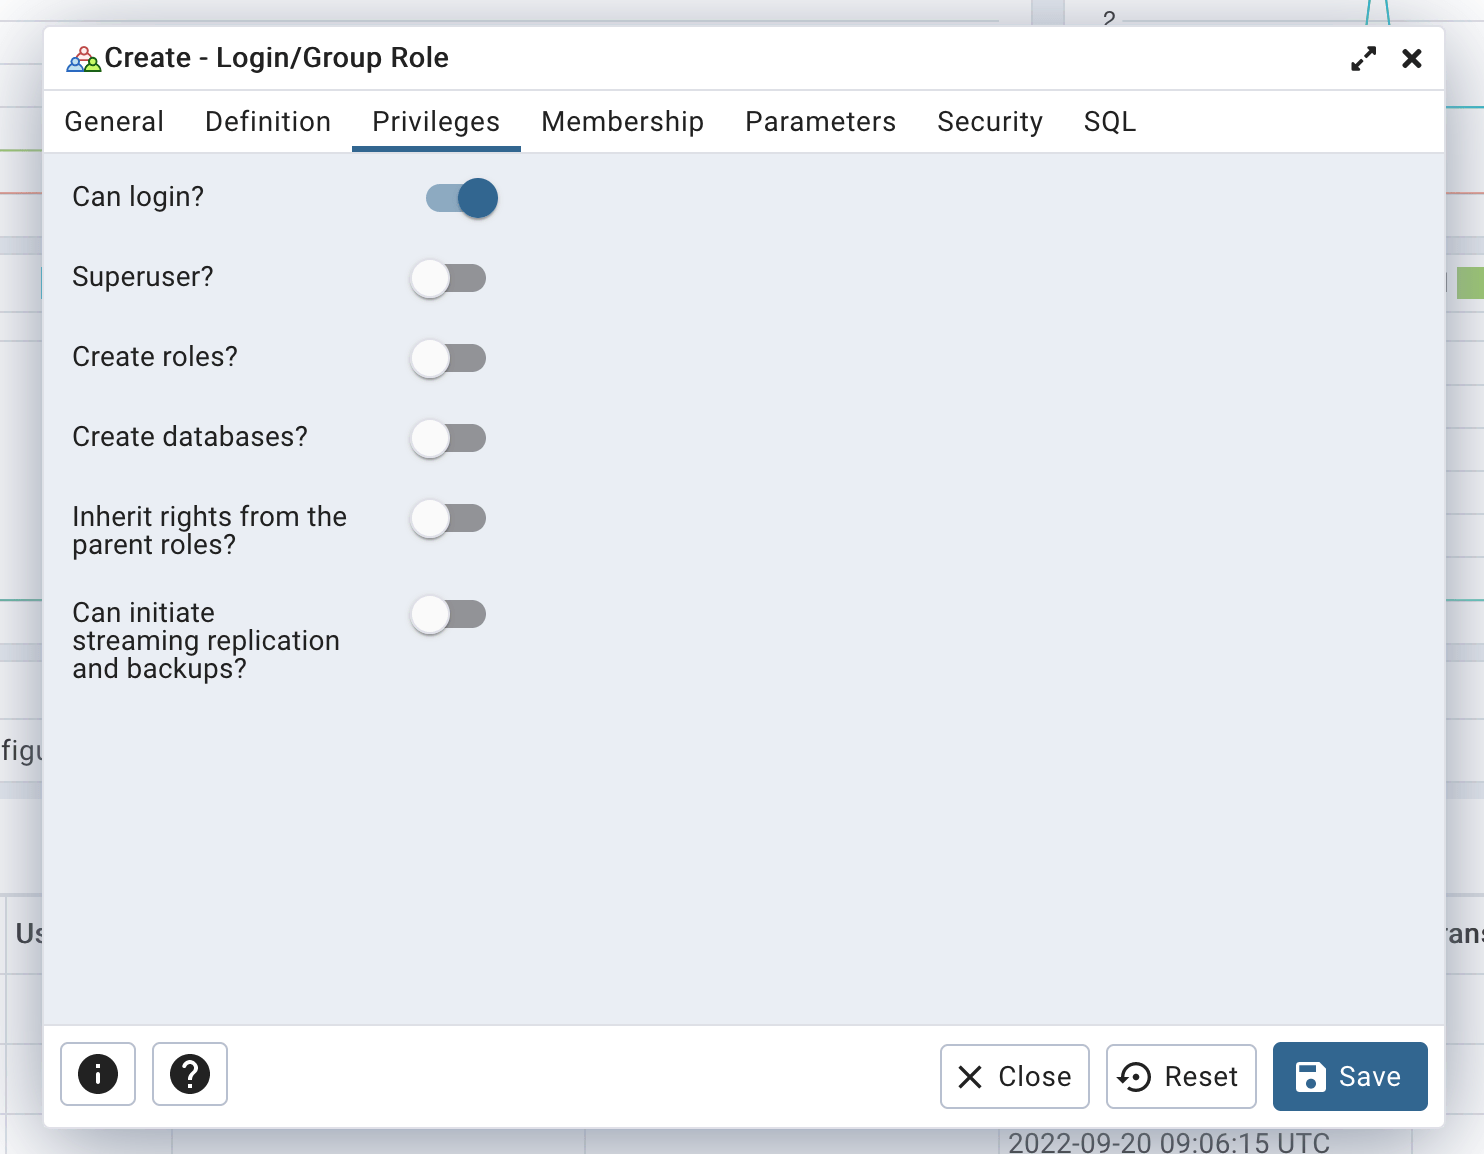
Click on the “Save” button and that’s it, your user is created :)
Create a database
Go to Servers/postgresql, click right on Databases and select Create/Database...:

A good practice is to define the same name for the database and the user. For example, if your project name is “superWebsite”, we recommend to create a user named “superWebsite” as a database named “superWebsite”.
Then set the database name and select the owner, which is the user you have just created before:
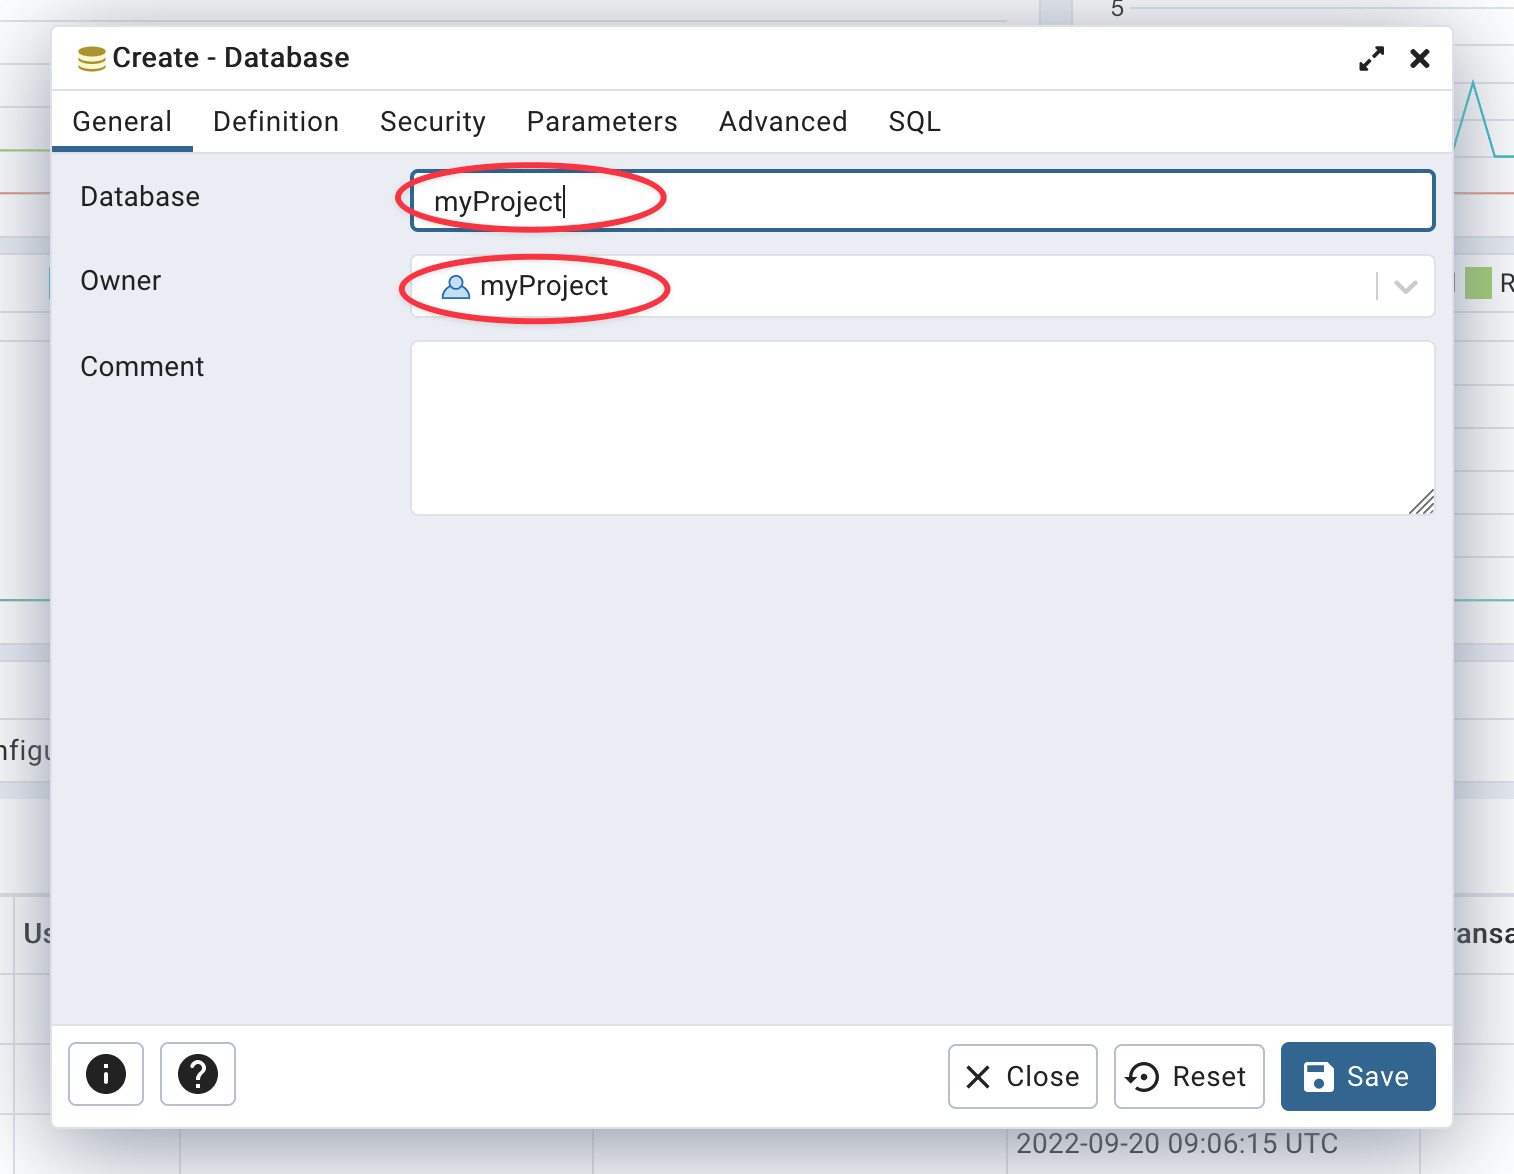
That’s it, your database is now created :)
Import pgsql data from your computer to PostgreSQL
The easiest way to import data from your computer to your PostgreSQL instance is to use the PostgreSQL CLI.
On your computer, simply run this command (replace <DB_NAME> per your database name and data.pgsql with your SQL file):
$ psql \
  --host=<STACKHERO_POSTGRESQL_HOST> \
  --port=<STACKHERO_POSTGRESQL_PORT> \
  --username=admin \
  --dbname=<DB_NAME> \
  < data.pgsql
Export data from PostgreSQL to your computer
As for importing data, the easiest way to export them from your PostgreSQL instance to your computer is to use the PostgreSQL CLI.
On your computer, simply run one of these commands:
- To export the whole database (replace
<DB_NAME>per your database name):
$ pg_dump \
  --host=<STACKHERO_POSTGRESQL_HOST> \
  --port=<STACKHERO_POSTGRESQL_PORT> \
  --username=admin \
  --dbname=<DB_NAME> \
  > data.pgsql
- To export only a table (replace
<DB_NAME>per your database name and<TABLE_NAME>per your table name):
$ pg_dump \
  --host=<STACKHERO_POSTGRESQL_HOST> \
  --port=<STACKHERO_POSTGRESQL_PORT> \
  --username=admin \
  --dbname=<DB_NAME> \
  --table=<TABLE_NAME> \
  > data.pgsql
You will find a complete example of code to use PostgreSQL with Node.js and the pg library with async/await on this git repository: https://github.com/stackhero-io/postgresqlGettingStarted.
Activate PostgreSQL PostGIS extension
PostGIS extension is included with our PostgreSQL service. You have to activate it on each database where you want to use it.
To activate it, connect to your database and simply execute this query:
CREATE EXTENSION postgis;
Check then that PostGIS is working by checking its version:
SELECT PostGIS_Full_Version();
Or get the list of every PostGIS extensions installed:
SELECT * FROM pg_extension WHERE extname LIKE 'postgis%';
You can add these other extensions if necessary, but we strongly recommend to NOT activate extensions you will not use:
-- Enable PostGIS
CREATE EXTENSION postgis;

-- Enable raster support
CREATE EXTENSION postgis_raster;

-- Enable Topology
CREATE EXTENSION postgis_topology;

-- Fuzzy matching needed for Tiger
CREATE EXTENSION fuzzystrmatch;

-- Rule based standardizer
CREATE EXTENSION address_standardizer;

-- Example rule data set
CREATE EXTENSION address_standardizer_data_us;

-- Enable US Tiger Geocoder
CREATE EXTENSION postgis_tiger_geocoder;
Caution: do not activate PostGIS on the database postgres!
Deactivate PostgreSQL PostGIS extension
To deactivate PostGIS, simply connect to the database where PostGIS is installed and run this query:
DROP EXTENSION postgis;
Activating PgVector extension
Activating the PgVector extension on Stackhero is simple. Run the following query:
CREATE EXTENSION vector;
Activating TimescaleDB extension
Activating the TimescaleDB extension on Stackhero is simple. Run the following query:
CREATE EXTENSION timescaledb;
Upgrading your plan
You cannot downgrade an existing add-on.
Application owners should carefully manage the migration timing to ensure proper application function during the migration process.
Use the heroku addons:upgrade command to migrate to a new plan.
$ heroku addons:upgrade ah-postgresql-stackhero:newplan
-----> Upgrading ah-postgresql-stackhero:newplan to sharp-mountain-4005... done
       Your plan has been updated to: ah-postgresql-stackhero:newplan
Removing the add-on
You can remove Stackhero for PostgreSQL via the CLI:
This will destroy all associated data and cannot be undone!
$ heroku addons:destroy ah-postgresql-stackhero
-----> Removing ah-postgresql-stackhero from sharp-mountain-4005... done
Support
Stackhero for PostgreSQL support and runtime issues should be submitted via one of the Heroku Support channels. We recommend adding support@stackhero.io in copy for urgent issues.
Additional resources
- PostgreSQL documentation by Stackhero
- PostgreSQL managed cloud