Last updated November 09, 2022
Softtrends Dedup is an add-on that lets you to merge multiple tables or datasets. It also lets you examine a table to identify, then resolve potential duplicate records.
Dedup lets you:
- Examine data sources from Postgres tables
- Selecting Remove Duplicates from Source table enables:
- Simulation: Syncs just one of the duplicates to a Simulation result table for validation
- Dedup: This simply removes all the duplicates without copying them to a destination table
- Selecting Merge Source Data to Destination and Remove duplicates from Destination enables:
- Simulation: Merges Source to a Destination table and Syncs just one of the duplicates from Destination table to Simulation result table for validation
- Dedup: Merges Source to a Destination table, and simply removes all the duplicates from the Destination table
The two different modes, Simulation and Dedup, lets you determine whether a new table is created for verification, or the action performed on the source tables.
You can use Dedup with all applicable languages and frameworks supported by Heroku.
If you are just getting started with Heroku or Heroku add-ons, please see the Heroku Getting Started Guides or the add-ons overview.
Provisioning the add-on
If you want to use DeDup with an existing app, you can provision it from your app’s Resources tab in the Heroku Dashboard, or via the CLI:
A list of all plans available can be found here.
$ heroku addons:create dedup:test
Creating dedup:test on ⬢ dedup-demo... free
Created dedup-polished-31206
Setup
Before you begin using DeDup, you need to perform the following setup tasks:
Have your Postgres instance information ready to provide configuration details to DeDup, as the add-on requires that your app has a Postgres database available to compare and identify the duplicate records.
Open the DeDup add-on and complete its configuration by selecting it from the Resources tab of your app in the Heroku Dashboard, or by running the following CLI command:
$ heroku addons:open dedup:test
Full instructions for configuring DeDup are described in Navigating the add-on dashboard.
Supported data services
Heroku Postgres
DeDup supports all Standard, Premium, and Private Heroku Postgres plan types (excluding Shield Postgres). DeDup can be used to merge multiple tables or datasets into one and identify, then resolve, potential duplicate records in Heroku Postgres database tables.
Although it is possible to use DeDup with a essential-tier Postgres database, it is strongly recommended that you use a standard-tier or premium-tier database. Essential-tier databases have limited row and connection counts that can be consumed quickly if you configure multiple tables in the add-on.
Upgrading the add-on plan
You can upgrade from the free test or dev-edition plan to the paid mc-edition or hub-edition or ent-edition using the Edit plan option in the Heroku Dashboard or using the CLI, assuming you are operating inside a Heroku organization with a paid plan entitlement:
$ heroku addons:upgrade dedup:ent-edition -a mynewdedupapp
Changing dedup-rigid-36410 on mynewdedupapp from dedup:test to dedup:ent-edition... done, free
Removing the add-on
You can remove the add-on from the Heroku dashboard or with the CLI.
Mapped tables will be dropped from your Postgres database when removing the add-on: you should ensure you have an up-to-date backup of your database before proceeding.
$ heroku addons:destroy dedup:test --app dedup-demo
▸    WARNING: Destructive Action
▸    This command will affect the app new-marketing-connector-app
▸    To proceed, type dedup-demo or re-run this command with --confirm dedup-demo
Navigating the add-on dashboard
The DeDup dashboard allows you to configure, monitor, and troubleshoot your data connector mappings. It is available to any member or collaborator on your application. See Collaborating with Other Developers on Your App for more information on how to manage the users who have access to your application.
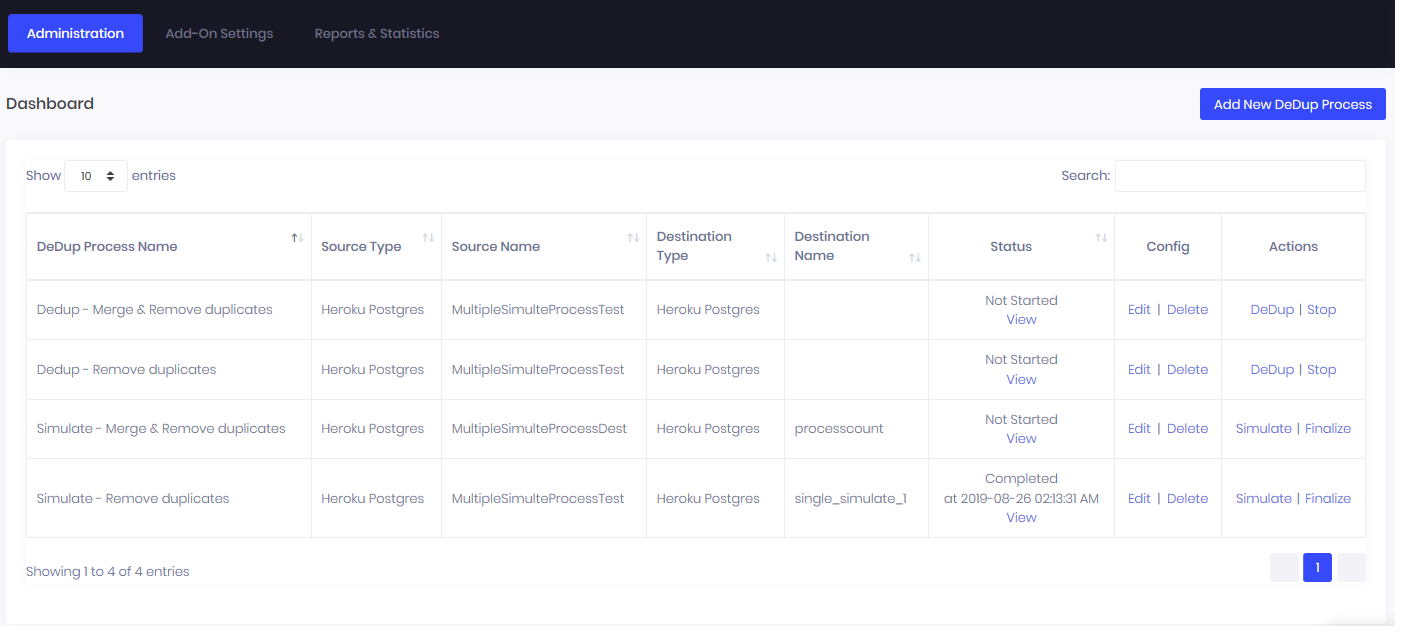
In the Dashboard, you have the option to do the following actions for each DeDup Process you have already Setup
DeDup: DeDup the underlying source for the DeDup Process
Simulate: Simulate a DeDup process to Verify if the DeDup is working as you expect
Delete: Delete a DeDup Process you no longer need
Stop: Stop a DeDup process you have started
View: View result for a DeDup or Simulation process that you have started
Bring up any of the menu options: i.e. Administration, Add-on Settings, Reports & Statistics
Add a new DeDup Process: Add a new DeDup Process
The Administration menu
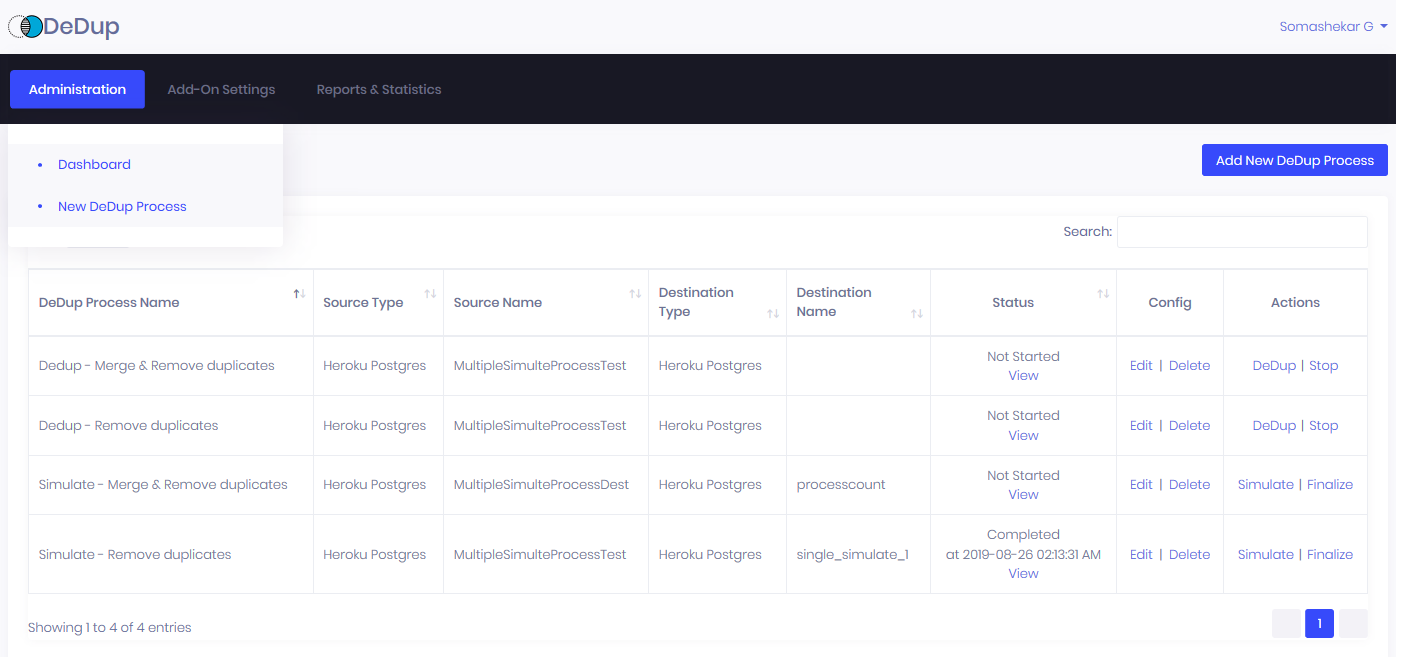
The Administration menu allows you to:
- Display the Dashboard from any Screen
- Create a new DeDup process
Creating a New Process
Select New DeDup Process from the menu or select the Add New DeDup Process button to create a new DeDup process.
The steps to create a new process are described in Step 1: Creating a Process
Start a DeDup process or Simulation Process
The Add-on Settings menu
The Add-on Settings menu allows you to:
- View and Set your Default Postgres database configuration
- View the Heroku host application’s settings
Default Postgres Database Settings
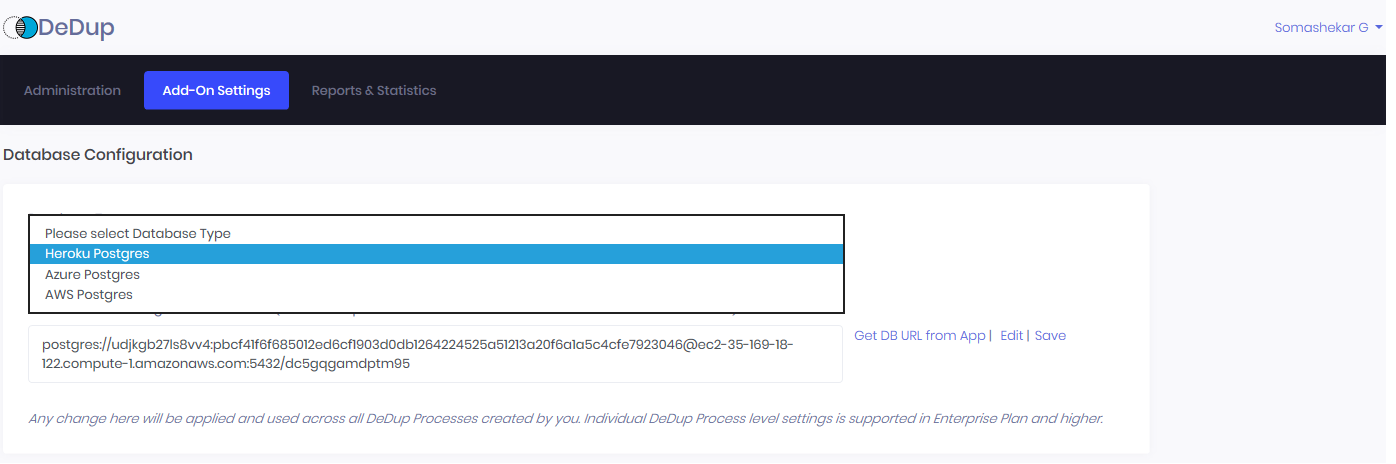
You can set up the Default Database configuration as Heroku Postgres',AWS Postgres, orAzure Postgres`along with its connection string.
These default settings are used across all DeDup Processes you create in all Plans except the Enterprise and Private Space plans. In Enterprise and Private Space plans, database connection strings can be set separately for each DeDup Process.
Heroku App Config
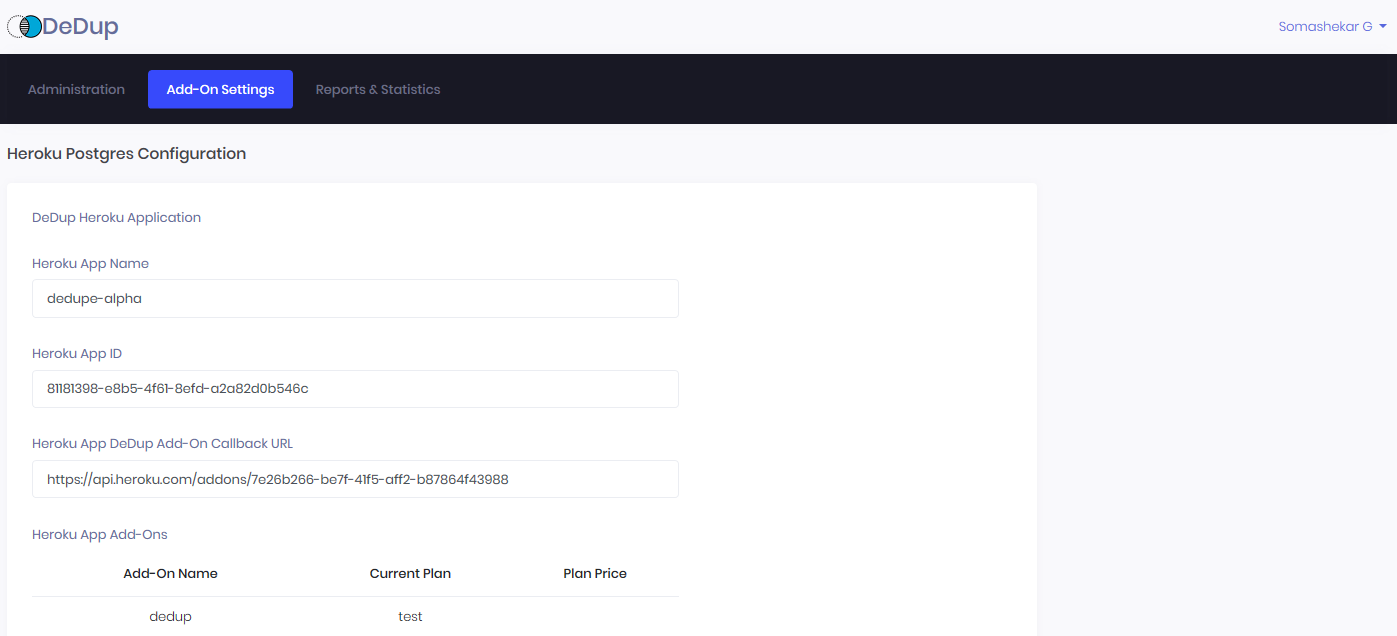
This is provided for informational purposes.
Configuring the add-on
Step 1
From the Resources tab of your new Heroku application, click on the DeDup add-on to open its administrative dashboard:
Step 2
Click on the Add-On Settings tab, then Default Database Settings to begin configuring the add-on for your destination Postgres instance. If you are using Heroku Postgres and you have provisioned it inside of your DeDup add-on’s new Heroku app, it will auto-detect your Heroku Postgres instance and you can then click Save.
If you would like to specify a remote Postgres database on another Heroku app or one that is on AWS or Azure, you can simply specify the connection string manually in the following notation:
postgres://username:password@ec2-instance.amazonaws.com:5432/databasename`
Step 1: Creating a Process
Click on the New DeDup Process menu item and complete the configuration screen. The Configuration screen has different sections and the options can change based on what you previously selected in the first one.
Section 1: Process Type, Name & Execution Mode
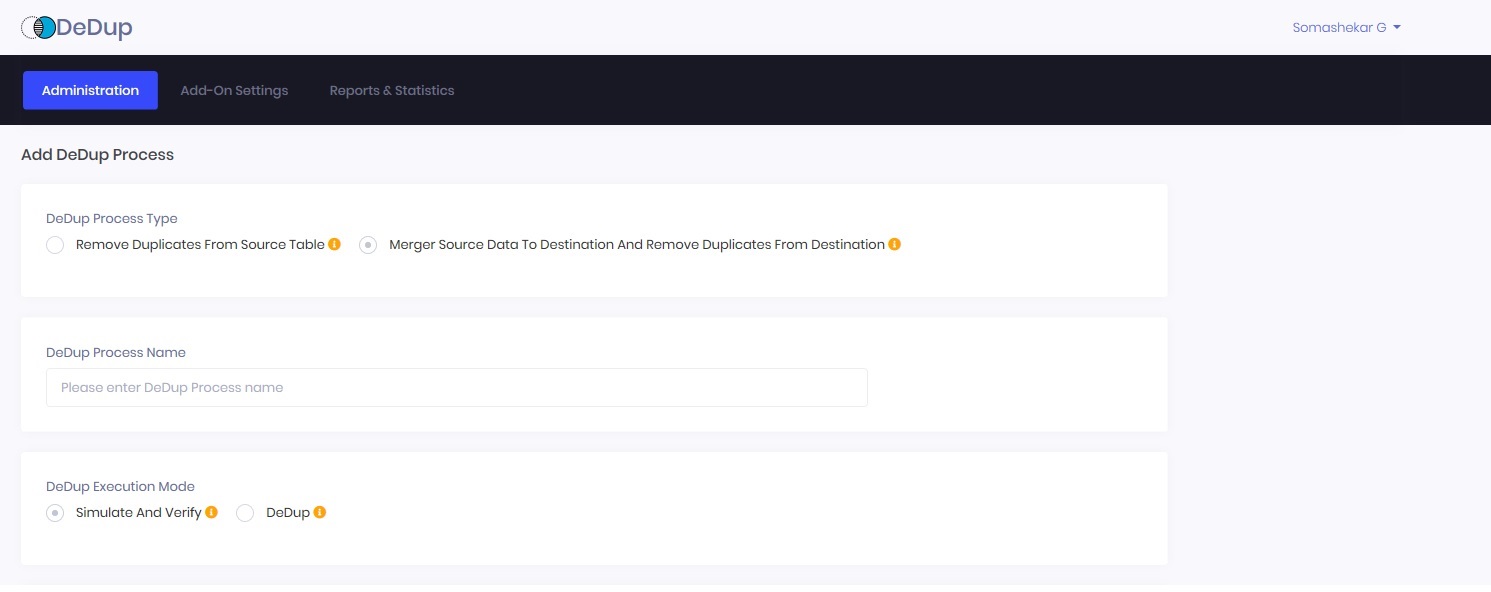
DeDup Process Name: You may give it any name (e.g., Single-Simulate)
DeDup Process Type: Select Remove Duplicates From Source Table or Merge Source Data To Destination And Remove Duplicates From Destination
Remove Duplicates From Source Table
The DeDup process will remove all duplicates from the Source table (based on the DeDup fields you have selected), and the Source table will be left with unique data rows.
When you use this option, the duplicate table rows will be permanently deleted from the Source table. If you do not want those deleted, you should consider the ‘Merge Source data to a Destination and DeDup Destination table’ option. If your goal is to ‘DeDup a Source table’ with checks, then you are strongly advised to use the ‘Simulate’ option to verify that the DeDup process executed fits your requirement before finalizing the process as a DeDup process.
Merge Source Data To Destination And Remove Duplicates From Destination
The DeDup process will first copy the new data rows coming from the Source table into the Destination table and then remove duplicates from the Destination table. The Destination table then will be left with unique data rows; Source table data rows will be left unaltered.
Duplicate table rows from Destination table will be permanently deleted so you are strongly advised to use the ‘Simulate’ option to verify that the DeDup process executed fits your requirements and the data is as intended, before finalizing the process as a DeDup process.
DeDup Execution Mode: Select Simulate & Verify or DeDup
Simulate & Verify
When this option is selected, a new section called Specify the Destination for Simulation Result appears in the UI. You will need to specify the information requested in this new section. When you select & perform a DeDup with Simulate & Verify option, DeDup results are copied to the Simulation table you specify instead and your DeDup source source data remains unchanged. This gives you the option to check the temporary table and verify that the ‘DeDup’ process works the way you expect it to, before you perform the actual DeDup operation.
DeDup
This option will perform the actual DeDup operation and remove duplicate records from the corresponding tables based on the DeDup Process Type.
Section 2: Specify the Destination for Simulation Result
This section is displayed if the DeDup Process type is selected with ‘Simulate & Verify’
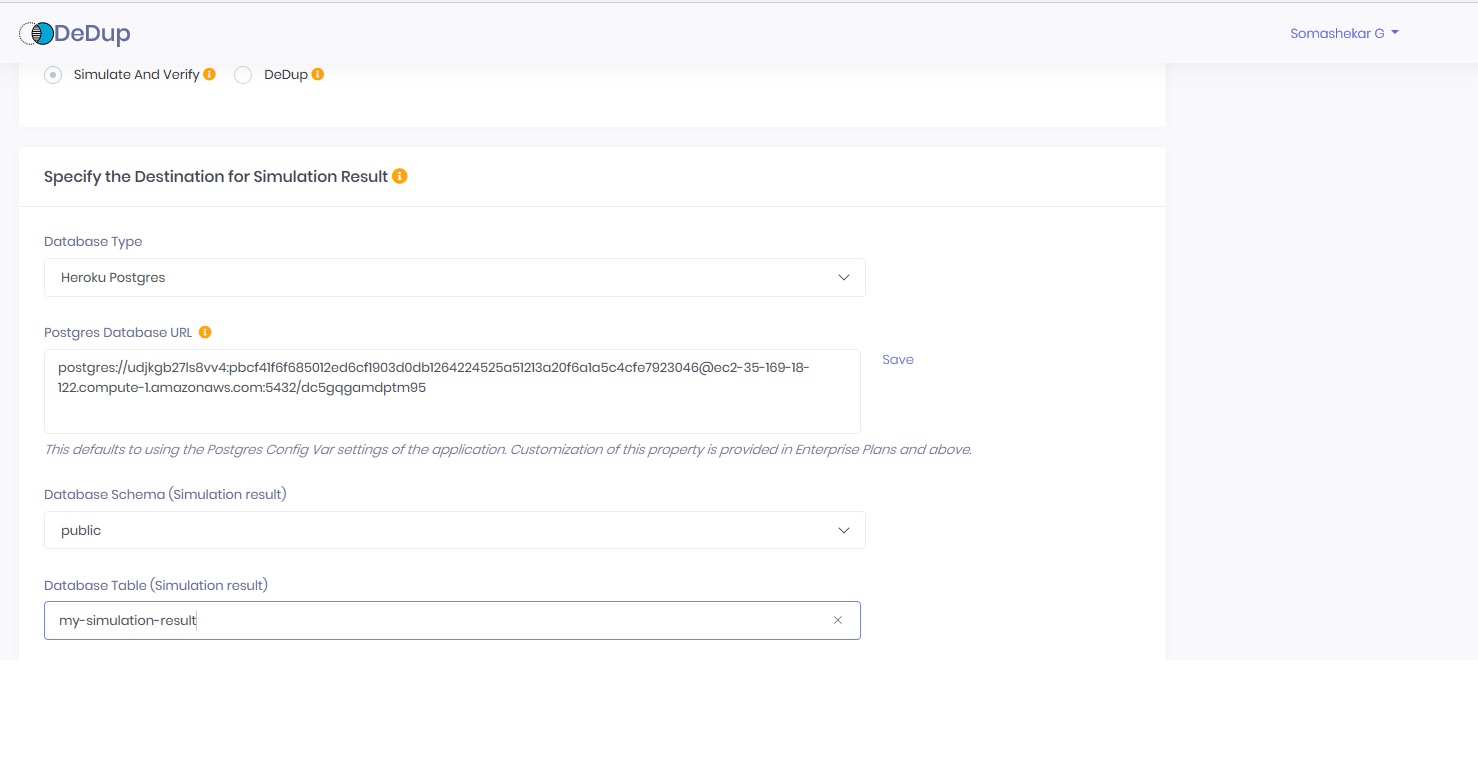
Database Type: Select Heroku Postgres, Azure Postgres, Aws Postgres or Azure SQL
Database URL: Enter the connection string to connect to your Database
Database Schema (Simulation Result): Select the Schema where your Data table exists
Database table (Simulation Result): Enter a table name where you want the Simulation result stored
Section 3: Specify the DeDup Source
The parameters required for this section depends on the DeDup Process type you have selected.
Figure 1 - Remove Duplicates From Source Table
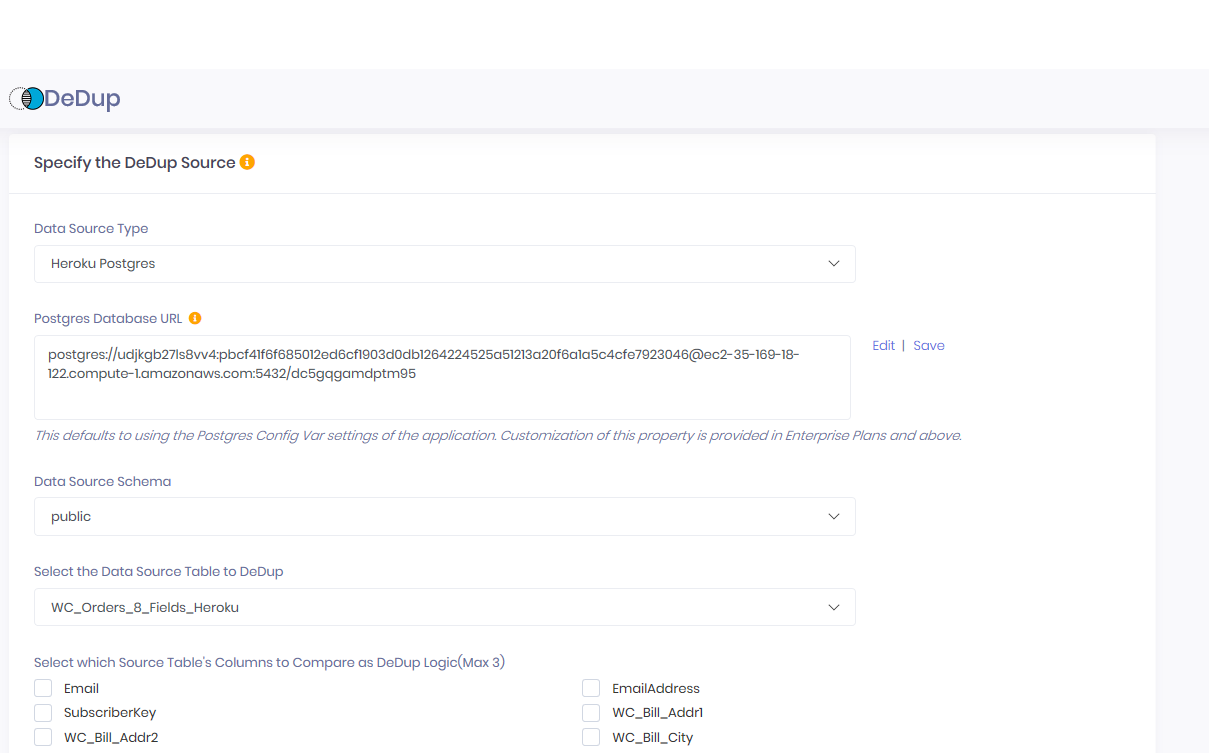
Figure 2 - Merge Source Data To Destination And Remove Duplicates From Destination

Specify the DeDup Source
Data Source Type: Select Heroku Postgres, Azure Postgres, Aws Postgres or Azure SQL
Database URL: Enter the connection string to connect to your Database
Data Source Schema: Select the Schema where your Data table exists
Select the Data Source Table to DeDup: Select the table you want to use as DeDup source
Select which Source Table's Columns to Compare as DeDup Logic(Max nn): Select the table columns you want to compare to find duplicates. ‘nn’ displayed is Plan based e.g. if you Plan allows comparing 4 fields, it will be 4
DeDup uses the Columns you select to compare and flags duplicate records irrespective of the value in the other Columns. e.g. If 2 records have same value in the ‘Columns selected by you’ but have completely different values in the other Columns, one of them will be flagged as Duplicate and Deleted.
Specify Destination to Merge Source data & Remove duplicates
Destination Database Type: Select Heroku Postgres, Azure Postgres, Aws Postgres or Azure SQL
Database URL: Enter the connection string to connect to your Database
Destination Database Schema: Select the Schema where your Data table exists
Destination Table: Select either Create New Table or Select Existing table.
Specify Destination table name: If you selected Create New table above then enter the table name for DeDup to create to merge data to and DeDup. This table will be created only during the fist DeDup operation and all subsequent DeDup operation will use this table.
Select Existing Table: : Select a table from the Drop down list if you want the Dedup results to be stored in a table that already exists.
Section 4: Incremental DeDup
After a Source table is DeDuped for the first time, you have the option of instructing DeDup to consider only the records newly inserted and updated instead of including all records in the Source every time. This will reduce the time to DeDup. In order to do that, you will need to specify which ‘timestamp’ to check to determine which records are Inserted and Updated since last DeDup.
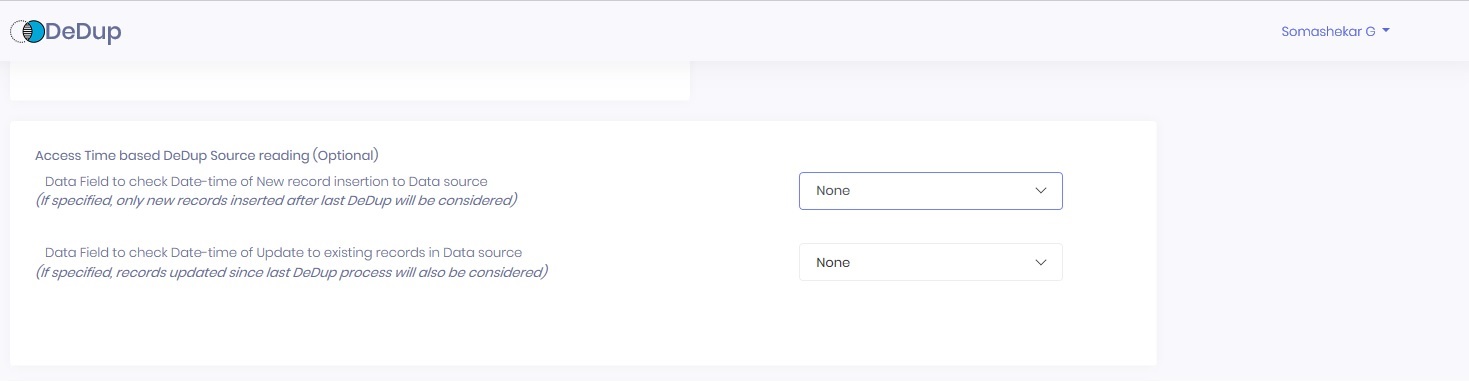
Using Incremental sync setting will be useful only when you are using the option Merge Source Data To Destination And Remove Duplicates From Destination so that DeDup only reads new and updated records from Data source. When using Remove Duplicates From Source Table all records need to be considered as newly Inserted and Updated records may cause duplicates in already DeDuped records.
Section 5: DeDup Schedule
In addition to the option of on-demand DeDup by clicking on the link in dashboard, you can also schedule a DeDup process to automatically happen in background based on the schedule you specify.

Options: Manual or On fixed time for background DeDup
Custom: You can also specify a time period (in minutes) when you want DeDup to happen in background
After clicking Save Process you will return to the Dashboard where your new DeDup Process is displayed.
Step 2: Initiate the Process
Click DeDup or Simulate to initiate the process for the DeDup process you have created
Step 3: Finalizing a Process (After Simulation)
If you had selected DeDup Execution Mode as `Simulate & Verify’ for any process, you have 3 options in the Dashboard to act on the Process.
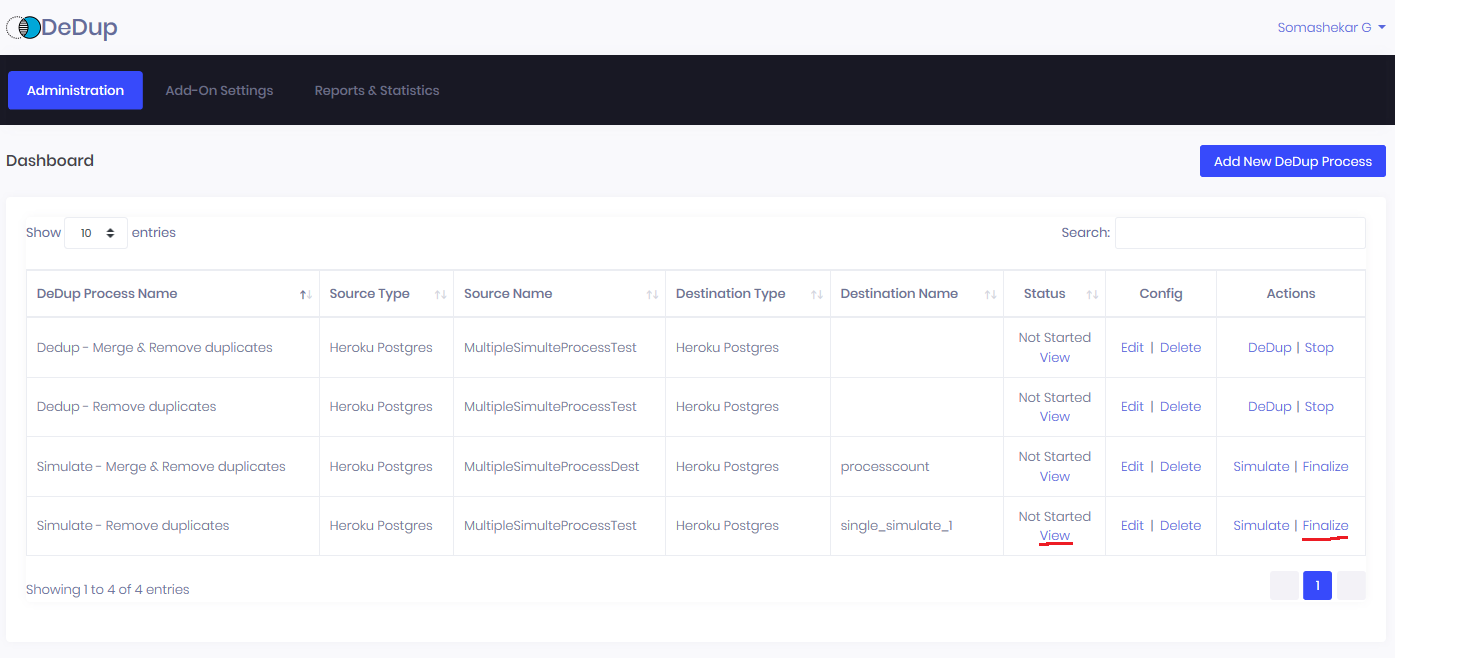
Simulate: This will go through DeDup in Simulation mode and create the Simulation destination table
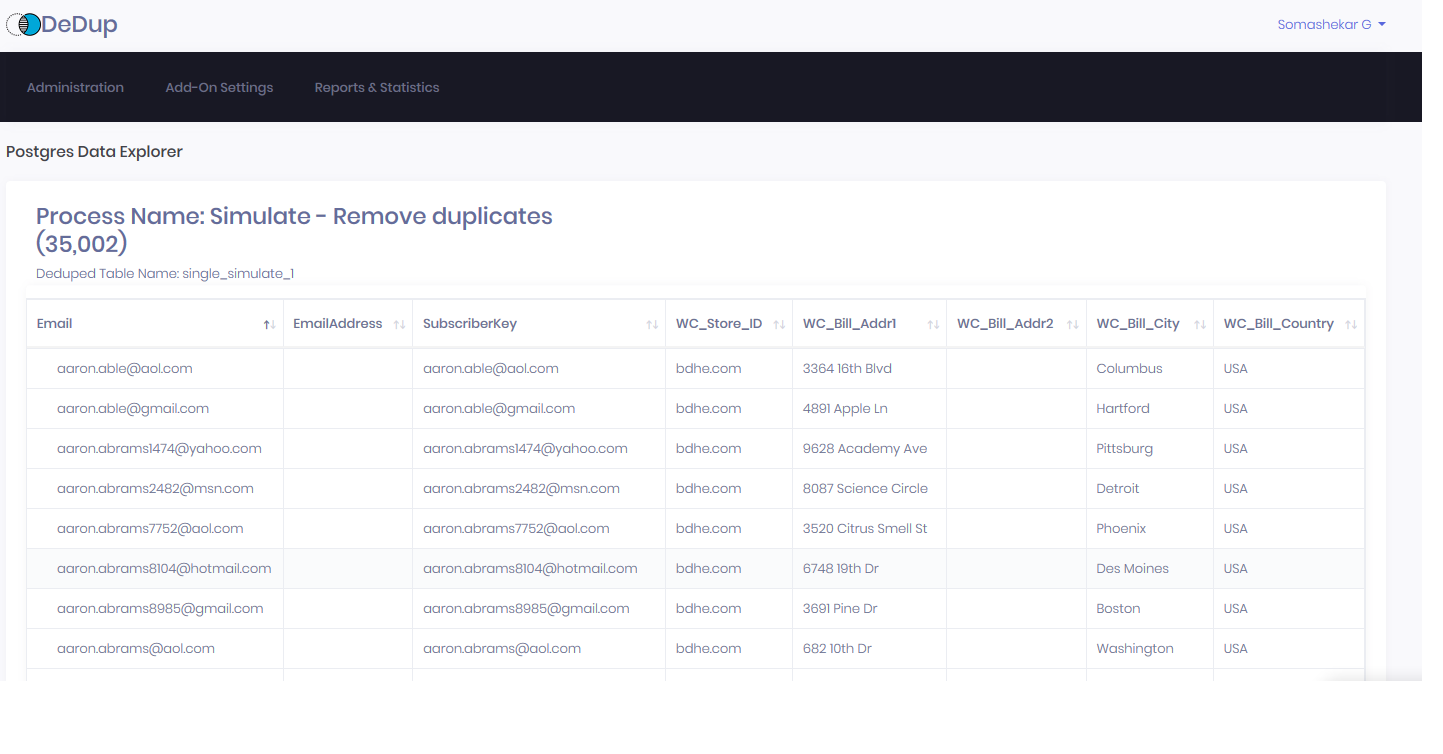
View: This will display the Data rows from the Simulation destination table for you to verify whether the DeDup process worked as you expected
Finalize: Once you determine that the DeDup process work properly in Simulation, you will need to Finalize the DeDup process so that you can actually DeDup the table
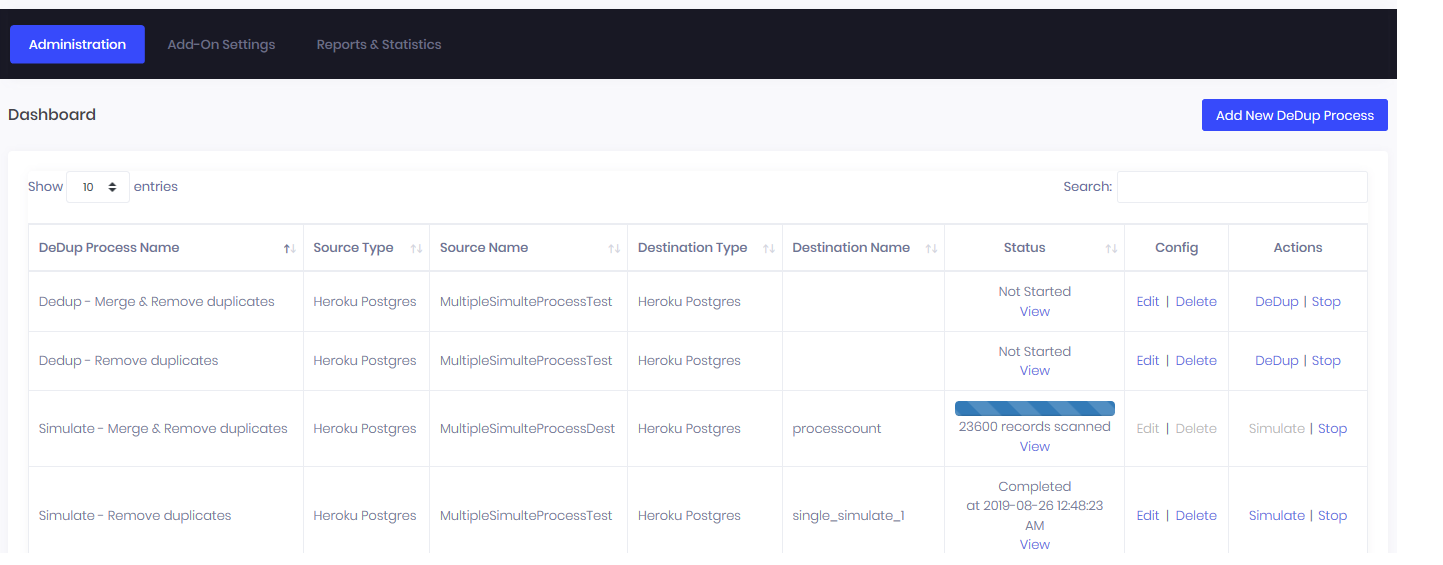
Verifying DeDup Result
Once you ‘Simulate’ or ‘DeDup’ a process, you have the option to Browse the records in the table buy selecting View link in the corresponding process.
Support
All Softtrends Marketing Connector support and runtime issues should be submitted via one of the Heroku Support channels. Any non-support related issues or product feedback is welcome at heroku@softtrends.com.