Last updated April 14, 2023
This add-on is operated by Mjolnir Software LLC
Start saving now with smart Auto Scaling for your Web and Worker Heroku Dynos.
Dynoscale is an add-on for scaling your web and worker dynos for Rails and Python applications. Dynoscale relies on queue time to scale, not total response time, for more reliable autoscaling.
Autoscaling your application means that your app handles all the traffic in your peak times, but it will also quickly release resources back to Heroku when they aren’t needed, avoiding slowdowns and unnecessary costs.
Dynoscale supports the Ruby and Python languages on Heroku.
Provisioning the Add-on
Attach Dynoscale to a Heroku application via the CLI:
Reference the Dynoscale Elements Page for a list of available plans and regions.
$ heroku addons:create dscale
Creating dscale on sharp-mountain-4005... free
Your add-on has been provisioned successfully
After provisioning Dynoscale, the DYNOSCALE_URL config var is available in the attached app’s configuration. It contains the URL and an account token associated with the application. You can see the config var via the heroku config:get command:
$ heroku config:get DYNOSCALE_URL
https://dynoscale.net/api/v1/report/abcdefg1234
Language-Specific Integrations
Ruby on Rails
You can access Dynoscale via its client libraries for Ruby. Add the following to the Gemfile, specifying the Dynoscale client library.
gem 'dynoscale_ruby'
Update the application dependencies with bundler.
$ bundle install
Once the gem is installed and deployed in a production environment, it sends request queue time data to Dynoscale servers.
Python - WSGI or Gunicorn Hook
You can access Dynoscale via its client libraries for Python. Add dynoscale to your requirements.txt file, then choose how you want to integrate it.
DynoscaleWsgiApp
The following example shows how to wrap your WSGI app:
from flask import Flask
# FIRST, IMPORT DYNOSCALE
from dynoscale.wsgi import DynoscaleWsgiApp

app = Flask(_name__)

@app.route("/")
def index():
    return "Hello from Flask!"

if __name__ == "__main__":
    # THE CHANGE BELOW IS ALL YOU NEED TO DO
    app.wsgi_app = DynoscaleWsgiApp(app.wsgi_app)
    # YUP, WE KNOW, CAN'T GET SIMPLER THAN THAT :)
    app.run(host='127.0.0.1', port=3000, debug=True)
Gunicorn Hook
Import the hook in your gunicorn.conf.py file:
from dynoscale.hooks.gunicorn import pre_request
If you already use the pre_request hook, in which case alias the Dynoscale hook and call it manually:
# Alias the import...
from dynoscale.hooks.gunicorn import pre_request as ds_pre_request

# ...and remember to call ours first!
def pre_request(worker, req):
   ds_pre_request(worker, req)
Configuration
Autoscale Rule
Autoscale rules control over how your application scales under load.
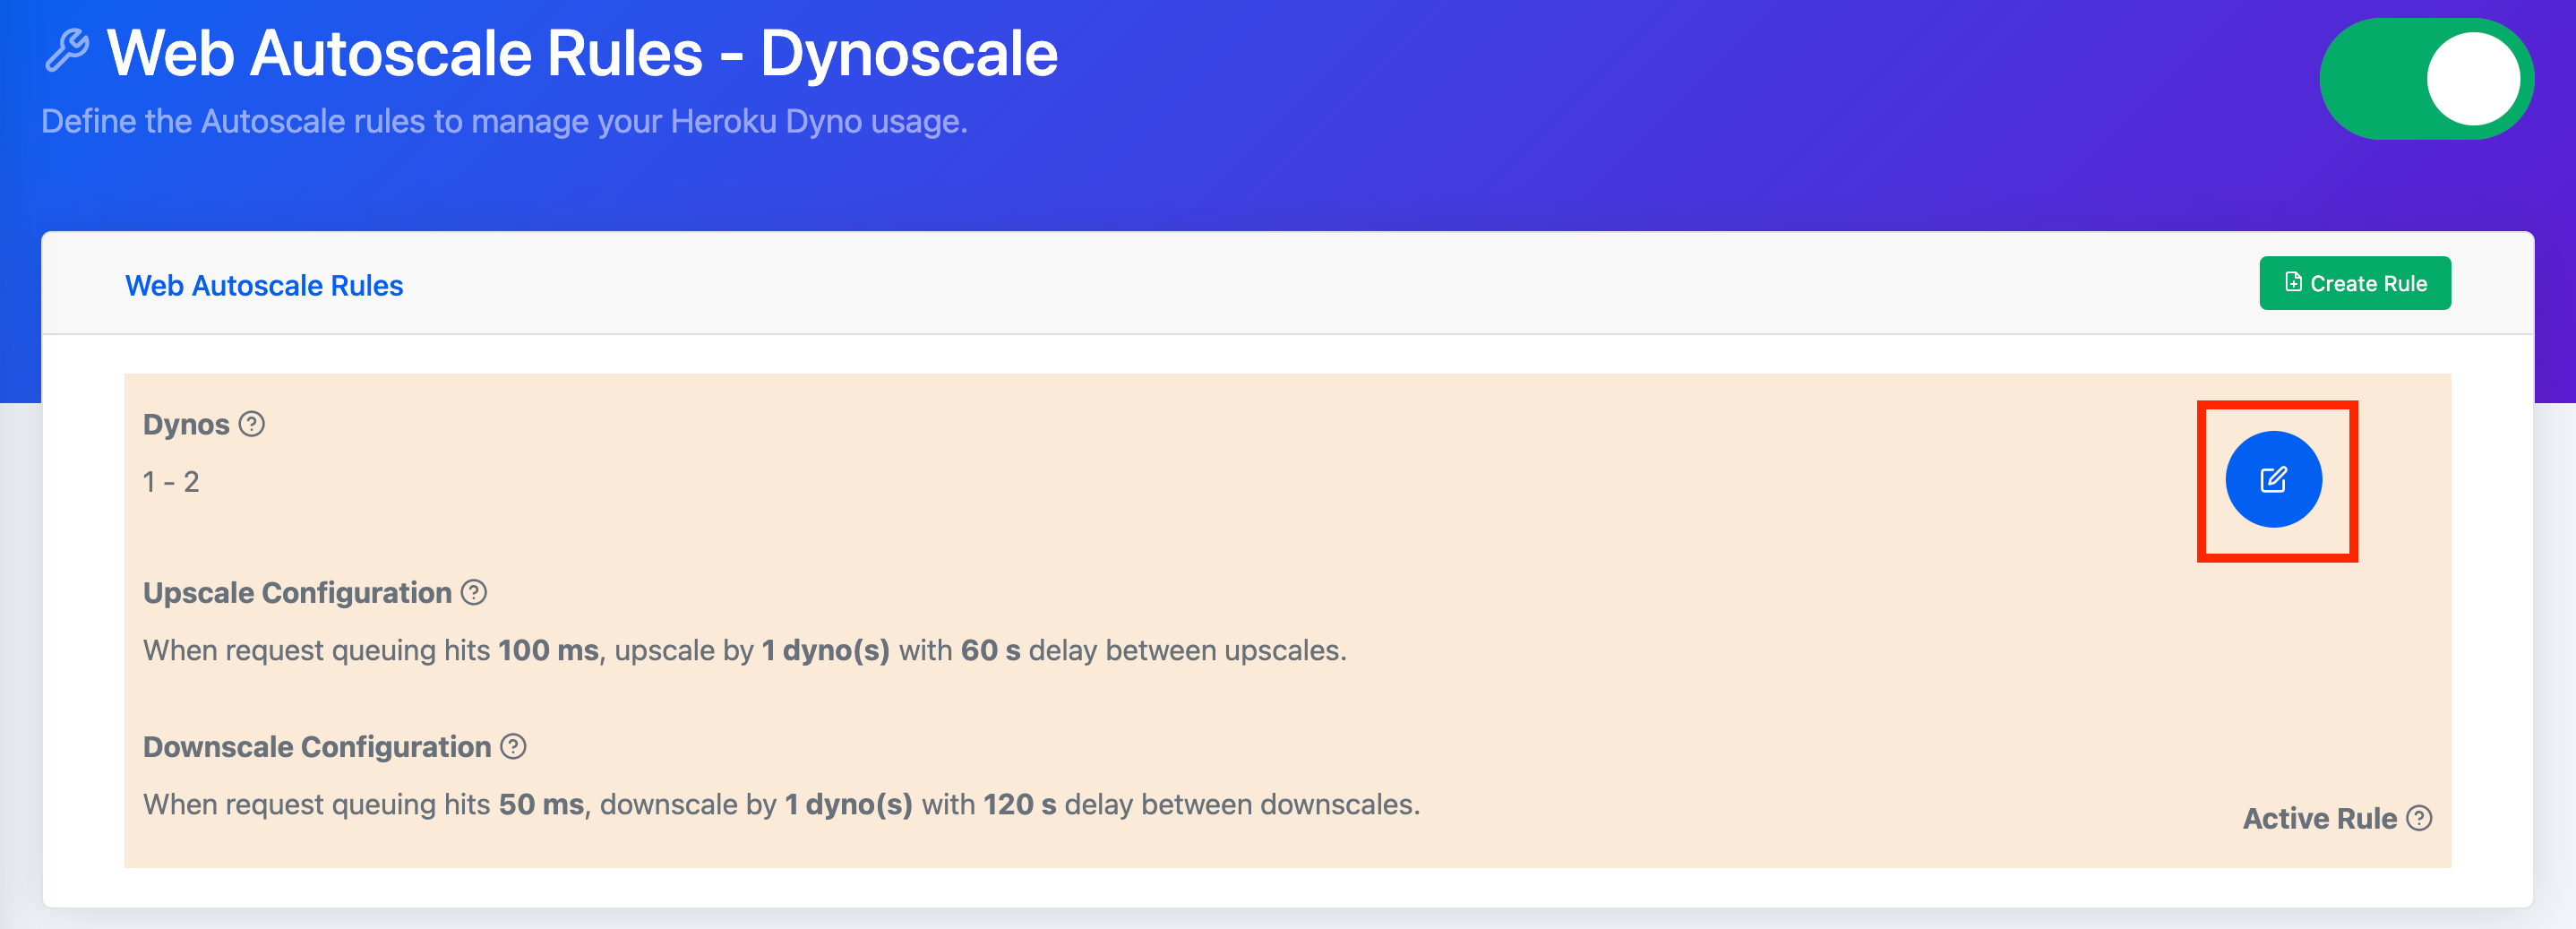 Navigate to the Web Auto Scale Rules page of the Dynoscale Admin and look at the auto scale rule. Select the blue edit rule button.
 You can find the upper and lower bound for dynos on the upper left side of the rule. These bounds set the maximum and minimum number of dynos this rule will permit. For a low traffic application with some periods of high traffic, begin by setting the lower bound to 1 and the upper bound to 2. You can tune the values over time.
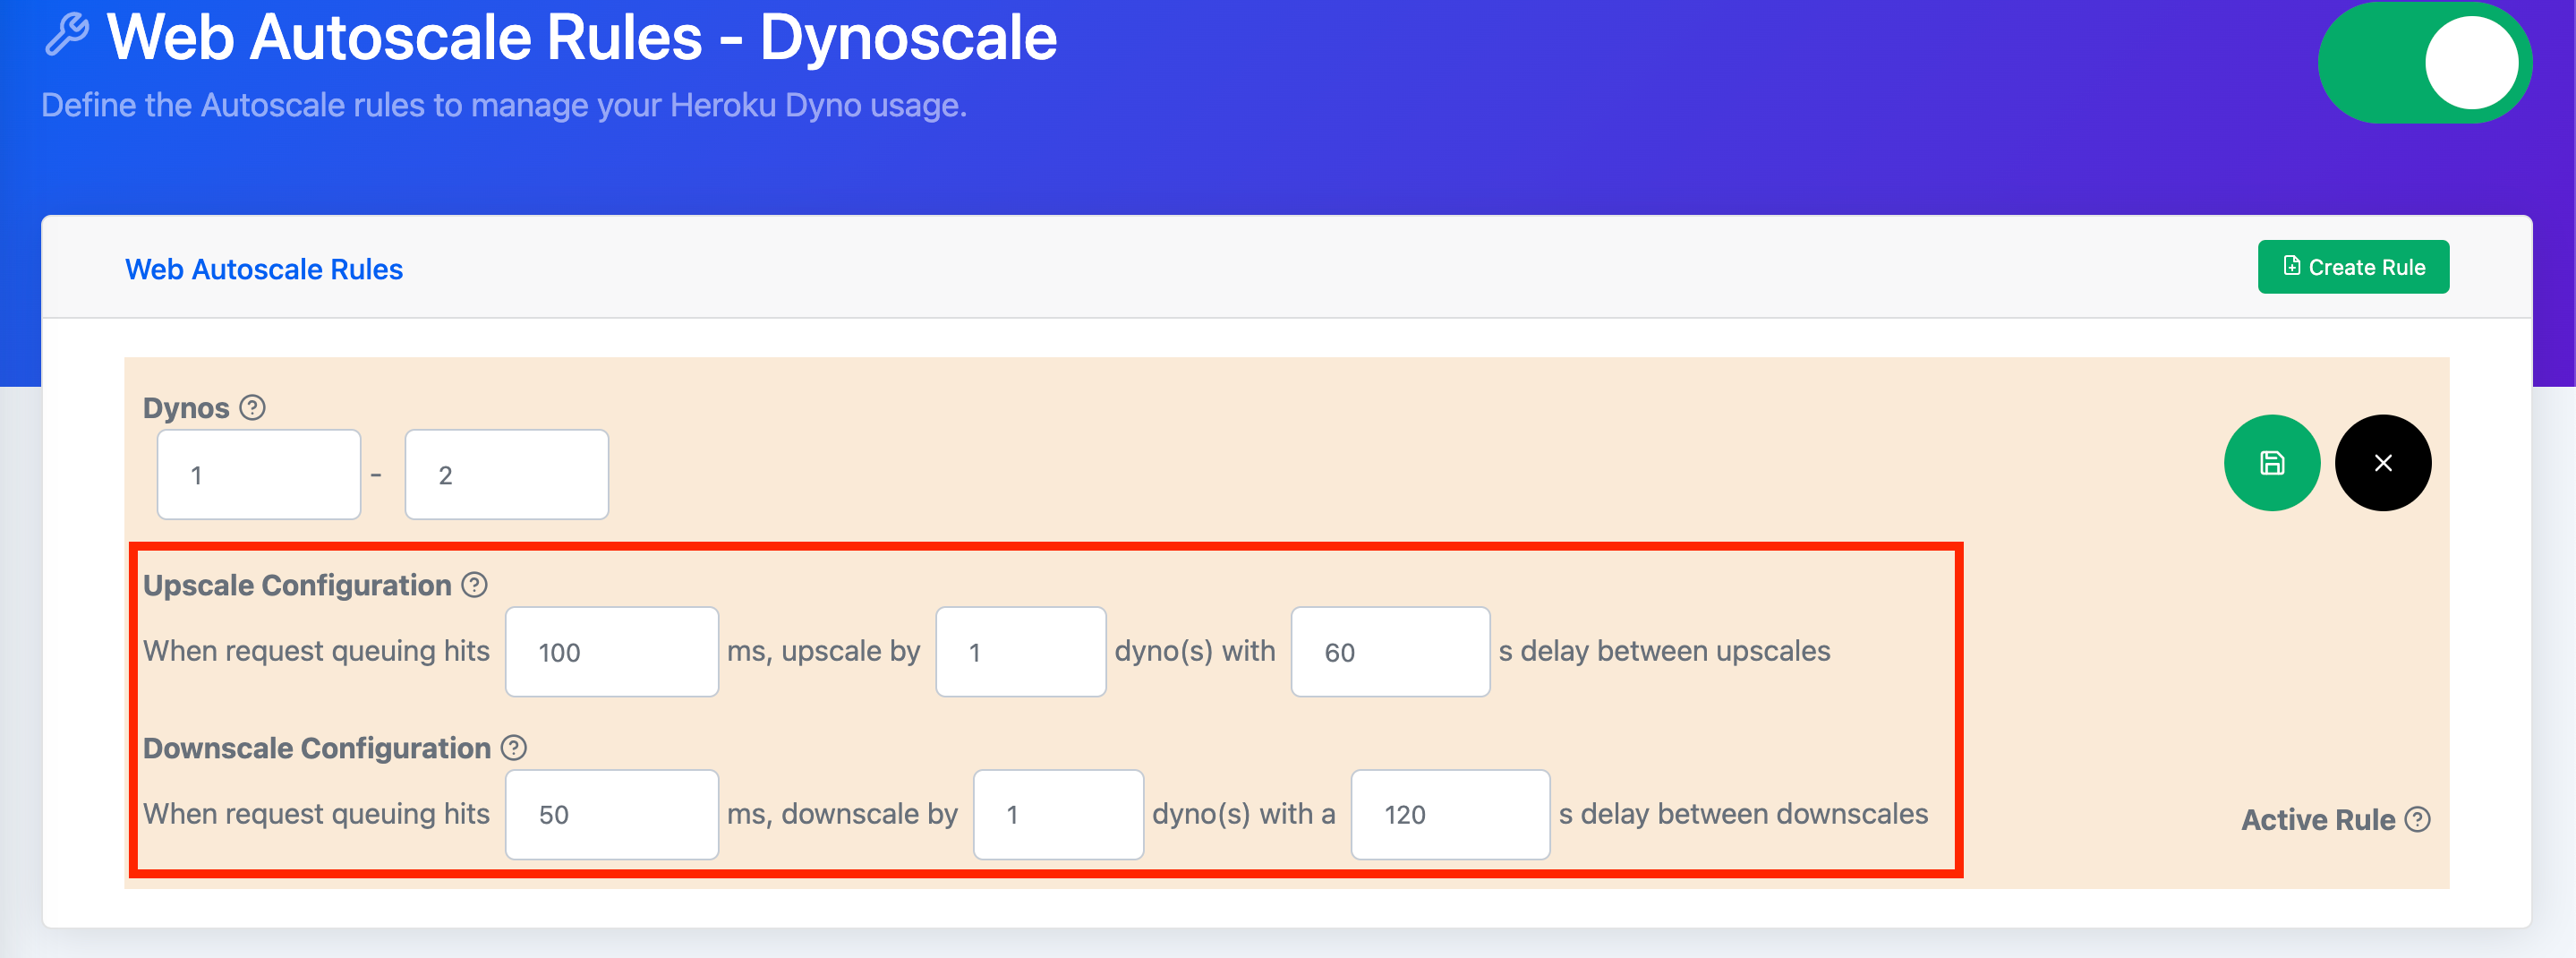
The Upscale Configuration specifies when to upscale your application. The first field is the request queue threshold. It determines when more dynos are needed to meet the traffic needs of your application. Once the threshold is exceeded, Dynoscale will scale up your application by the increment specified in the next field. Finally, the last field allows you to control how long you want Dynoscale to wait before considering another scaling.
The Downscale Configuration specifies when to downscale your application. The first field is the request queue threshold. It determines when to reduce the dynos needed to meet the traffic needs of your application. Once the request queue drops below the threshold, Dynoscale will scale down your application by an increment set in the next field. Finally, to avoid frequent scaling, the last field delays incremental scale downs with a buffer time.
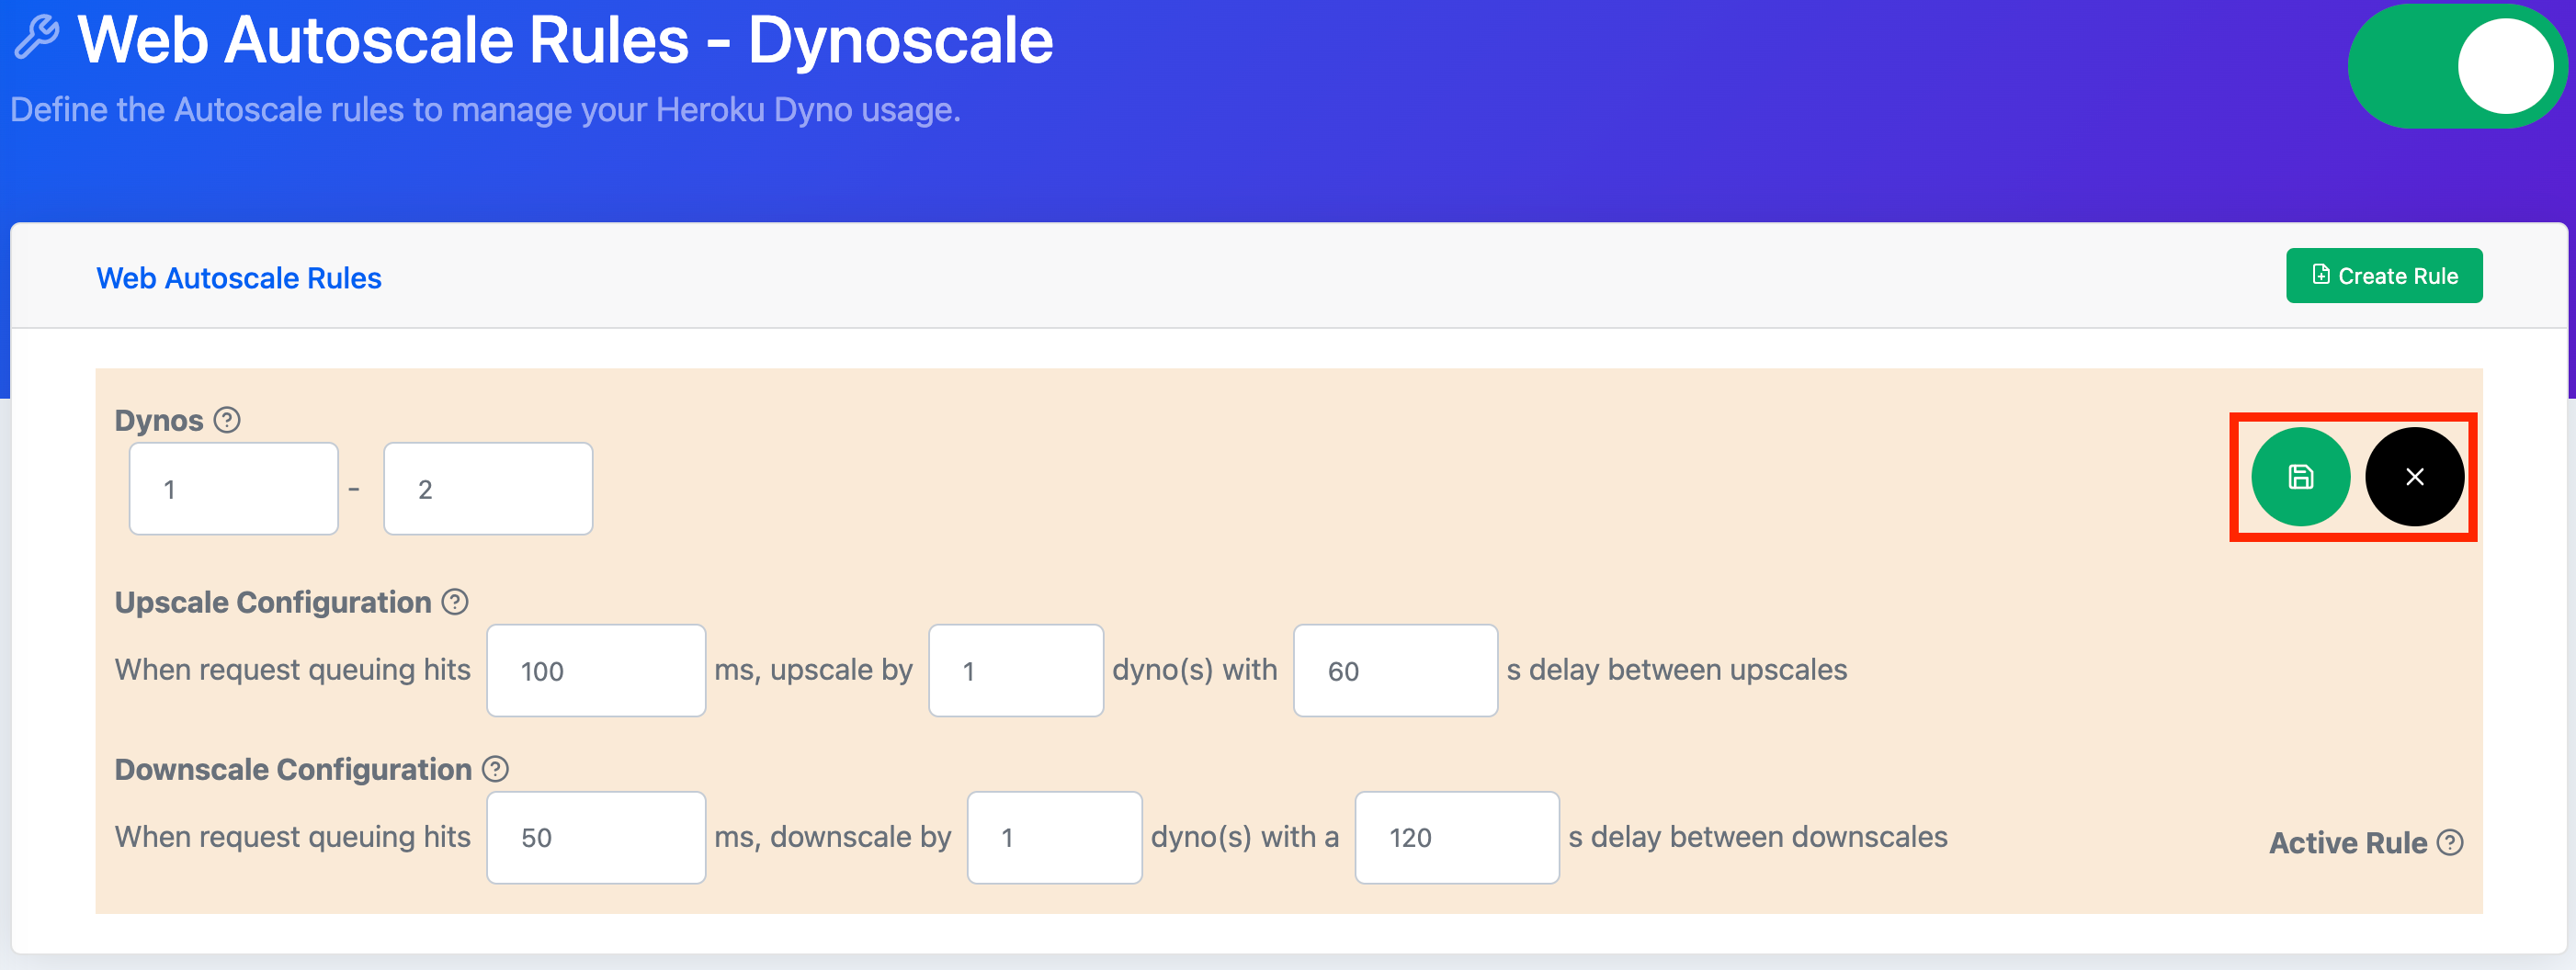 Select the green save button in the upper right side of the rule. Alternatively, if you don’t want to save changes, select the black cancel button.
Default Autoscale Rules and Other Rules
An application must have a default rule. It dictates how the application should scale when other rules aren’t active. To create another rule, click the “Create Rule” button at the top of the Autoscale Rule page.
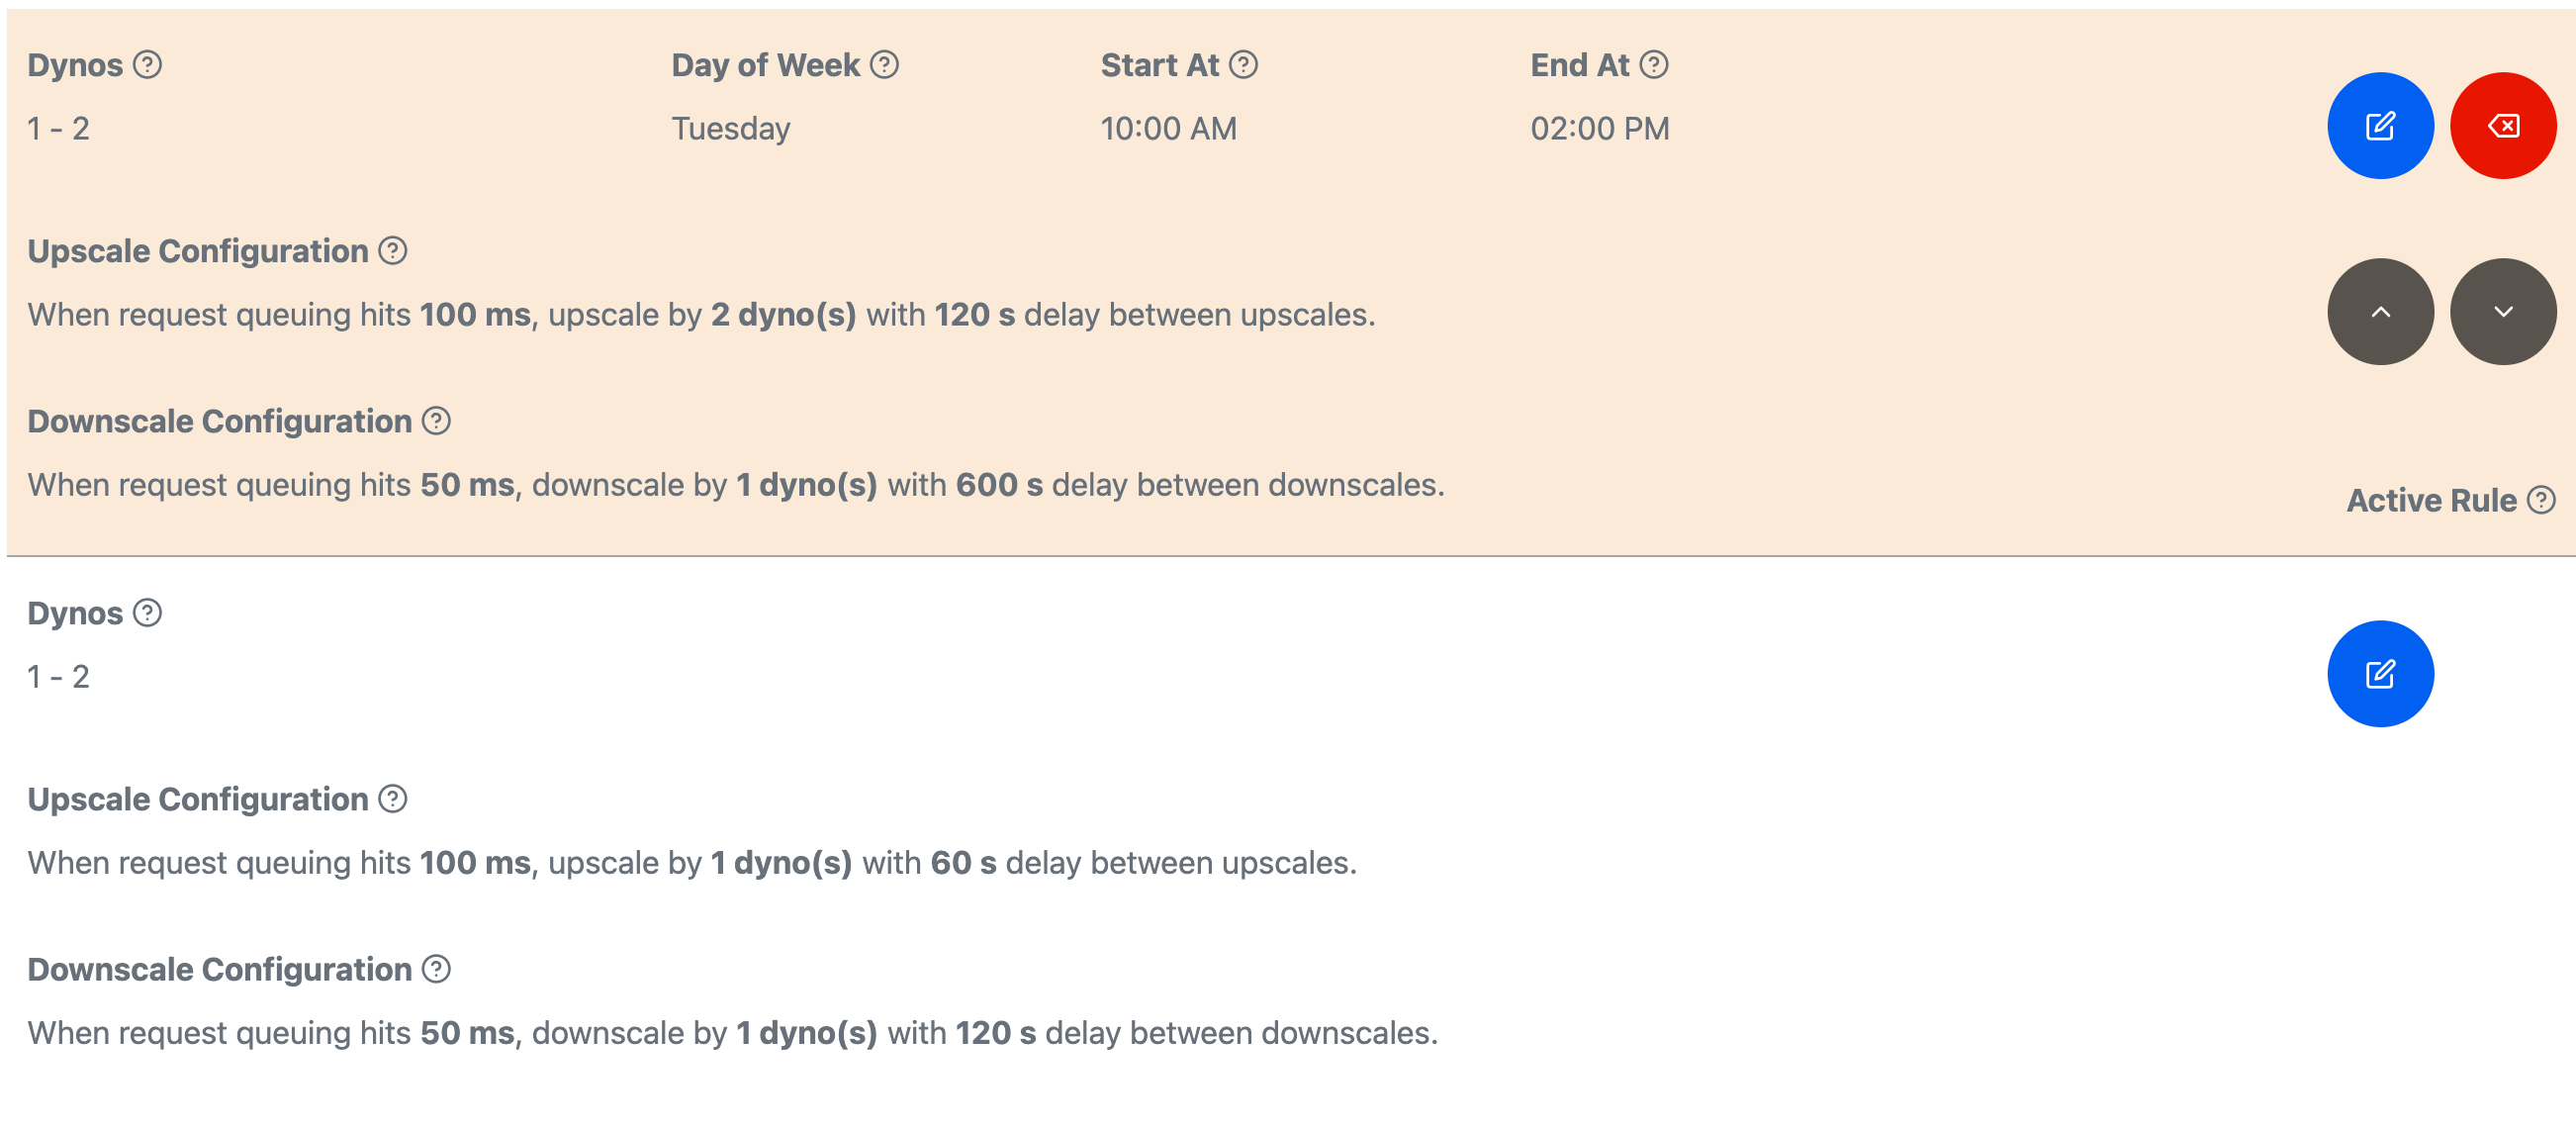
You’ll notice that unlike the default rule, this rule has a dropdown for day of week and fields for start/end times. These fields determine when a rule is active. When rules overlap in time, the topmost rule is selected first.
Reordering Autoscale Rules
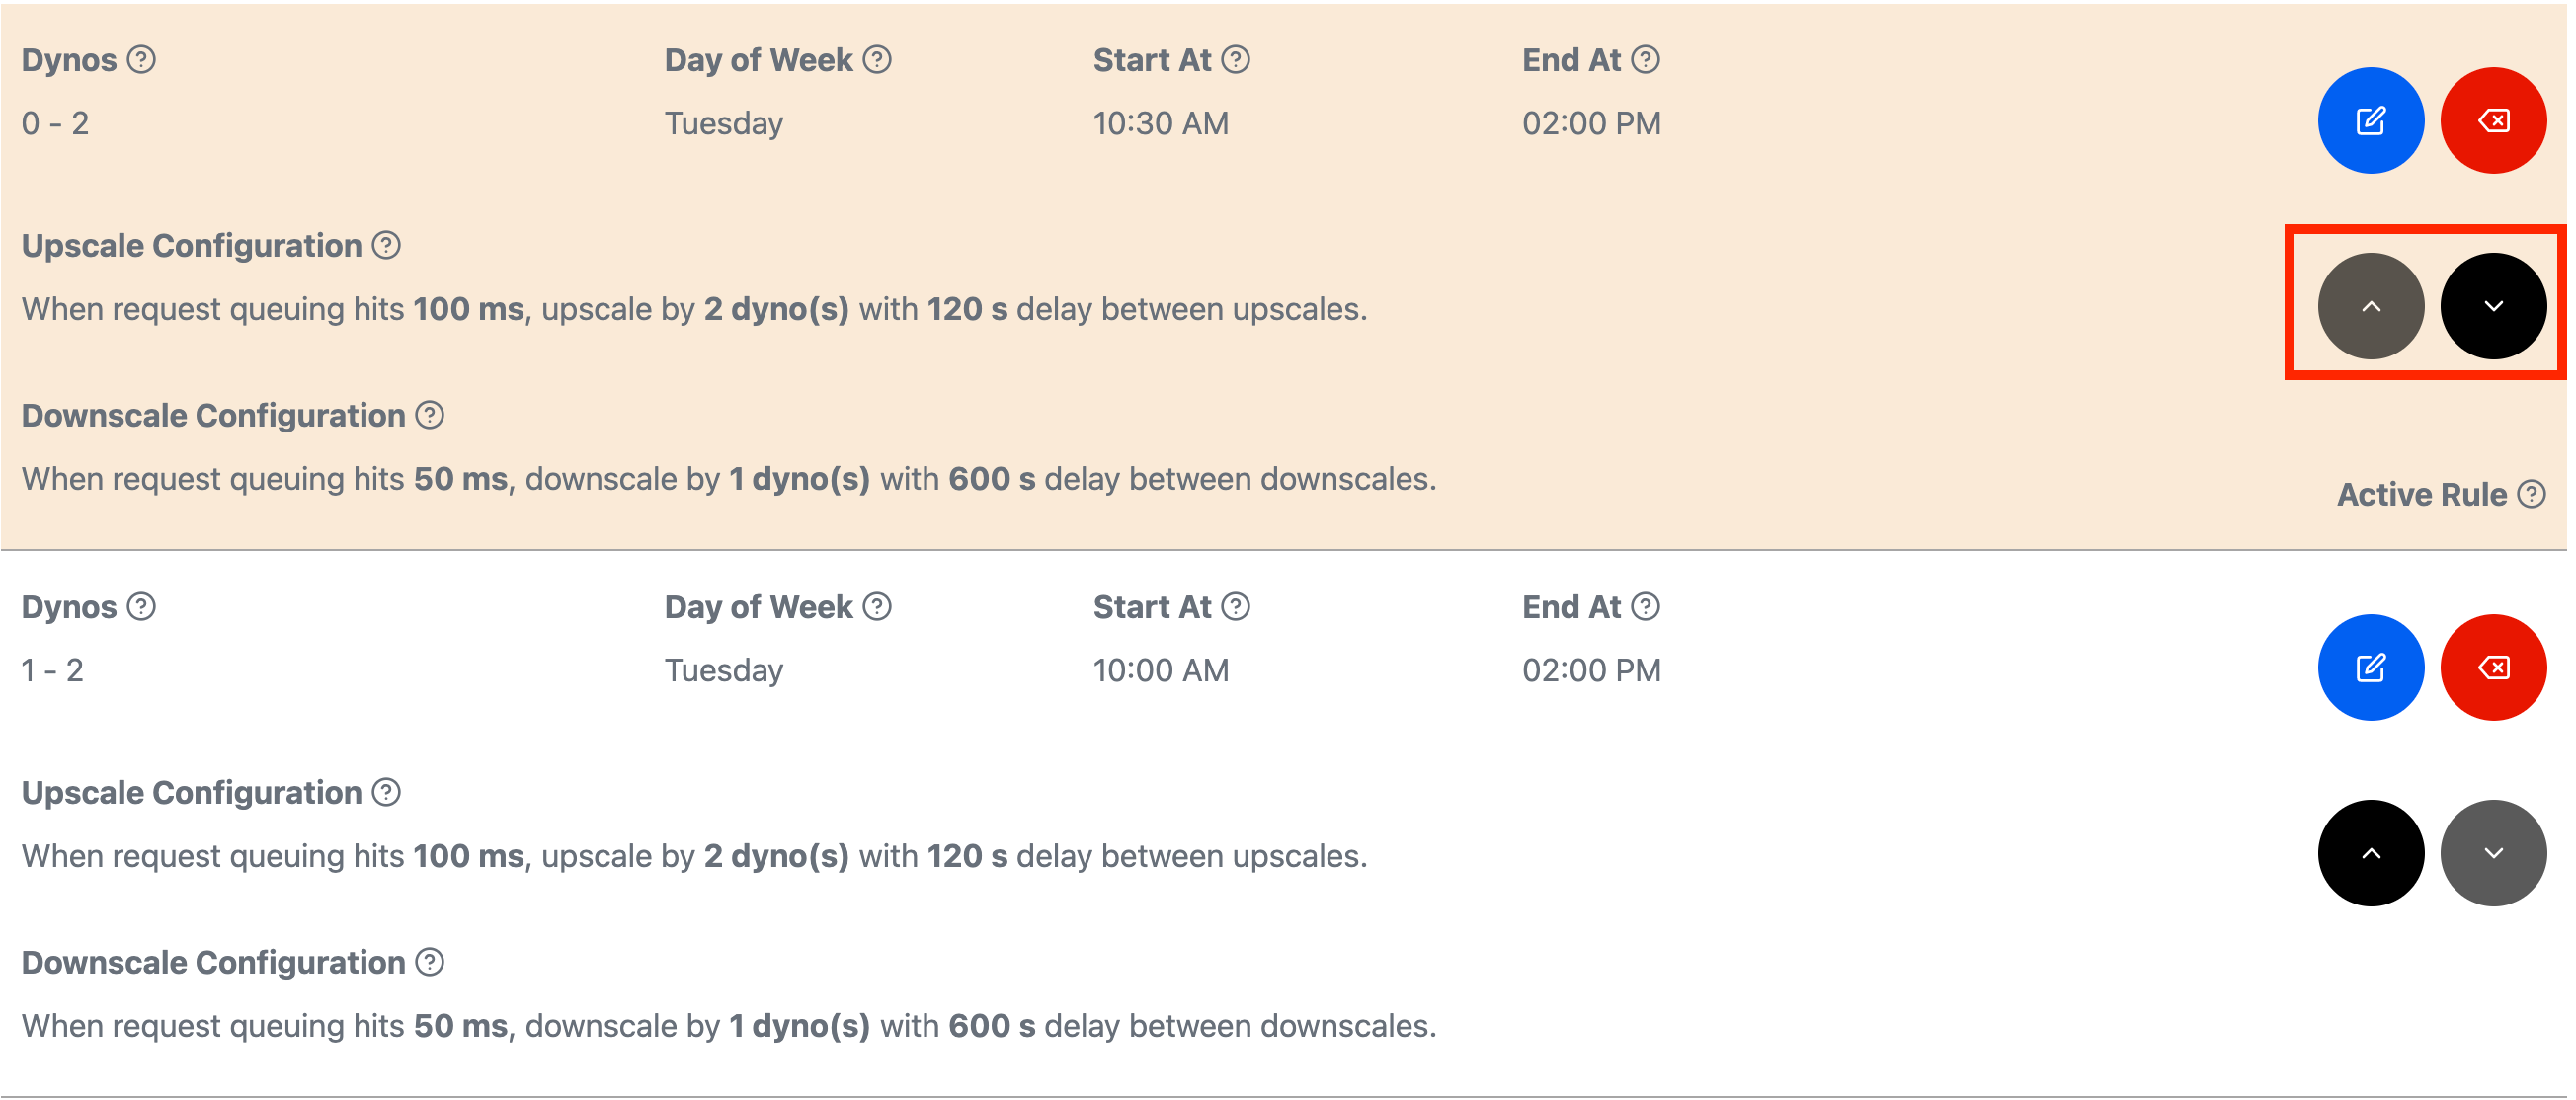 To shift the priority of a rule, you can use the black arrow buttons on the right side of any non-default rule.
Enabling Autoscale Rules
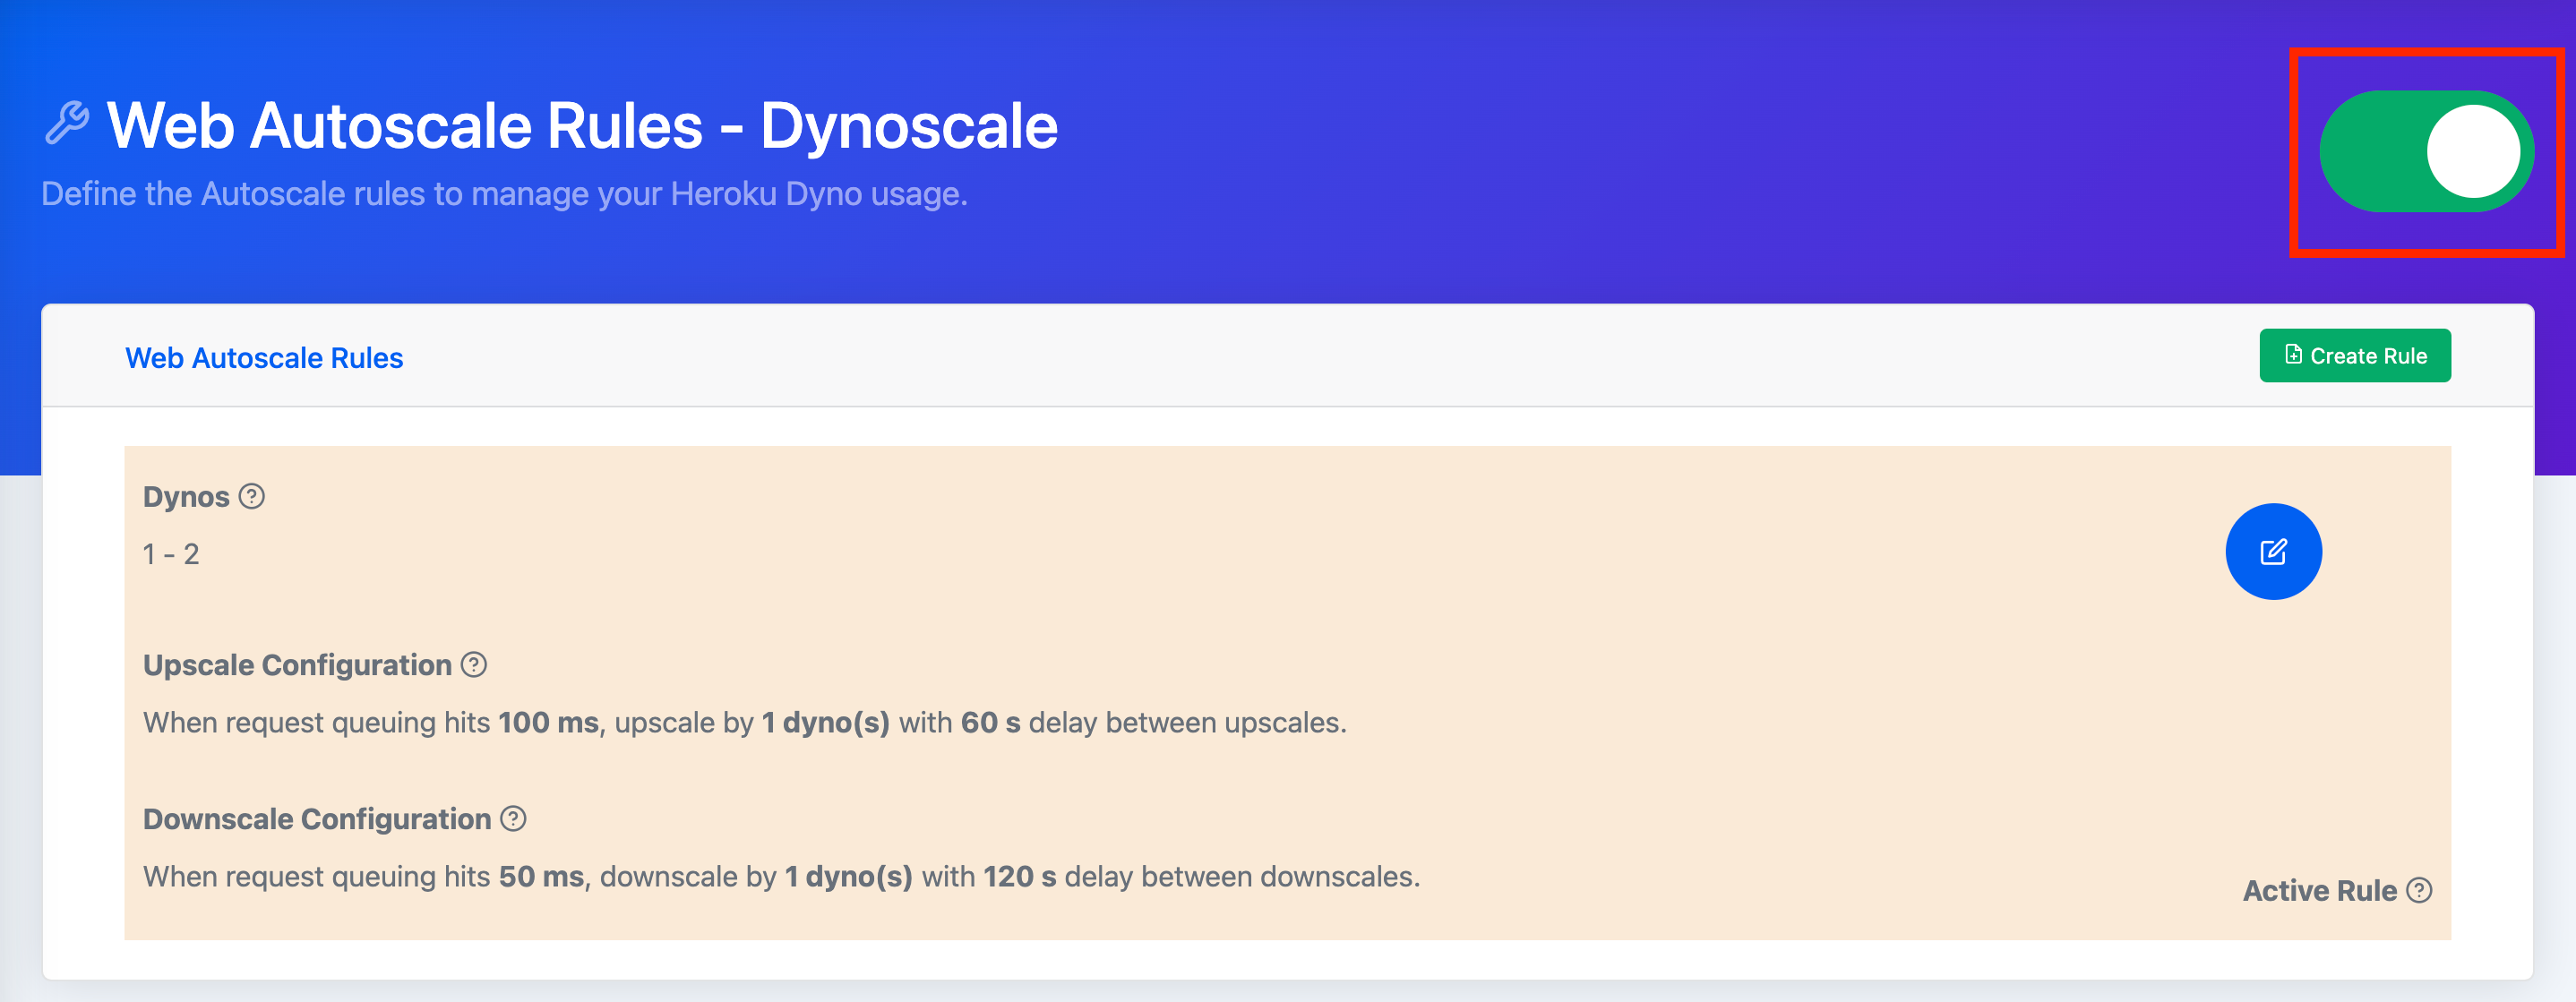 Once you’re happy with the rules, click the toggle on the upper right side of the page. Red indicates that your rules are off and green means your rules are active.
Selecting Worker Autscale Rule Queues
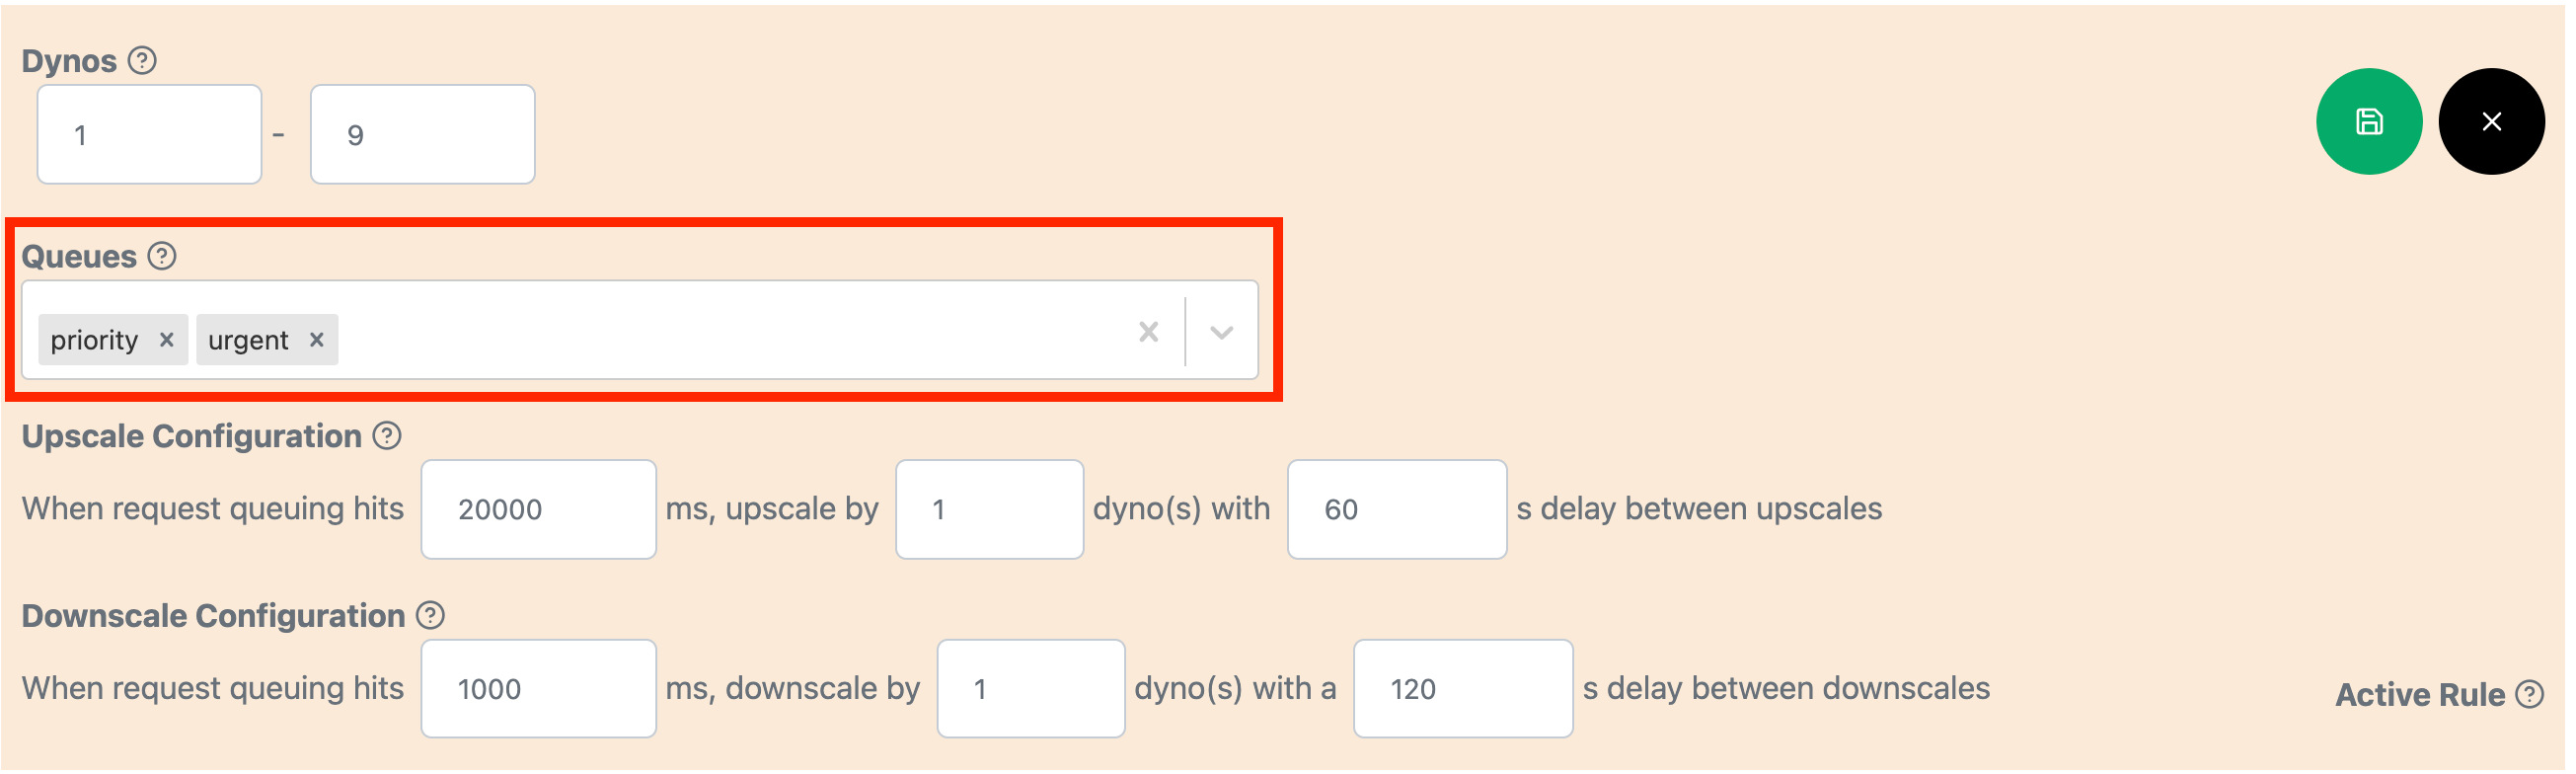 Worker Auto Scale Rules have slightly different criteria. Most of the Worker Rule fields are the same as the Web Rule fields. One exception is the Queues field, it specifies which queues are applicable for a rule. To ensure a cost-effective usage of auto scaling dynos, make sure to only include queues, which have time sensitive execution.
Monitoring and Logging
Request queue time and dyno scaling for Web and Worker dynos can be monitored via the addon website for logged in users.
Connect to the Dynoscale Dashboard
For more information on the features available within the Dynoscale dashboard, see https://dynoscale.net/documentation.
The Dynoscale dashboard provides details about auto scale rule configuration, dyno queue time and cost savings.
Access the dashboard via the CLI:
$ heroku addons:open dscale
Opening dscale for sharp-mountain-4005
or by visiting the Heroku Dashboard and selecting the application in question. Select Dynoscale from the Add-ons menu.
Troubleshooting
Did I Install the Dynoscale Agent Correctly?
Ruby on Rails Troubleshooting
To install the Dynoscale Agent, follow these instructions. To verify the rails agent installation, run the following Heroku CLI command:
heroku run rails runner 'puts DynoscaleRuby::VERSION'
If the agent is installed successfully, you’ll see the version number of the Dynoscale ruby gem.
Python Troubleshooting
To install the Dynoscale Agent, follow these instructions. To verify the python agent installation, run the following Heroku CLI command:
heroku run python -c 'import dynoscale as ds;print(ds.__version__)'
If the agent is installed successfully, you’ll see the version number of the python Dynoscale package.
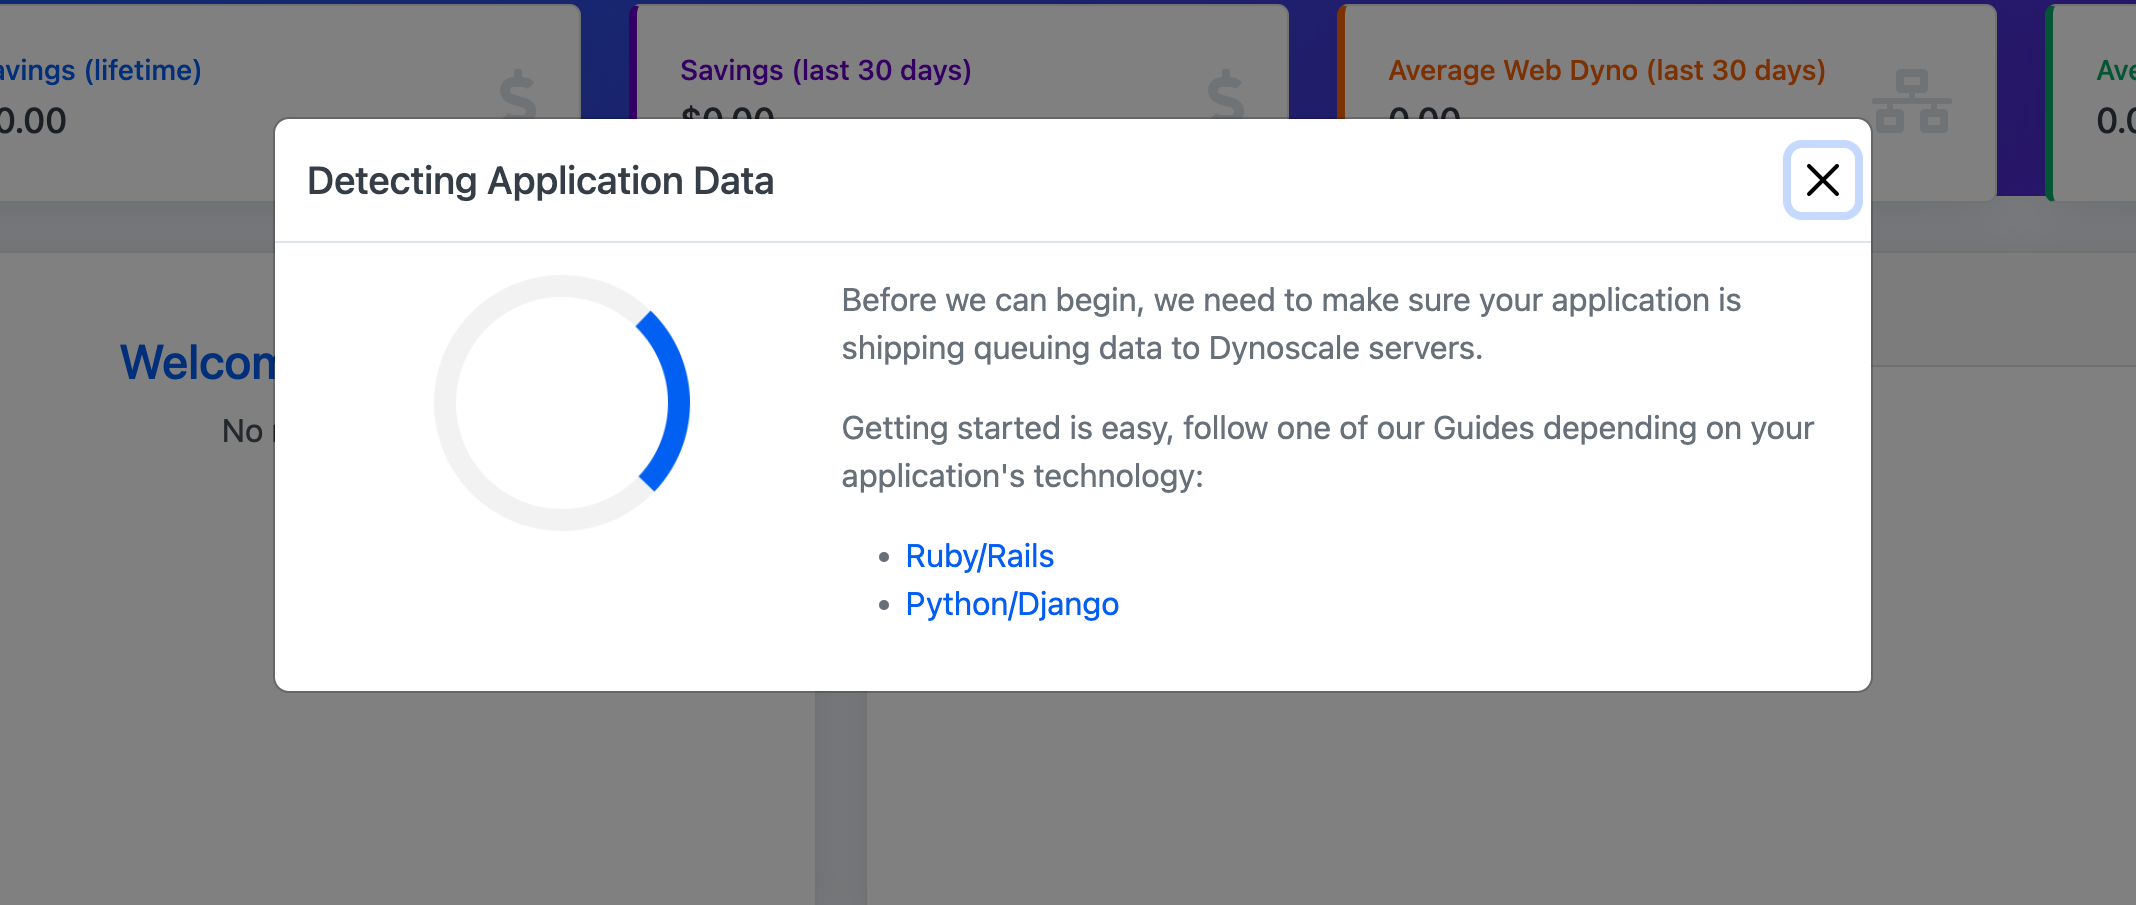
Is My Application Sending Queueing Data?
Navigate to the Dashboard page. If you see a sceen like the one below, Dynoscale isn’t receiving your application queuing data. One fix is to trigger an http request to your application.
Migrating Between Plans
Use the heroku addons:upgrade command to migrate to a new plan. It won’t cause a service disruption to the application.
$ heroku addons:upgrade dscale:performance
-----> Upgrading dscale:performance to sharp-mountain-4005... done, v18 ($249/mo)
       Your plan has been updated to: dscale:performance
Removing the Add-on
Remove Dynoscale via the CLI:
This action destroys all associated data and you can’t undo it!
$ heroku addons:destroy dscale
-----> Removing dscale from sharp-mountain-4005... done, v20 (free)
Support
Submit all Dynoscale support and runtime issues via support@dynoscale.net. Any non-support-related issues or product feedback is welcome by emailing eric@dynoscale.net.