Table of Contents [expand]
- Getting Started
- Advantages of a WAF
- Provisioning the add-on
- Post-provisioning configuration
- Identifying abusive IP addresses
- Blocking IP addresses
- Blocking user agents
- Blocking referring sites
- Blocking clients via cookies
- Blocking anonymous proxies
- Blocking requests based on country
- DDoS HTTP flood protection
- Stopping XSS, CSRF, SQL injection, and framework attacks
- Page / URL protection
- Enabling security headers
- Forcing HTTPS
- Blocking HTML in forms (XSS prevention)
- Caching and compression for site speed
- Caching profiles
- Compression settings
- SSL Certificates for HTTPS
- TLS 1.2 and 1.3
- Reporting
- Logging
- Troubleshooting
- Migrating between plans
- Removing the add-on
- Support
Last updated July 04, 2023
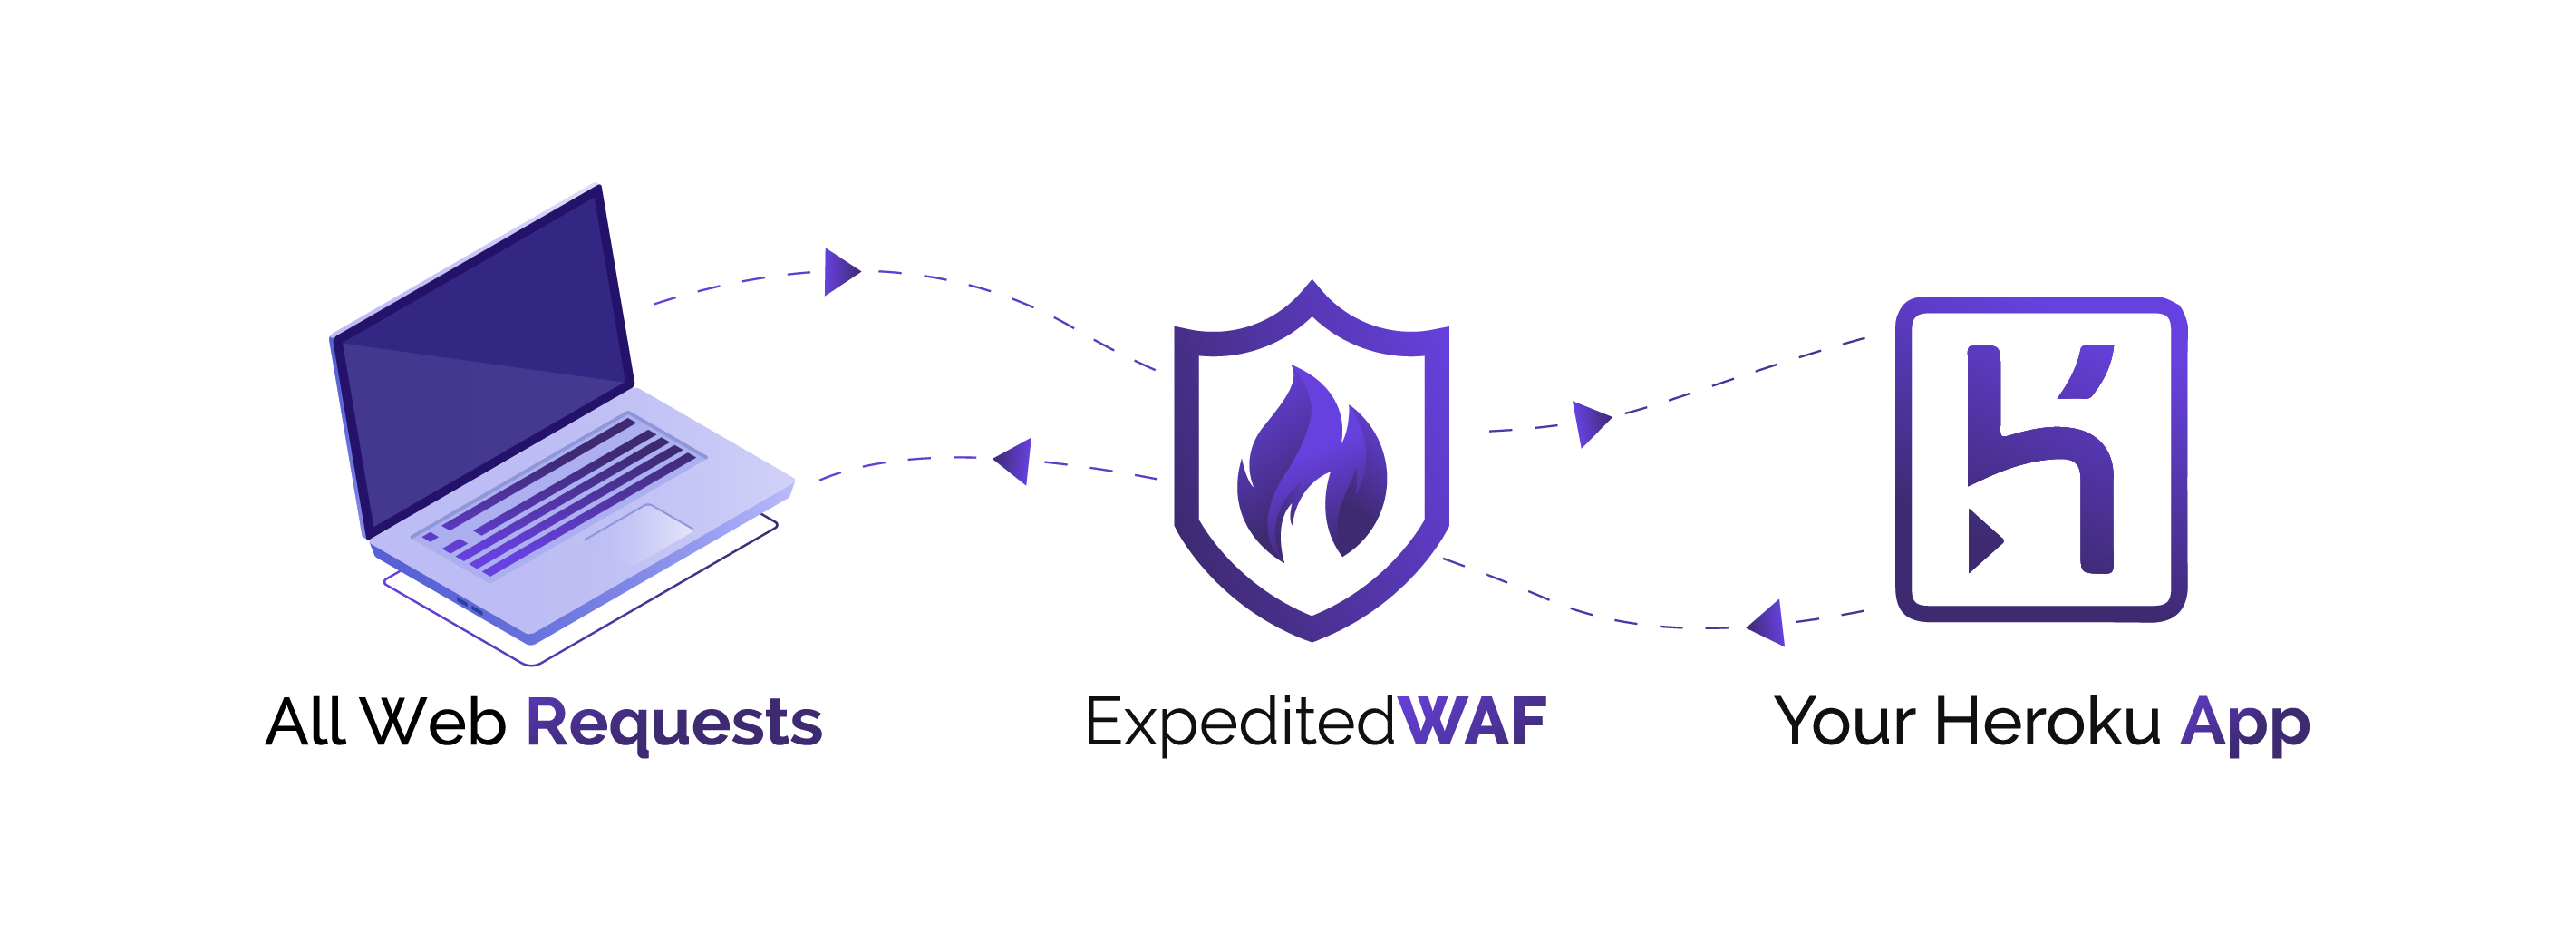
Expedited WAF is an add-on that provides a web application firewall (WAF) as a service with both automated protections and additional tools to improve the security of your Heroku applications.
Expedited WAF sits in front of your application, inspecting each inbound request for attack patterns that match an extensive threat database, known bad IPs, and any custom rules you have configured.
Together, this automatically:
- Speeds up how fast your site loads (CDN)
- Protects your app from CSRF, XSS, and SQL injection attacks
- Stops brute-force admin attacks
- Helps meet PCI/HIPAA/CCPA and GDPR compliance requirements
- Stops DDOS floods via Captcha or “real browser” tests
- Lets you password-protect pages (or your whole site)
- Lets you block any IP4/IPv6 address or range from accessing your site
Getting Started
If you have just installed Expedited WAF, you should navigate to your application’s Resources page and click the add-on listing for Expedited WAF.
This will walk you step by step through configuration and testing of your new Web Application Firewall instance.
Advantages of a WAF
Identify DDoS attacks and abusive traffic
Automated bots continually search the web for vulnerable applications, performing actions like:
- Scanning for unsecured admin screens
- Identifying frameworks with known vulnerabilities
- Brute-forcing passwords
- Submitting bogus forms to reveal sensitive information
Expedited WAF helps identify all of these malicious actions.
Intrusion Detection System
Because software vulnerabilities can be exploited within hours of their discovery, timely security patching can still fail to protect against every threat. Expedited WAF uses different intrusion detection methods to provide an additional layer of security for your applications.
As a managed WAF offering, our security team is constantly updating the identification rules as new threats emerge.
Speed up your site
Expedited WAF’s network servers are located around the globe, meaning you can potentially improve your app’s latency while monitoring for attacks.
Provisioning the add-on
Prerequisites
Expedited WAF requires that your app has an associated custom domain and that it’s reachable at that domain. Read this article to learn how to configure one for your app.
Also confirm that you have access to change your site’s DNS configuration.
Add the add-on to your application
Expedited WAF can be attached to a Heroku application via the CLI:
A list of all plans available can be found here.
$ heroku addons: add expeditedwaf --app your-app-name
-----> Adding expeditedwaf to sharp-mountain-4005... done, v18 (free)
Post-provisioning configuration
After provisioning the add-on, click on Expedited WAF from your app’s Resources tab in the Heroku Dashboard to begin setup. You can also open it with the Heroku CLI:
$ heroku addons:open expeditedwaf
You’ll walk through the following setup steps:
- Selecting your domain
- Configuring DNS
- Testing DNS
Note that although you have a great degree of flexibility in configuring Expedited WAF, its default configuration is intended to:
- Minimize risk, hassle, and complexity of setup
- Work for the majority of Heroku applications out of the box
- Give you a solid base for customizing security rules
Identifying abusive IP addresses
Identify IPs making malicious requests to your Heroku app by reviewing your app’s Heroku Logs.
Use the heroku logs command to bring up the most recent logs making requests and look for entries with the fwd attribute.
Adding the --dyno router flag to your command will filter results to only the relevant entries.
heroku logs --dyno router --app your-app-name

2019-04-10T15:08:39.514500+00:00 heroku[router]: at=info method=POST path="/events" host=example.com  fwd="213.86.93.32,66.
248.202.11"
When Expedited WAF is configured for your application, two IP addresses will be in each request:
The first IP address (
213.86.93.32in the above example) is the IP address of the client making the request. This is the IP address that you should block.The second IP address (
66.248.202.11) is the IP Address of the Expedited WAF edge server that is located geographically closest to the client, and should not be blocked.
If you’re using a different logging service or examining headers directly within your application, you’ll find this same set of IP addresses in the X-Forwarded-For HTTP request headers.
Blocking IP addresses
From the Block/Allow IPs page of your Expedited WAF dashboard, add each IP or CIDR-notated IP range that you want to block:
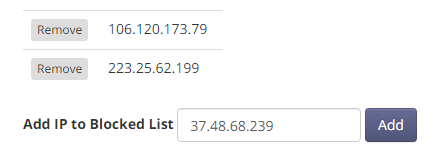
All requests from that IP/range will be stopped at the WAF and will not reach your Heroku application.
Blocking user agents
Many requests include obvious indicators that they aren’t coming from a human using a web browser, but rather a Python app, Curl script, or other automated requesting mechanism.
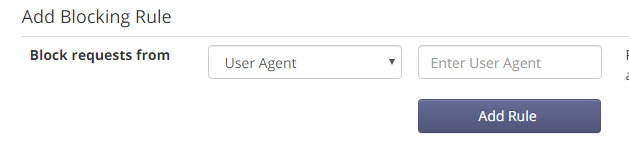
If you identify a malicious user agent, you can block it from the Block Bots page of your Expedited WAF dashboard by adding a user agent Blocking Rule:
You can also filter aggressive bots by enabling the setting on the Block Bots page that validates user agents before allowing requests through to your Heroku application.
Blocking referring sites
Links to your application from malicious sites might also hurt your app. You can block suspicious referrers from the Block Bots page of your Expedited WAF dashboard:

Blocking clients via cookies
If you can identify abusive clients from within your application, you can block those clients by setting a cookie that you defined as a blocking rule:

When Expedited WAF detects a request from a client with a blocked cookie name set, the request is blocked. Note that only the name of the cookie is compared, not the value.
Blocking anonymous proxies
Anonymous proxies are computers that make requests on behalf of another client. Attackers use anonymous proxies to mask their requests and bypass rules like IP restrictions.
Expedited WAF maintains a continually updated list of known anonymous proxies, which you can choose to block as a group.
Blocking requests based on country
You can block requests from individual countries to reduce the incidence of fraud or other malicious interactions.
Blocking POST requests
Blocking POST requests helps prevent malicious actions like brute-force login attempts, form hijacking (where additional fields or files are added into a form), and possible manipulation of application rules.
On the Block Bots page of your Expedited WAF dashboard, select the Country from POSTing option, and a list of countries to choose will appear.

Blocking GET requests
Blocking GET requests can stop certain forms of DDOS attacks, vulnerability scans, and fraud attempts.
On the Block Bots page, select the Country from GETing option, and a list of countries to choose will appear.

DDoS HTTP flood protection
Distributed Denial of Service (DDoS) attacks seek to overwhelm your application with illegitimate requests. Network-protocol-based DDoS attempts like UDP floods, ICMP floods, and other attacks are automatically blocked.
Application-level DDoS attempts (where massive numbers of HTTP GET/POST requests are issued in rapid succession) are more difficult to block, because outwardly they look very much like legitimate traffic.
If you’re currently under DDoS attack or suspect that you will be, set the HTTP Flood (DDOS) Mode setting on the Stop Attacks page of your Expedited WAF dashboard to Filtering. This forces each client making requests to be able to execute javascript.

This requirement eliminates most DDOS HTTP Floods, which are conducted with low-resource, script-based tools that can’t run javascript.
Stopping XSS, CSRF, SQL injection, and framework attacks
Attacks like XSS, SQL injection, and CSRF web applications fall into detectable patterns. By monitoring for these, you can stop them with a WAF before they reach your application server.
On the Stop Attacks page of your Expedited WAF dashboard, set the Stop Suspected Attacks setting to Stopping:

Page / URL protection
You can apply page protection rules to limit who can access specific URLs of your Heroku application.
All page protection rules are set from the Protect Pages page in the Expedited WAF admin.
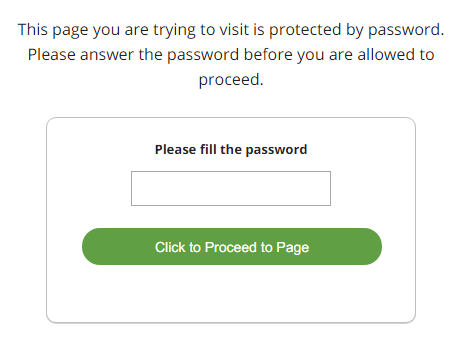
Password protection
Password protection is optional. It is disabled by default and will only apply to the specific URLs that you include in a rule.
At rule creation, a generated password is assigned for each protected page URL:
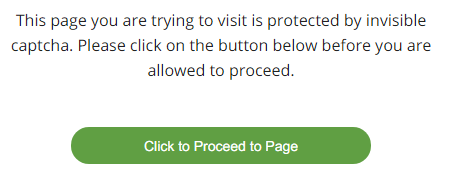
CAPTCHA protection
CAPTCHA protection is optional. It is disabled by default and will only apply to the specific URLs that you include in a rule.
Users who request a CAPTCHA-protected URL will be required to manually click a button to proceed from the CAPTCHA-protected page to their destination URL.
If your site is under DDOS attack, temporarily setting a CAPTCHA protection rule for the entire site (enter / as the URL) is an option to help filter out disruptive traffic, although you should try using HTTP Flood Protection first.
More often, CAPTCHA protection is used to help prevent automated scraping of pages with proprietary data, allowing ordinary users to browse with no issues.
It’s not possible to apply multiple page protection rules to a single URL.
IP protection
URLs can be set only to allow requests from specified IP addresses. This IP Protection is often used along with other application-specific security and authorization tools to provide an additional layer of security on high-value URLs, like /admin.
Enabling security headers
Security headers are responses set by the WAF that communicate to browsers rules about what behaviors are allowed.
X-XSS-Protection
Helps to prevent cross-site scripting attacks by restricting certain browser behaviors.
X-Frame-Options
Prevents your site from loading iframes, which are sometimes used in phishing attempts.
X-Content-Type-Options
Prevents MIME-based content attacks.
Forcing HTTPS
You can set the option to force all client requests from http to https on the Stop Attack page.
Blocking HTML in forms (XSS prevention)
Attackers often inject Javascript and HTML into forms to gain access to admin areas, exfiltrate data from other users, or delete resources on your site.
This rule catches forms that contain HTML and Javascript at the WAF level before they’re pushed into your application. This is disabled by default, as you may currently be depending on this in your application.
Caching and compression for site speed
Expedited WAF improves site speed and page load times in the following ways:
- It caches assets like images, javascript, and CSS on edge servers.
- It opportunistically compresses data in transit
- It uses modern protocols to bundle connections, which reduces latency
Edge network points of presence
Expedited WAF edge servers are located at both geographic population centers and strategic network locations. Client requests are routed to these servers. Requests are filtered for attacks, rules matches, and DDOS signs, and then passed to your Heroku application. Responses are compressed and cached.
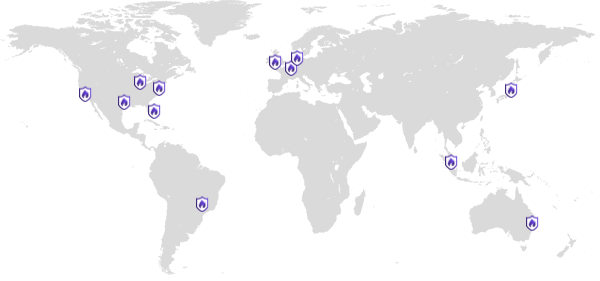
- San Jose, California
- Washington, DC
- Dallas, Texas
- Miami, Florida
- London, United Kingdom
- Amsterdam, Netherlands
- Frankfurt, Germany
- Tokyo, Japan
- Singapore
Caching profiles
Cache profiles outline the broad settings most applicable to your site. They provide a reliable default configuration, which you can modify to match exactly what your site needs.
| Profile | HTML Pages | Redirects | 404s | Assets | Cache-Control Respected |
|---|---|---|---|---|---|
| Full Site Profile | 180 mins | 180 mins | 4 mins | 3 days | No |
| Assets Only Profile | Not Cached | 10 mins | 1 min | 3 days | Yes |
Full site profile
Use this profile if your entire site is public, with pages that do not require users to log in and do not display different information to different users.
- Pages cached 180 minutes
- Redirects cached 180 minutes
- 404’s cached for 4 minutes
- Asset files (images, js, and css) cached 3 days
- Cache-Control Headers Ignored
Assets only profile
Use this profile if your application is mostly dynamic, with each page being customized to the user that is logged in or if pages are updated with data in the background.
- Pages are not cached
- Redirects cached for 10 minutes
- 404’s cached for 1 minute
- Asset files (images, js, and css) cached 3 days
- Cache-Control Headers Respected
HTTP Response Cache-Control header directives are how your application tells the WAF what URLs should be cached and for how long.
Asset file caching details
Asset files such as multimedia files, javascript, and CSS typically are cached according to the above profiles by the edge network.
Modern web framework asset handling often renames files with distinct fingerprints or means of assisting with asset caching. If those aren’t available in your framework, you’ll need to manually clear the cache after deploying your application.
Asset file extensions
Files served by your Heroku application that end in any of the following file extensions are considered assets and are cached for 3 days:
js, css, png, swf, jpg, jpeg, svg, svz, gif, ico, mp3, mp4, odf, pdf, woff, woff2, ttf, thumb, webp, txt, otf, 7z, aac, ai, asf, avi, bmp, bz2, doc, docx, eot, eps, fla, flv, gz, ind, m4a, m4v, mkv, mko, mpeg, oga, ogx, pptx, psd, rar, rtf, tar, tgz, tiff, wav, xlsx, xml, zip, zipx
Versioning cache URLs
Expedited WAF considers URL parameters to be distinct resources for caching. This means that:
https://example.com/users/?id=1
and
https://example.com/users/?id=2
are distinct, and requesting the second does not return the cached results for the first. You can use this to version URLs within your application by appending different URL parameters to any URL that you need not to be cached.
Clearing the cache manually
On the Site Speed Up page of your Expedited WAF dashboard, there is a Clear Cache button. Clicking this removes all currently cached responses and assets that are being stored across the edge network and being served to clients.
Compression settings
Compression settings are enabled by default and are very unlikely to interfere with proper functioning of your application.
GZip Compression
Pages will be compressed via GZip. This helps reduce the overall amount of time spent sending information from the edge network to the user’s browser.
Brotli Compression
Modern browsers can use Brotli compression instead of GZip. This helps further reduce the overall amount of time spent sending information from the edge network to the user’s browser.
HTTP2 (“SPDY”)
HTTP2 is an improved protocol for web traffic. It takes fewer resources, uses those more effectively and gracefully falls back on clients where it is not supported.
SSL Certificates for HTTPS
All sites are automatically issued a new SSL/TLS certificate as part of their setup. This encrypts communications between clients and the site via HTTPS.
TLS 1.2 and 1.3
Expedited WAF will only connect to HTTP clients via TLS 1.2 and TLS 1.3.
Prior versions of TLS and SSL used by legacy HTTP clients will not be accepted. This prevents downgrade attacks and ensures that secure communications can be established between your Heroku app and external clients.
We default to TLS version 1.3 (latest) and set of secure cipher suites selected specifically to work with Heroku and provide optimum speed and security.
TLS 1.2+ is a common requirement for GDPR, HIPPA, CCPA and PCI compliance regulations.
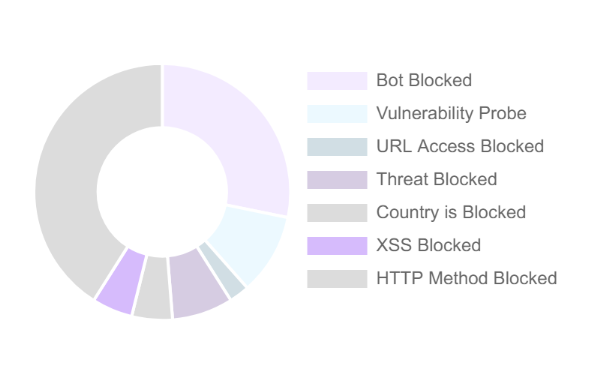
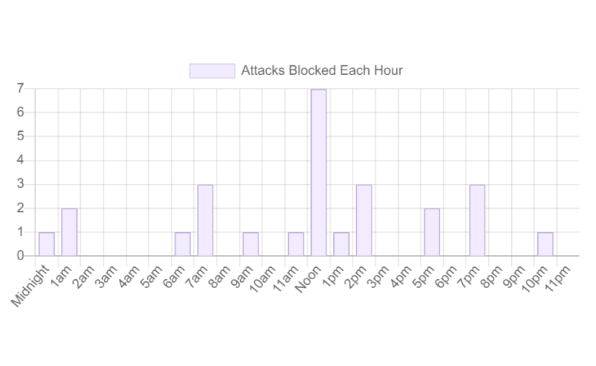
Reporting
Your main point of analytics and tuning is your Dashboard page. This lists the types of attacks and threats blocked, along with the time, country, and IP they originated from.
The dashboard shows only the requests blocked, not all of the requests that passed through Expedited WAF.
Logging
As the WAF exists between your Heroku application and the general Internet, log entries are not passed back to Heroku.
Similarly, requests blocked by the WAF are not displayed in the Heroku logs.
Troubleshooting
The most common issues with setting up your WAF relate to DNS and delayed DNS propagation. If the built-in DNS tester in the WAF dashboard states that you are set up correctly, the best option is typically to wait an hour for DNS to fully propagate before making additional changes.
Migrating between plans
You can migrate between plans at any time as your security, site traffic, and caching needs change.
Removing the add-on
Expedited WAF can be removed via the CLI.
This will bring down your running application if you have not first migrated your DNS to another endpoint!
$ heroku addons:remove expeditedwaf --app your-app-name
-----> Removing expeditedwaf from sharp-mountain-4005... done, v20 (free)
Support
All Expedited WAF support and runtime issues should be submitted via one of the Heroku Support channels. Any non-support related issues or product feedback is welcome at support@expeditedsecurity.com.