Last updated July 10, 2020
This add-on is operated by Softtrends LLC
Create and use Amazon S3, Azure Blob Storage and Google Bucket from Heroku App.
Softtrends HDdrive allows you to add cloud storage to your Heroku applications using Amazon S3 or Azure Storage or Google Storage.
Use HDrive to:
- Create an HDrive from an AWS S3 Bucket, Azure Storage Blob Container or Google Storage Bucket
- Build custom folders and files within HDrive and toggle them as Public or Private
- Manage folders and files using the HDrive Dashboard or CLI
- Programmatically access HDrives and their contents from within Heroku apps using REST APIs
- Directly access public files using custom content URLs
Upon provisioning an HDrive, you will be issued IAM credentials for AWS S3 and Storage Account Credentials for Azure Storage and Google Storage (allowing you to programmatically access HDrive). These credentials are managed by the add-on you can regenerate your HDrive access keys any time using the Dashboard.
HDrive is compatible with all applicable languages and frameworks supported by the Heroku platform.
If you are just getting started with Heroku or Heroku add-ons, please see the Heroku Getting Started Guides or the add-ons overview.
Provisioning the add-on
You can provision the HDrive add-on for a Heroku application from the Heroku Dashboard, or via the Heroku CLI:
A list of all plans available can be found here.
$ heroku addons:create hdrive:PLANNAME --app HEROKU_APP_NAME
Creating hdrive on HEROKU_APP_NAME ... PLANNAME
Created hdrive-shaped-92224
Replace PLANNAME with the name of one HDrive’s add-on plans, and replace HEROKU_APP_NAME with the name of the Heroku to add HDrive to. If you do not provide a PLANNAME, the default plan (test) is used.
Initial setup
HDrive does not automatically create an AWS S3 Bucket, Azure Storage Blob Container or Google Storage Bucket for you, as this is based on which type you’d like to use within your Heroku app. Instead, you can use the HDrive Admin Dashboard to create your first preferred storage instance or a combination of multiple. You may even BYOD (Bring Your Own Drive) as well.
To do so, open HDrive by selecting it from the Resources tab of your app in the Heroku Dashboard, or by running the following CLI command:
$ heroku addons:open hdrive -a HEROKU_APP_NAME
Once completed, you will see the HDrive Add-On Dashboard open and the setup screen as shown below:
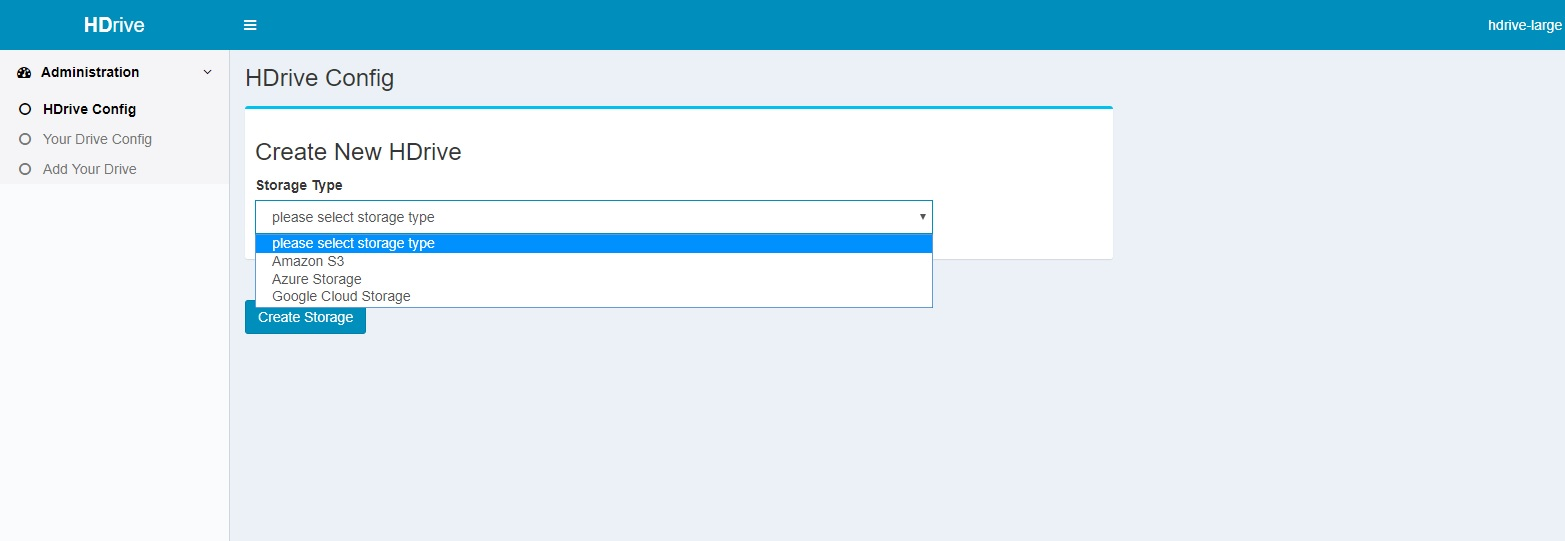
In this step, you can:
- Select whether you want the HDrive to be of type AWS S3, Azure Storage or Google Storage
- Provide a custom name for your HDrive, which will become the name of the S3 bucket, the Azure Storage blob container or the Google Storage bucket (based on your selection)
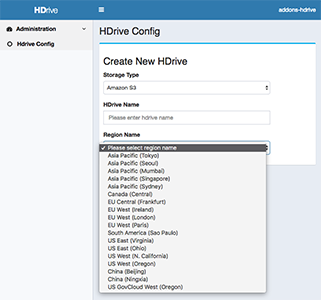
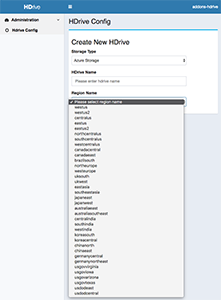
- Select the region into which you want the HDrive created
Available Storage Regions for AWS S3 include:
Available Storage Regions for Azure Storage include:
Available Storage Regions for Google Storage include:
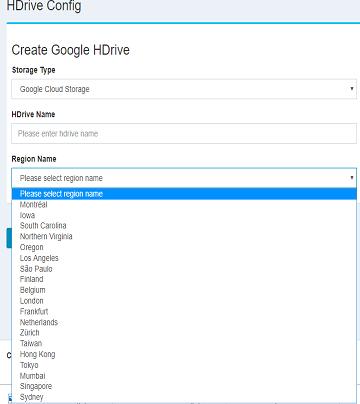
To improve your app’s performance, select a region that is geographically close to your Heroku application’s region.
After you successfully provision a storage instance, you will see the Dashboard displayed without any folders or files in it. From here, you can create new folders and upload files. You can obtain your storage instance’s associated credentials from the Config screen by clicking the HDrive Config link in the left panel.
HDrive Config Screen
The HDrive Config screen displays the name of each AWS S3, Azure Storage or Google Storage instance you have created.
AWS S3 Config Screen
Azure Storage Config Screen
Google Storage Config Screen
Navigating the HDrive Dashboard
The HDrive Dashboard has two primary menu headings:
- Administration lets you manage the configuration for your HDrives.
- HDrives lets you view your created HDrives at a glance.
Clicking on HDrive Config displays the configuration screen, and clicking on an HDrive’s name will open the Explorer screen for that specific HDrive.
The HDrive Config screen
HDrive config options vary based on the type of HDrive you have created (S3 Bucket, Azure Storage Blob Container or Google Bucket). Based on your chosen add-on plan, you might see one or both screens associated with these HDrive types.
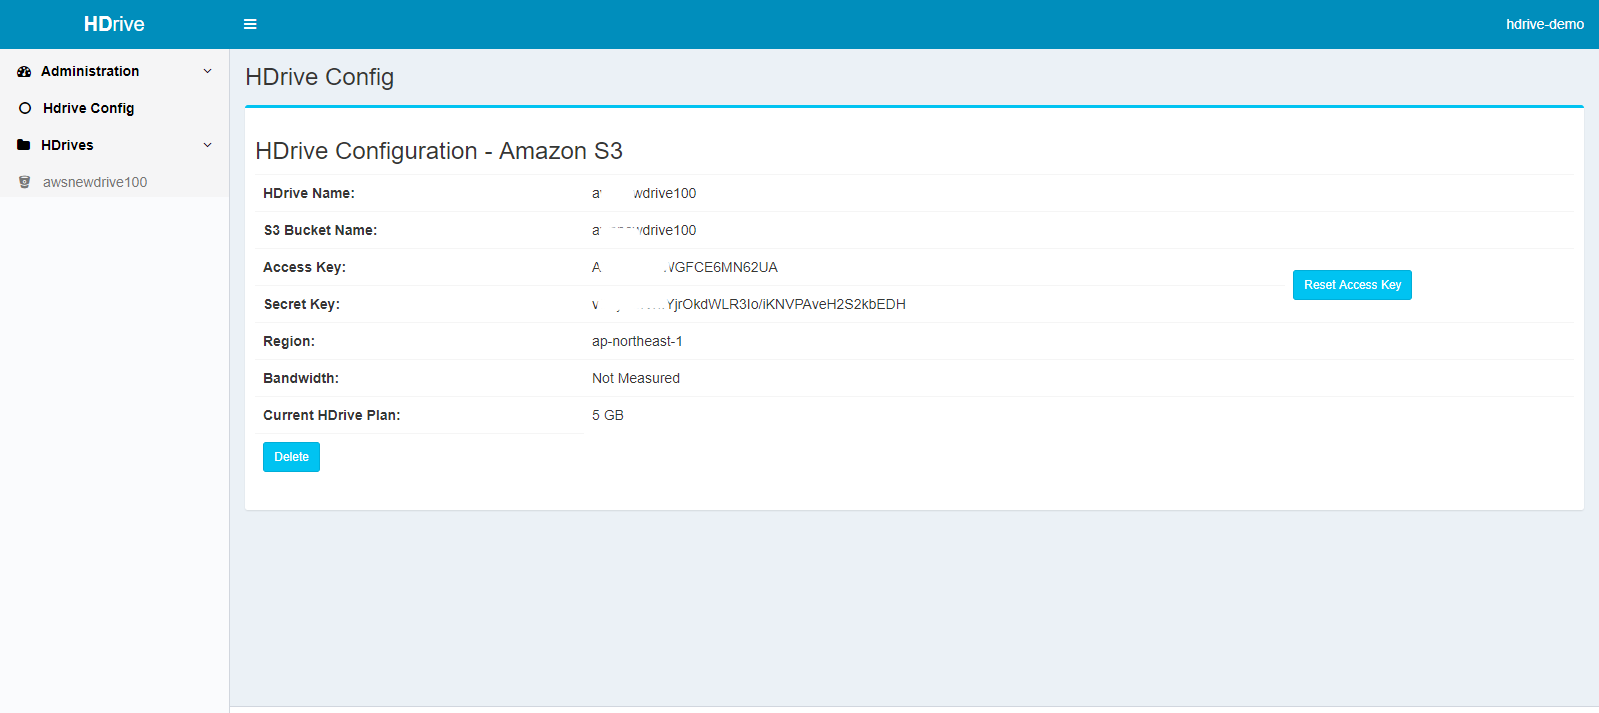
HDrive on AWS S3
This screen displays the following information:
- The HDrive name, which is also the AWS S3 Bucket name
- The Access Key and Secret Key for the underlying AWS S3 bucket
- AWS S3 bucket’s associated region
- Bandwidth you have consumed working with files and folders
- The size of your HDrive plan
In addition to viewing the above information, you also have the option to:
- Reset the AWS S3 Access Key
- Delete the HDrive and associated AWS S3 Bucket if you are sure you no longer require it (or any of its contents)
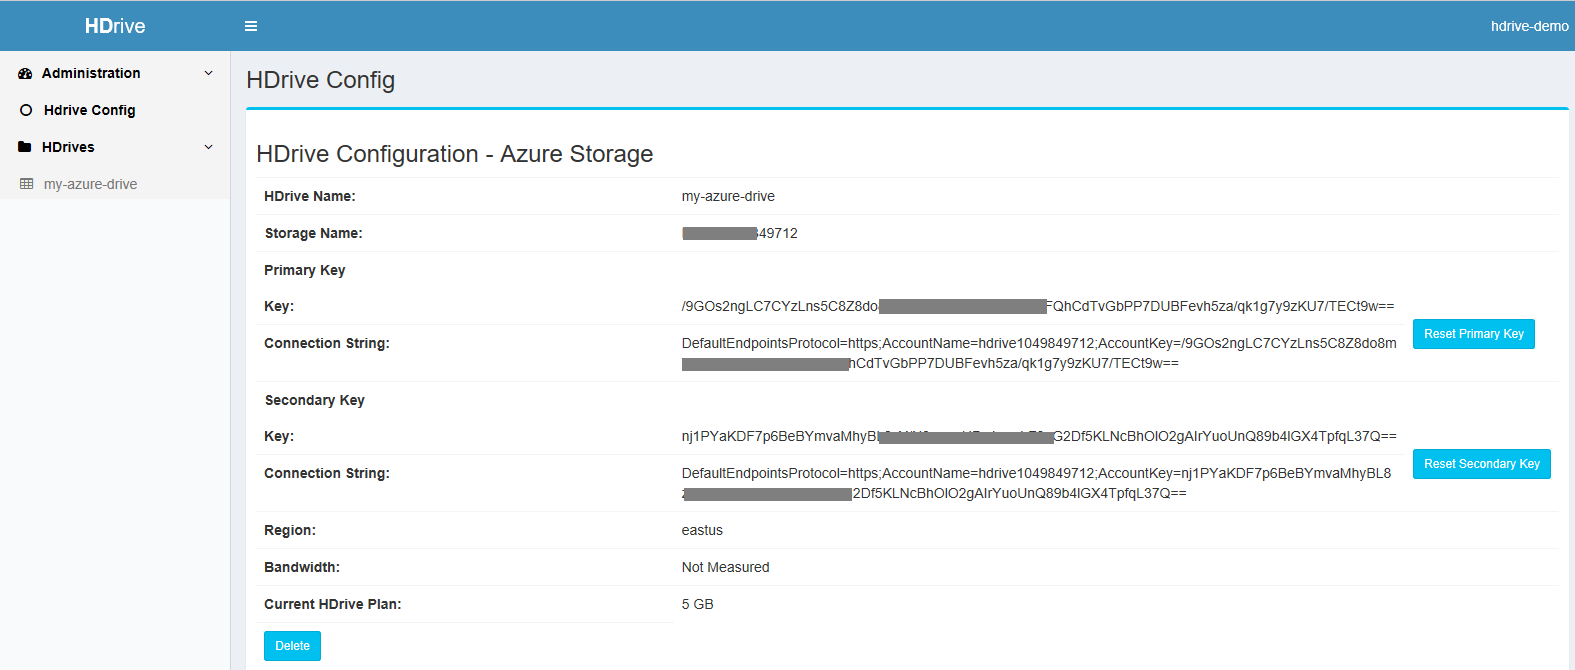
HDrive on Azure Storage

This screen displays the following information:
- The HDrive name, which is also the Azure Storage Blob Container name
- The Primary and Secondary Key for the underlying Azure Storage
- The Azure Storage Blob Container’s associated region
- Bandwidth you have consumed working with files and folders
- The size of your HDrive plan
In addition to viewing the above information, you also have the option to:
- Reset the Primary and/or Secondary Azure Storage Key
- Delete the HDrive / Azure Storage Blob Container if you no longer require it (or any of its contents)
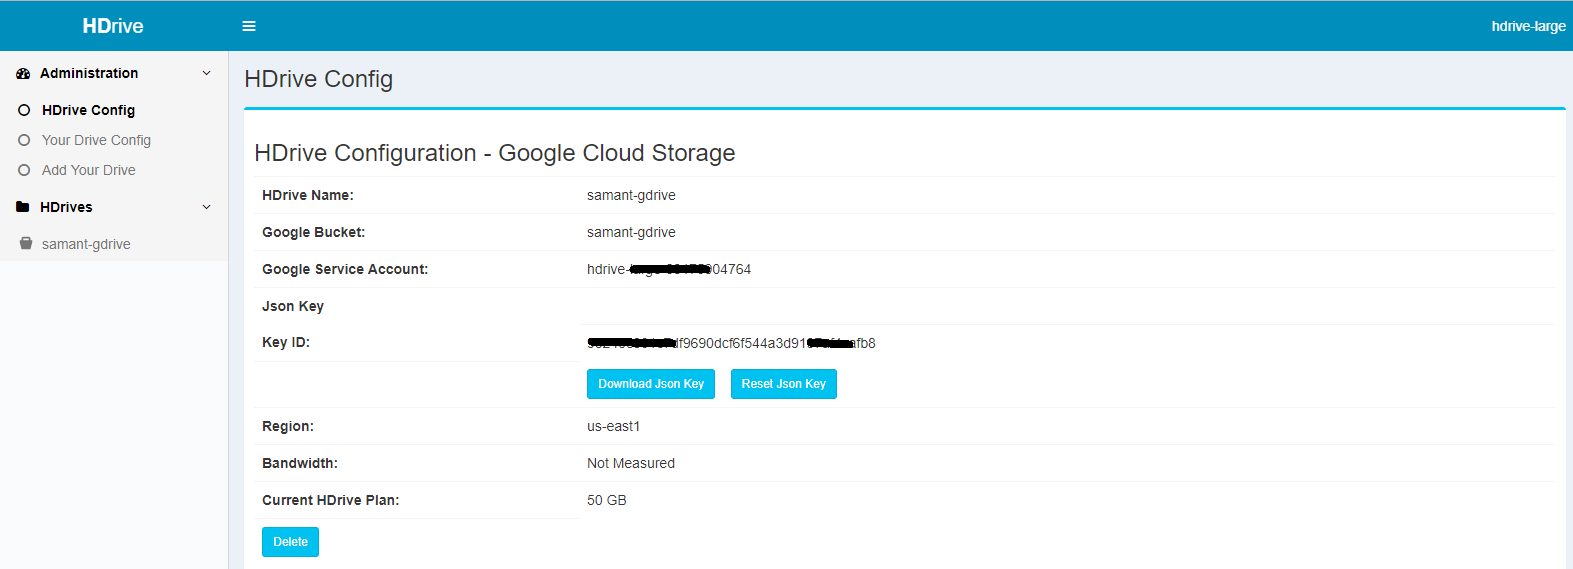
HDrive on Google Storage
This screen displays the following information:
- The HDrive name, which is also the Google Bucket name
- The Json Key for the underlying Google Bucket
- The Google Bucket’s associated region
- Bandwidth you have consumed working with files and folders
- The size of your HDrive plan
In addition to viewing the above information, you also have the option to:
- Reset the Google Bucket Json Key
- Delete the HDrive / Google Bucket if you no longer require it (or any of its contents)
Deleting an HDrive
The HDrive Config screen allows you to delete an HDrive (and all of its contents). A confirmation message is displayed to make sure you really want to delete the drive, as all contents (files and folders) will permanently be deleted and are unrecoverable.
When you delete an HDrive, all data stored by you is permanently removed. This may impact your Heroku apps, dependencies within, or may affect other documents, processes, or Heroku dynos accessing the HDrive content. As such, you should be extremely careful when deleting an HDrive!
Deleting an HDrive does not remove the Heroku app’s HDrive add-on, because you can create another one in its place. To permanently remove the HDrive add-on after deleting the underlying HDrive storage container, follow the step listed under Removing the Add-on.
HDrive Explorer
The HDrive Explorer allows you to create public and private folders, and upload files to any selected folder. To explore the HDrive, click on the HDrive name on the left panel:
Figure 1. Explorer Main screen
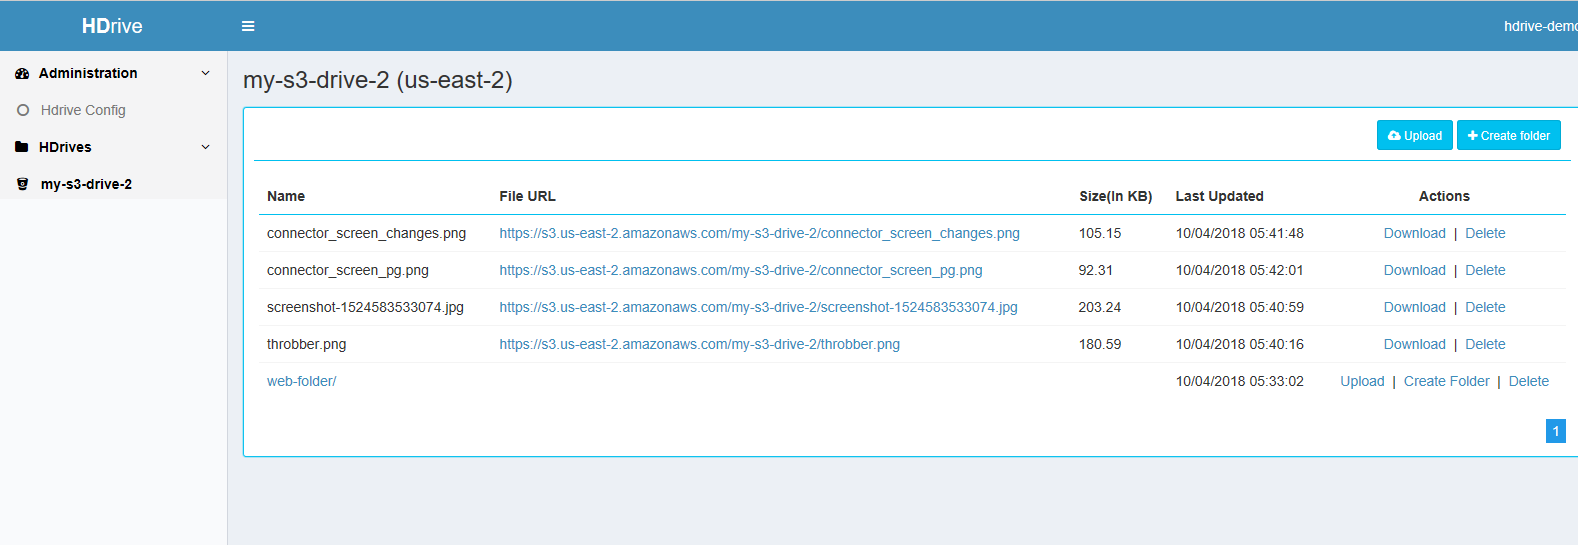
Note the details provided in the HDrive Explorer:
- HDrive Name and associated Region it is created in
- List of files and folders
- Files’ associated URLs, which can be accessed externally by anyone (if you have selected the public option when uploading)
- Ability to create folders and upload files, delete files and folders, as well as download files from the drive
Figure 2. Creating a Folder
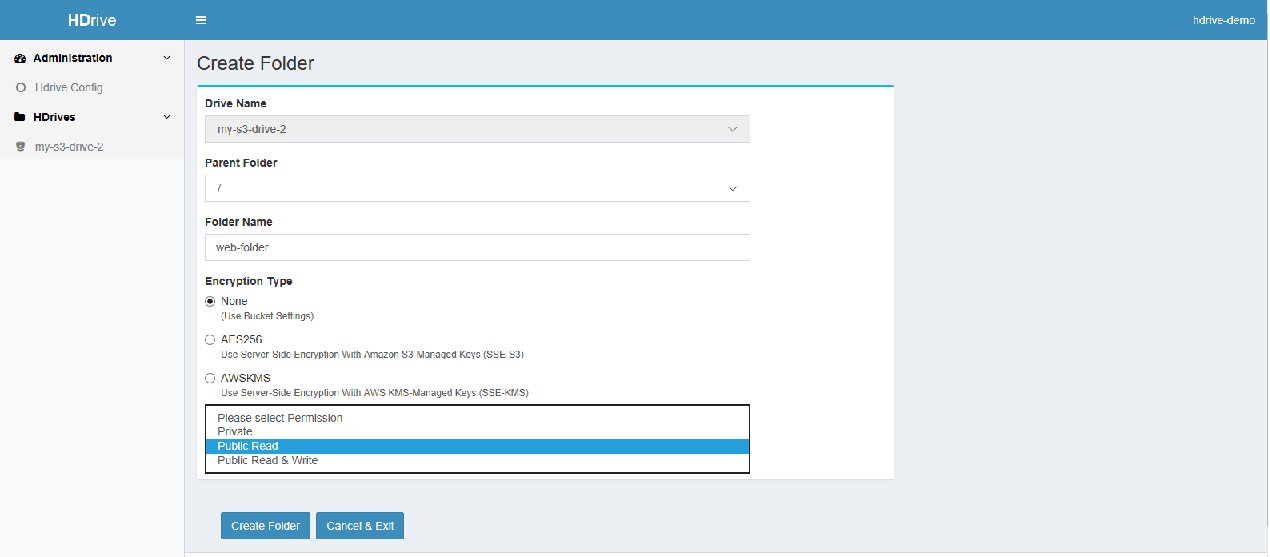
Note that this gives you the option to:
- Select a parent folder
- Provide an encryption option
- Specify the type of permissions for the folder
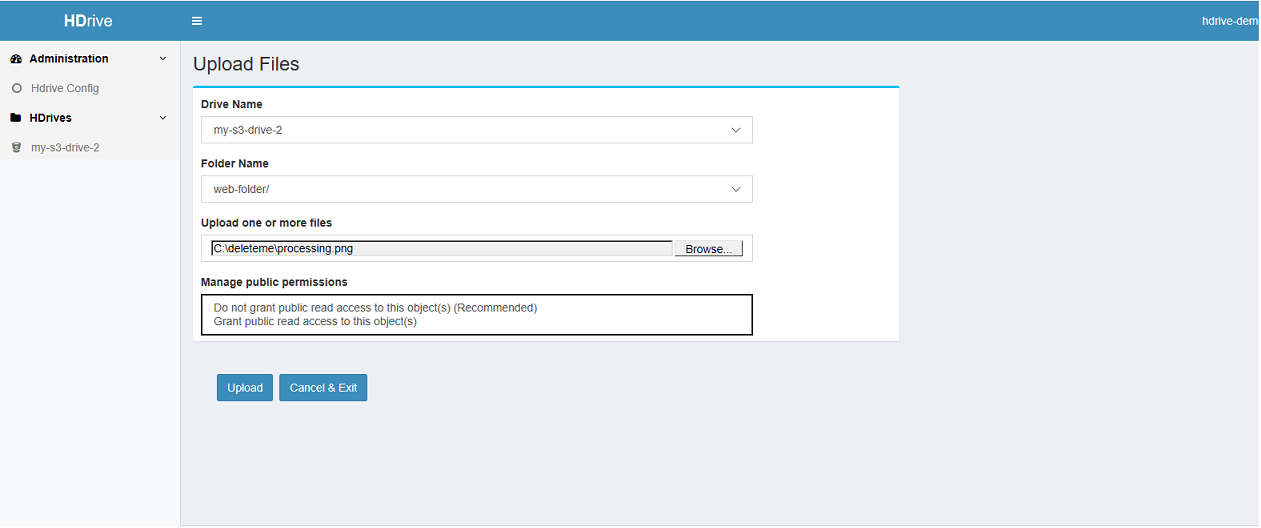
Figure 3. Uploading a file
Upgrading the add-on plan
At any time, you can upgrade from a plan with lower entitlement to one with higher by selecting a different one from HDrive Add-On Plans using the CLI, assuming you are operating inside a Heroku organization with a paid plan entitlement:
$ heroku addons:upgrade hdrive: NEW_PLAN -a HEROKU_APP_NAME
Changing hdrive-rigid-36410 on HEROKU_APP_NAME from hdrive: OLD_PLAN to hdrive: NEW_PLAN...
Upgrading your plan has no effect on data that is already stored in your existing HDrives, and there is no downtime associated with an upgrade.
Removing the Add-On
You can remove the HDrive add-on using the Heroku Dashboard or via the Heroku CLI as follows:
When you remove the add-on, all of its associated HDrives (and the data they contain) are permanently destroyed!
$ heroku addons:destroy hdrive -a HEROKU_APP_NAME
▸    WARNING: Destructive Action
▸    This command will affect the app HEROKU_APP_NAME
▸    To proceed, type app-name or re-run this command with --confirm app-name
$heroku addons:destroy hdrive -a HEROKU_APP_NAME --confirm HEROKU_APP_NAME
Destroying hdrive-shallow-50722 on ⬢ HEROKU_APP_NAME... done
Support
All support and runtime issues related to the Softtrends HDrive Add-On should be submitted via one of the Heroku Support channels. Any non-support related issues or product feedback is welcome at heroku@softtrends.com.