Table of Contents [expand]
- Overview
- Heroku Prerequisites
- Configuring Mutual TLS and Allowlisting Your IP
- Downloading Client-Side Certificates
- Connecting to Your Database From an External Resource
- Client Certificate Renewal
- Configuring External Applications to Connect via mTLS
- Revoking IP Rules
- Disabling Mutual TLS
- Configuring Mutual TLS via the Dashboard
- mTLS CLI Plugin
- Limitations and Caveats
Last updated May 18, 2026
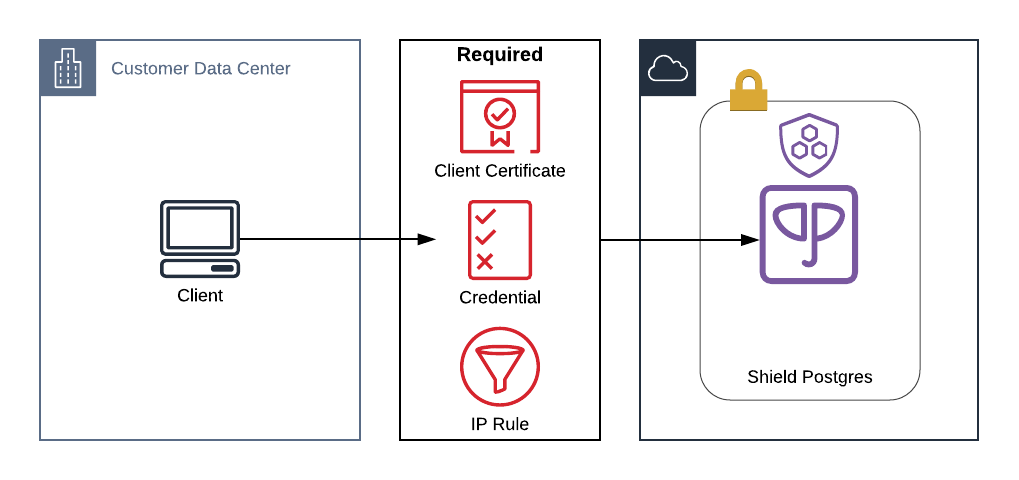
Use Mutual TLS (mTLS) to create a secure and mutually authenticated channel between an external resource and a Heroku Postgres database running in a Private Space or a Shield Private Space. External resources can include any mTLS-enabled application or system running in private data centers or public clouds. To use this feature, you must also allowlist the external IP that connects to your database.
Mutual TLS isn’t supported on Heroku Postgres Advanced (Limited GA). Subscribe to our changelog to stay informed of when this feature is available for Advanced databases.
Overview
This feature is only available for Private and Shield Postgres databases.
Heroku provisions certificate authorities (CAs) in the Private Space and Shield Private Space, and generates certificates for the Postgres database server and your client. Your Postgres client can then configure the server certificate chain, client certificate chain, and client private key. You can provision more client certificates if needed.
This process involves three high-level steps:
- Configuring Mutual TLS and allowlisting your external IP range
- Downloading client-side certificates
- Connecting to your database from an external resource
Heroku Prerequisites
Set up the following Heroku resources required for Mutual TLS:
- A Private Space or Shield Private Space
- A Heroku app running in the space with an attached Private or Shield Heroku Postgres database
Configuring Mutual TLS and Allowlisting Your IP
Step 1: Install the Mutual TLS CLI plugin
$ heroku plugins:install mtls
Step 2: Enable Mutual TLS
Enable Mutual TLS on your database with heroku data:mtls:create:
$ heroku data:mtls:create postgresql-rectangle-12345 --app example-app

Enabling Mutual TLS will allow external access to this restricted data service. This action will be logged. Continue?: yes
addon:           postgresql-rectangle-12345
app:             example-app
enabled_by:      example@heroku.com
status:          Provisioning
Enabling MTLS on postgresql-rectangle-12345... done
- Replace
postgresql-rectangle-12345with the name of your Postgres database. - Replace
example-appwith the name of your app.
Track the enablement progress with heroku data:mtls DATABASE_NAME --app APP_NAME. The command shows the status of the mTLS feature for the database and its corresponding certificates:
$ heroku data:mtls postgresql-rectangle-12345 -a example-app
TLS-status: Provisioning
addon:      postgresql-rectangle-12345
app:        example-app

Certificates

 ID                                   Created At                Status
 ──────────────────────────────────── ───────────────────────── ───────
 4bb38419-a368-475f-ac9a-cf2b1b53b31a 2026-05-05 12:37:01 +0000 pending
It typically takes 5–10 minutes to enable Mutual TLS. When enabled, the TLS status for your database becomes Operational.
Step 3: Allowlist External IPs
Create one or more IP rules to allow external traffic from those IP blocks or ranges to reach your database. You can allowlist a hard limit of 60 IP blocks for each Heroku Postgres database. Run heroku data:mtls:ip-rules:create to create an IP rule:
$ heroku data:mtls:ip-rules:create postgresql-rectangle-12345 --app example-app \
  --cidr "1.2.3.4/32" \
  --description "My Office IP"

Creating IP Rule for database postgresql-rectangle-12345... done
cidr:        1.2.3.4/32
created_at:  2026-05-05 12:43:33 +0000
description: My Office IP
id:          38c466b6-dcfb-4869-b5ac-40420b786fb4
status:      Authorizing
updated_at:  2026-05-05 12:43:33 +0000
- Replace
postgresql-rectangle-12345with the name of your Postgres database. - Replace
example-appwith your the name of your app. - Replace
1.2.3.4/32with the IP range you want to allowlist, in Classless Inter-Domain Routing (CIDR) notation. An individual IP address is represented asx.x.x.x/32wherexcan be any number between 0 and 255 (inclusive). - Replace
My Office IPwith a readable description of this allowlisted CIDR block.
Track the progress of the IP rule creation with heroku data:mtls:ip-rules:
$ heroku data:mtls:ip-rules postgresql-rectangle-12345 -a example-app
 ID                                   CIDR       Description  Created At                Status
 ──────────────────────────────────── ────────── ──────────── ───────────────────────── ───────────
 38c466b6-dcfb-4869-b5ac-40420b786fb4 1.2.3.4/32 My Office IP 2026-05-05 12:46:09 +0000 Authorizing
Alternatively, run heroku data:mtls:ip-rules:get to obtain the details of a specific IP rule, providing the IP rule ID with the --id option:
$ heroku data:mtls:ip-rules:get postgresql-rectangle-12345 --id "38c466b6-dcfb-4869-b5ac-40420b786fb4" --app example-app

cidr:        1.2.3.4/32
created_at:  2026-05-05 12:43:33 +0000
description: My Office IP
id:          38c466b6-dcfb-4869-b5ac-40420b786fb4
status:      Authorized
updated_at:  2026-05-05 12:44:33 +0000
It usually takes a few minutes to create an IP rule.
You can list all the IP addresses allowlisted for your Heroku Postgres database with heroku data:mtls:ip-rules DATABASE_NAME --app APP_NAME.
Downloading Client-Side Certificates
View all client-side certificates for your Heroku Postgres database with heroku data:mtls:certificates:
$ heroku data:mtls:certificates postgresql-rectangle-12345 --app example-app
 ID                                   Created At                Status
 ──────────────────────────────────── ───────────────────────── ──────
61acf66f-e505-452c-a517-e727689fb54f 2026-05-05 12:37:01 +0000 ready
- Replace
postgresql-rectangle-12345with the name of your Postgres database. - Replace
example-appwith the name of your app.
Download the certificates needed to configure your client to access your Heroku Postgres database with heroku data:mtls:certificates:download:
$ heroku data:mtls:certificates:download postgresql-rectangle-12345 \
--id "61acf66f-e505-452c-a517-e727689fb54f" \
--prefix "demo_" \
--dir "./folder" \
--app example-app

Downloading certificates for database postgresql-rectangle-12345... done
your certs are now located in ./folder
- Replace
postgresql-rectangle-12345with the name of your Postgres database. - Replace
example-appwith the name of your app. - Replace
"61acf66f-e505-452c-a517-e727689fb54f"with theidof the certificate to download. - Replace
"demo_"with a prefix to put in front of the names of the downloaded files. - Replace
"./folder"with the directory to download files to. This value defaults to$HOME/.postgresql.
This command downloads the following files into the provided directory:
- Client certificate with chain:
PREFIXpostgresql.crt(in our example,demo_postgresql.crt) - Client private key:
PREFIXpostgresql.key(in our example,demo_postgresql.key) - Server certificate chain:
PREFIXroot.crt(in our example,demo_root.crt)
Set appropriate permissions for your private key. For the key downloaded in our example, set permissions with:
$ chmod 0600 ./folder/demo_postgresql.key
Postgres automatically detects and uses any postgresql.crt, postgresql.key and root.crt files in the user’s home directory. We recommend providing a prefix when downloading your certificates to help identify those certificates and avoid conflicts when connecting to other databases.
Downloading your database’s certificates with their default filenames causes your local Postgres client to use them by default and it can interfere with other Heroku CLI operations or any other attempts to connect to a different database.
Connecting to Your Database From an External Resource
With mTLS enabled, your external apps or clients can access your Heroku Postgres database when they connect from an allowlisted IP address. These connections must provide a valid client certificate and use sslmode=verify-ca.
The specifics of your connection configuration vary depending on the database client you use. Use your database’s connection string and set the following connection parameters to configure your Postgres client to connect to your database using mTLS:
sslcert: path to the downloaded client certificate (DIRECTORY/PREFIXpostgresql.crt)sslkey: path to the downloaded client private key (DIRECTORY/PREFIXpostgresql.key)sslrootcert: path to the downloaded server certificate chain (DIRECTORY/PREFIXroot.crt)sslmode:verify-ca
For example, to connect to a Heroku Postgres database with psql:
$ psql "${DATABASE_URL}?sslmode=verify-ca&sslcert=DIRECTORY/PREFIXpostgresql.crt&sslkey=DIRECTORY/PREFIXpostgresql.key&sslrootcert=DIRECTORY/PREFIXroot.crt"

psql (17.2 (Postgres.app), server 16.13 (Ubuntu 16.13-1.pgdg20.04+heroku2))
SSL connection (protocol: TLSv1.3, cipher: TLS_AES_256_GCM_SHA384, compression: off, ALPN: none)
Type "help" for help.

DATABASE=>
Alternatively, instead of specifying these SSL parameters for every connection, you can set the related environment variables on your system:
$ export DATABASE_URL=`heroku config:get DATABASE_CONFIG_VAR -a APP_NAME`
$ export PGSSLCERT=DIRECTORY/PREFIXpostgresql.crt
$ export PGSSLKEY=DIRECTORY/PREFIXpostgresql.key
$ export PGSSLROOTCERT=DIRECTORY/PREFIXroot.crt
- Replace
DATABASE_CONFIG_VARwith the config var containing the URL of your Heroku Postgres database (for example,DATABASE_URL,HEROKU_POSTGRESQL_CRIMSON_URL). - Replace
APP_NAMEwith your app’s name. - Replace
DIRECTORYwith the directory you downloaded the files to in the previous step. - Replace
PREFIXwith the prefix you put in front of the names of the downloaded files in the previous step.
It’s not necessary to set the PGSSLCERT, PGSSLKEY, and PGSSLROOTCERT config variables if you downloaded your files to the default directory without setting any prefix.
Client Certificate Renewal
A client certificate has an expiration date of 13 months after its creation date. 75 days before the expiration date, the following occurs:
- Heroku creates a new client certificate for you.
- Heroku sends an email to you about the pending expiration of your current certificate. The contents of the email includes details about your new certificate and how to begin using it.
After creating a new certificate, it’s recommended you begin using it before the current certificate expires and no longer works.
Configuring External Applications to Connect via mTLS
When configuring other apps to connect to your database via mTLS, we recommend referring to the documentation for that app or client to adapt to its specific requirements.
For example, apps that use the JDBC PostgreSQL connector require that the database connection string contains the sslcert, sslkey, sslroot and sslmode parameters, and a private key in either the PKCS-12 or PKCS-8 DER format.
The private key provided by the data:mtls:certificates:download command is in a PEM format. You can convert this key to DER format with openssl:
$ openssl pkcs8 -topk8 -inform PEM -in postgresql.key -outform DER -out postgresql.pk8 -nocrypt
Then, set appropriate permissions on the new key file:
$ chmod 0600 postgresql.pk8
See the official PostgreSQL documentation for more details on constructing JDBC connection URLs.
Revoking IP Rules
Delete an existing IP Rule from the Mutual TLS allowlist for your database with the heroku data:mtls:ip-rules:delete command. Specify the IP rule to delete with --id or --cidr options:
$ heroku data:mtls:ip-rules:delete postgresql-rectangle-12345 --id 38c466b6-dcfb-4869-b5ac-40420b786fb4 -a example-app
Deleting IP Rule for postgresql-rectangle-12345... done

$ heroku data:mtls:ip-rules:delete postgresql-rectangle-12345 --cidr 1.2.3.4/32 -a example-app
Deleting IP Rule for postgresql-rectangle-12345... done
Disabling Mutual TLS
Disable Mutual TLS with the heroku data:mtls:destroy command:
$ heroku data:mtls:destroy postgresql-rectangle-12345 -a example-app
Disabling MTLS on postgresql-rectangle-12345... done
Configuring Mutual TLS via the Dashboard
Alternatively, you can also enable mTLS and adjust allowed IPs for a Private or Shield Postgres database from the Heroku Dashboard. From the dashboard, select a Heroku Postgres database and then go to the Settings tab. To configure mTLS, click Show Configuration next to Secure External Database Access.

mTLS CLI Plugin
See the full documentation of the mTLS CLI plugin.
Limitations and Caveats
- mTLS isn’t compatible with connection pooling.
- When used with Trusted IPs for Data Services, mTLS IP rules and requirements take precedence over any overlapping rules specified in the Trusted IPs allowlist. Connections received from IP addresses allowlisted in both mTLS and Trusted IPs must provide a valid client certificate.