Deep-dive on the Next Gen Platform. Join the Webinar!

Skip Navigation
Show nav
Dev Center
  • Get Started
  • Documentation
  • Changelog
  • Search
  • Get Started
    • Node.js
    • Ruby on Rails
    • Ruby
    • Python
    • Java
    • PHP
    • Go
    • Scala
    • Clojure
    • .NET
  • Documentation
  • Changelog
  • More
    Additional Resources
    • Home
    • Elements
    • Products
    • Pricing
    • Careers
    • Help
    • Status
    • Events
    • Podcasts
    • Compliance Center
    Heroku Blog

    Heroku Blog

    Find out what's new with Heroku on our blog.

    Visit Blog
  • Log inorSign up
Hide categories

Categories

  • Heroku Architecture
    • Compute (Dynos)
      • Dyno Management
      • Dyno Concepts
      • Dyno Behavior
      • Dyno Reference
      • Dyno Troubleshooting
    • Stacks (operating system images)
    • Networking & DNS
    • Platform Policies
    • Platform Principles
  • Developer Tools
    • Command Line
    • Heroku VS Code Extension
  • Deployment
    • Deploying with Git
    • Deploying with Docker
    • Deployment Integrations
  • Continuous Delivery & Integration (Heroku Flow)
    • Continuous Integration
  • Language Support
    • Node.js
      • Node.js Behavior in Heroku
      • Working with Node.js
      • Troubleshooting Node.js Apps
    • Ruby
      • Rails Support
      • Working with Bundler
      • Working with Ruby
      • Ruby Behavior in Heroku
      • Troubleshooting Ruby Apps
    • Python
      • Working with Python
      • Background Jobs in Python
      • Python Behavior in Heroku
      • Working with Django
    • Java
      • Java Behavior in Heroku
      • Working with Java
      • Working with Maven
      • Working with Spring Boot
      • Troubleshooting Java Apps
    • PHP
      • Working with PHP
      • PHP Behavior in Heroku
    • Go
      • Go Dependency Management
    • Scala
    • Clojure
    • .NET
      • Working with .NET
  • Databases & Data Management
    • Heroku Postgres
      • Postgres Basics
      • Postgres Getting Started
      • Postgres Performance
      • Postgres Data Transfer & Preservation
      • Postgres Availability
      • Postgres Special Topics
      • Migrating to Heroku Postgres
    • Heroku Key-Value Store
    • Apache Kafka on Heroku
    • Other Data Stores
  • AI
    • Working with AI
    • Heroku Inference
      • AI Models
      • Inference Essentials
      • Inference API
      • Quick Start Guides
  • Monitoring & Metrics
    • Logging
  • App Performance
  • Add-ons
    • All Add-ons
  • Collaboration
  • Security
    • App Security
    • Identities & Authentication
      • Single Sign-on (SSO)
    • Private Spaces
      • Infrastructure Networking
    • Compliance
  • Heroku Enterprise
    • Enterprise Accounts
    • Enterprise Teams
    • Heroku Connect (Salesforce sync)
      • Heroku Connect Administration
      • Heroku Connect Reference
      • Heroku Connect Troubleshooting
  • Patterns & Best Practices
  • Extending Heroku
    • Platform API
    • App Webhooks
    • Heroku Labs
    • Building Add-ons
      • Add-on Development Tasks
      • Add-on APIs
      • Add-on Guidelines & Requirements
    • Building CLI Plugins
    • Developing Buildpacks
    • Dev Center
  • Accounts & Billing
  • Troubleshooting & Support
  • Integrating with Salesforce
  • Add-ons
  • Managing Add-ons

Managing Add-ons

English — 日本語に切り替える

Last updated April 21, 2025

Table of Contents

  • Using the command line interface
  • Using the dashboard

You can manage your add-ons either through the command line interface or through the Heroku Dashboard web interface.

Using the command line interface

You can view your current add-ons within an app with the heroku addons command.

$ heroku addons
newrelic:wayne
heroku-postgresql:essential-0

Creating an add-on

Previously to add an add-on you could use the command addons:add. That command is now deprecated in favor of the create command.

$ heroku addons:create newrelic:wayne
Adding newrelic:wayne on myapp...done, v27 (free)
Use `heroku addons:docs newrelic:wayne` to view documentation

You can specify the globally unique name using the --name flag. You can also specify the key your add-on is attached to using the --as flag.

Attaching an add-on to another app

You can attach certain add-ons to another app. When you attach an add-on it maintains a reference back to the original add-on provisioned on the initial app. The add-on must already exist on another app. In this case, the add-on’s fully qualified name is postgresql-rectangular-1234 and we are attaching it to an app named example-app. We also give it an alias of ATTACHED_DB using the --as flag:

$ heroku addons:attach postgresql-rectangular-1234 -a example-app --as ATTACHED_DB
Attaching postgresql-rectangular-1234 to example-app... done
Setting ATTACHED_DB vars and restarting example-app... done, v81

You can attach the same add-on to a maximum of 100 different apps.

Detaching an add-on from another app

You can also detach add-ons if you previously attached them to an app.

$ heroku addons:detach ATTACHED_DB -a example-app
Detaching ATTACHED_DB to example-app... done
Unsetting ATTACHED_DB config vars and restarting example-app... done, v82

Destroying an add-on

Previously to destroy an add-on you could use the command addons:remove. That command is now deprecated in favor of the destroy command.

$ heroku addons:destroy postgresql-rectangular-1234
Removing postgresql-rectangular-1234 from myapp...done, v27 ($5/month)

Upgrade an add-on

$ heroku addons:upgrade newrelic:hawke
Upgrading newrelic:hawke to myapp... done, v28 ($0.06/dyno/hr)
Use `heroku addons:docs newrelic:hawke` to view documentation

Downgrade an add-on

$ heroku addons:downgrade newrelic:wayne
Downgrading to newrelic:wayne on myapp... done, v27 (free)
Use `heroku addons:docs newrelic:wayne` to view documentation.

Open an add-on dashboard

$ heroku addons:open newrelic
Opening newrelic:hawke for myapp.

Using the dashboard

List add-ons

To see the add-ons provisioned and attached to an application, visit Heroku Dashboard and click on the name of the app or click the Resources tab when viewing an app.

Add an add-on

Visit the add-on catalog to find and install add-ons.

Remove, upgrade, or downgrade an add-on

Open the Heroku Dashboard. On the app’s Resources tab, scroll down to the Add-ons section. On the rightmost side of the add-on listing, click the actions button (three vertically-stacked dots) to open the menu. From this menu, you can remove, upgrade, or downgrade the add-on.

Edit add-on resources

Additional add-on actions may be possible in this menu as well, such as the back-up functionality provided by Heroku Postgres:
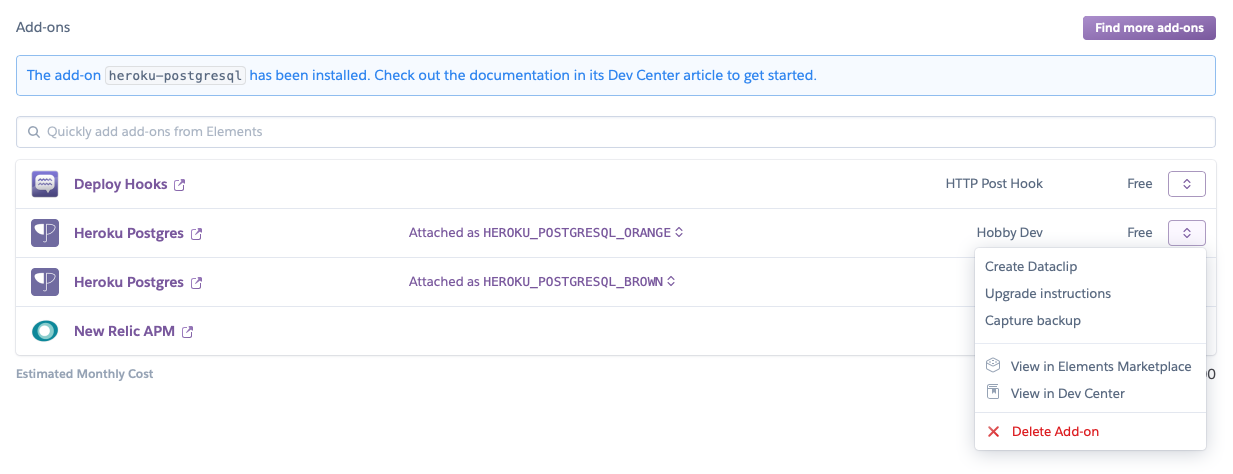
Add-on actions in menu

Attaching an add-on to another app

If an add-on has implemented support for sharing across apps, you can attach that add-on to another app. This can be done in its attachments menu:
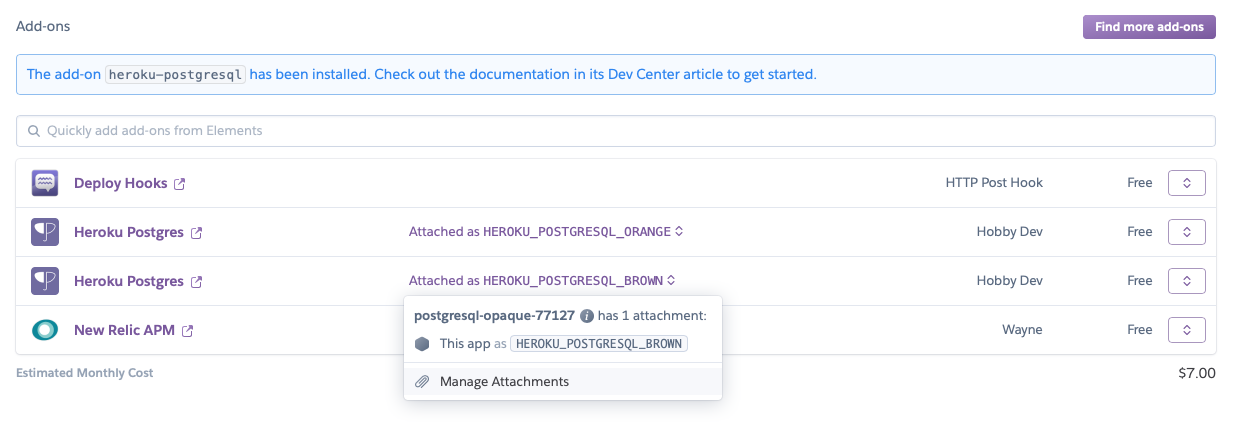
Attachment actions in menu

This can also be done through the command line interface by using the heroku addons:attach command.

Configure an add-on

Open the Heroku Dashboard. From the app’s Resources tab, find the add-on resource you want to configure and click on the name. This will take you to a configuration page that allows you to change the settings for the add-on.

Keep reading

  • Add-ons

Feedback

Log in to submit feedback.

Sending Email from Your App Sending Email from Your App

Information & Support

  • Getting Started
  • Documentation
  • Changelog
  • Compliance Center
  • Training & Education
  • Blog
  • Support Channels
  • Status

Language Reference

  • Node.js
  • Ruby
  • Java
  • PHP
  • Python
  • Go
  • Scala
  • Clojure
  • .NET

Other Resources

  • Careers
  • Elements
  • Products
  • Pricing
  • RSS
    • Dev Center Articles
    • Dev Center Changelog
    • Heroku Blog
    • Heroku News Blog
    • Heroku Engineering Blog
  • Twitter
    • Dev Center Articles
    • Dev Center Changelog
    • Heroku
    • Heroku Status
  • Github
  • LinkedIn
  • © 2025 Salesforce, Inc. All rights reserved. Various trademarks held by their respective owners. Salesforce Tower, 415 Mission Street, 3rd Floor, San Francisco, CA 94105, United States
  • heroku.com
  • Legal
  • Terms of Service
  • Privacy Information
  • Responsible Disclosure
  • Trust
  • Contact
  • Cookie Preferences
  • Your Privacy Choices