Last updated May 22, 2023
The Datenator add-on is currently in beta.
Datenator is an add-on that lets you sync data in your Salesforce org with a supported relational database. You can select what data to sync and the sync direction. All detected changes are propagated into the other system within the configured polling interval and the add-on resolves any possible conflicts.
Datenator provides a clear management console where you can configure the sync in one place. For the add-on to sync data, you must specify the Salesforce org and the supported relational database settings.
Datenator supports the following relational databases:
- Postgres 9.6+
- MariaDB 5.5.3+
- MySQL 5.7+
If you need a database that’s not supported or a specific version, contact Datenator’s support team to discuss and influence our roadmap.
Provisioning the Add-on
Attach Datenator to a Heroku application via the CLI:
Reference the Datenator Elements Page for a list of available plans and regions.
$ heroku addons:create perfect-sync-tool
Creating perfect-sync-tool on example-app... free
Your add-on has been provisioned successfully
After installing Datenator, the application is fully configured to integrate with the add-on.
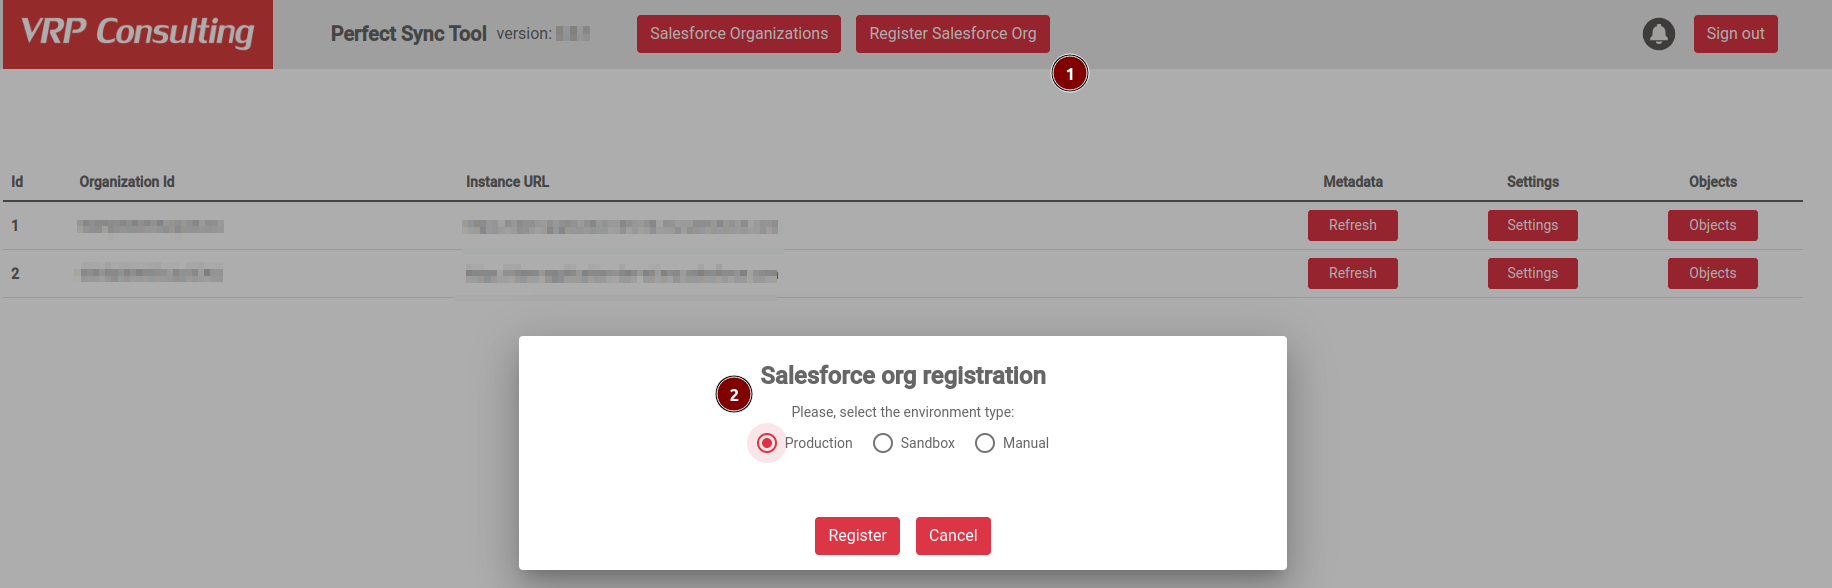
Registering a Salesforce Org
After you provision the add-on, you can register your Salesforce org in Datenator by authorizing the org. On the main Datenator page:
- Select
Register Salesforce org. - Select your org type or provide a custom domain.
- Click
Register.
In the opened window:
- Enter the Salesforce org credentials.
- Click
Log In.
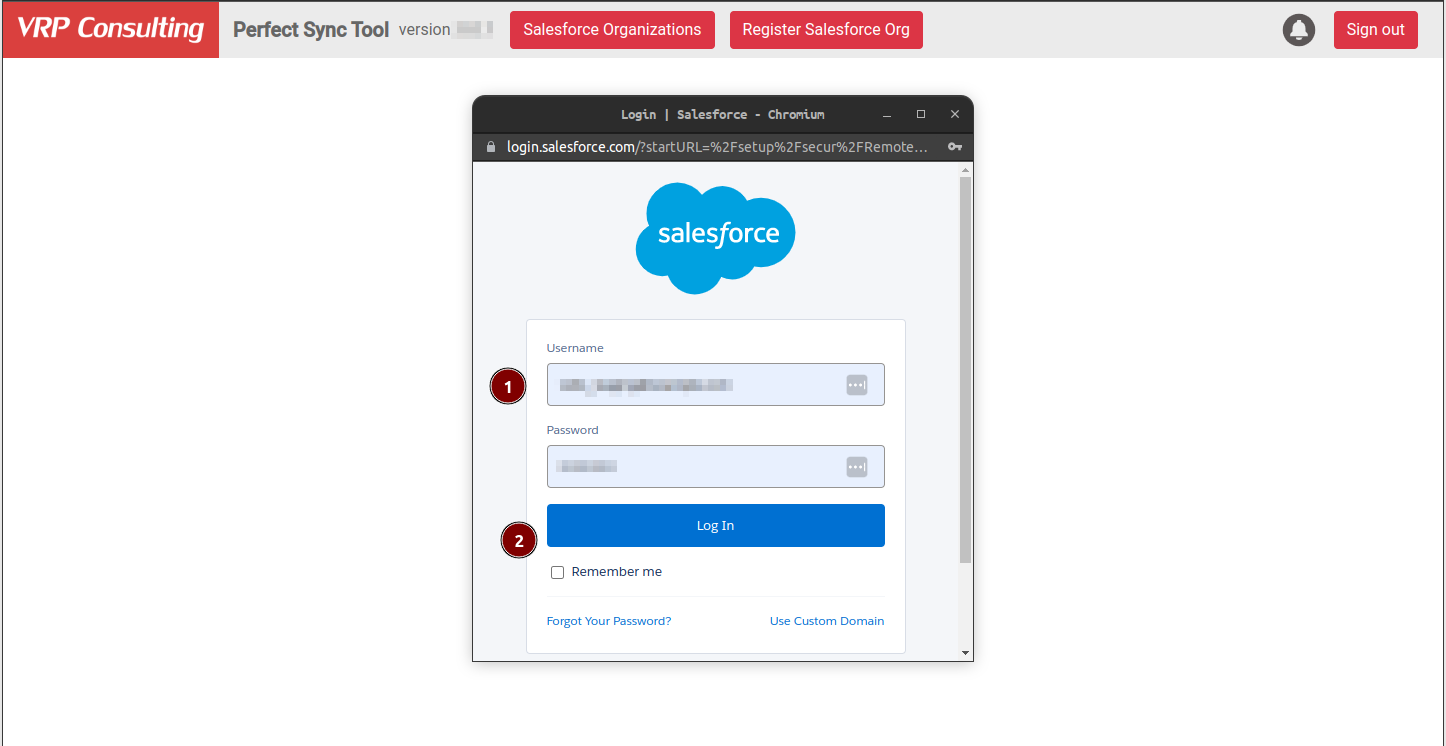
- Click
Allowto grant the requested permissions on your Salesforce org for the add-on. - Click
Closeon the success dialog window.
A newly registered org now appears on the main Datenator page. If one doesn’t appear, click the Refresh page button.
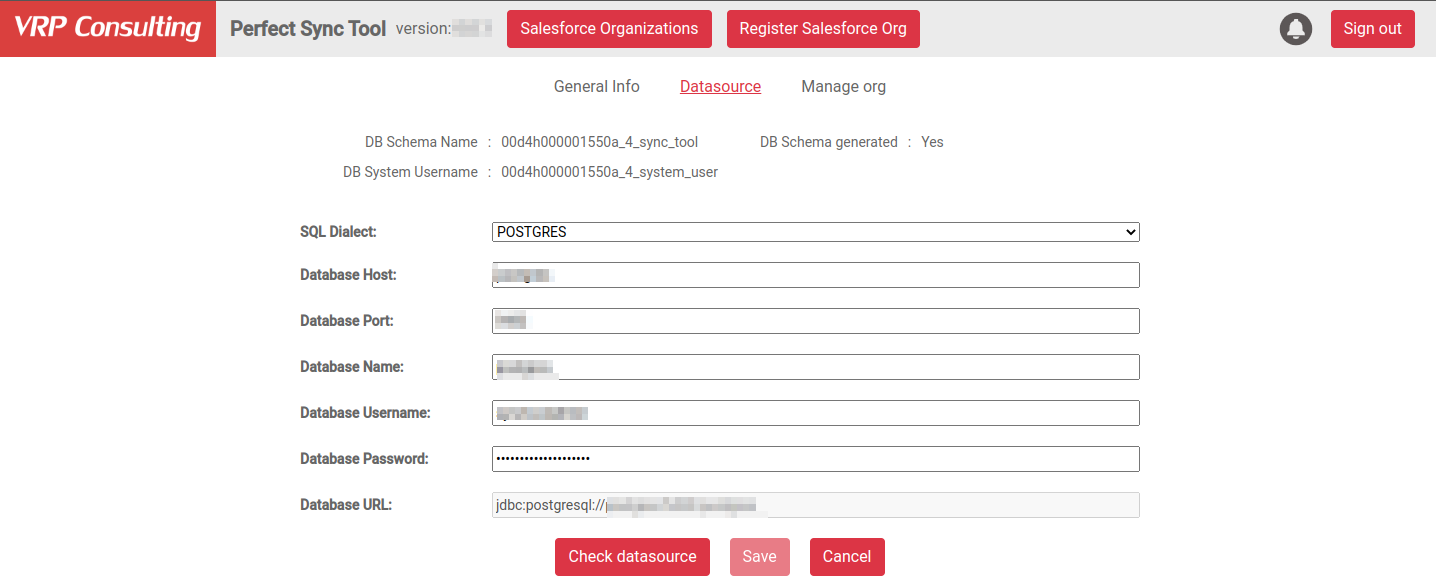
Provide Database Credentials
After you register your org in Datenator, click the Settings button of the registered org. Then in the Datasource tab, specify the details of the database you want to use for the sync.

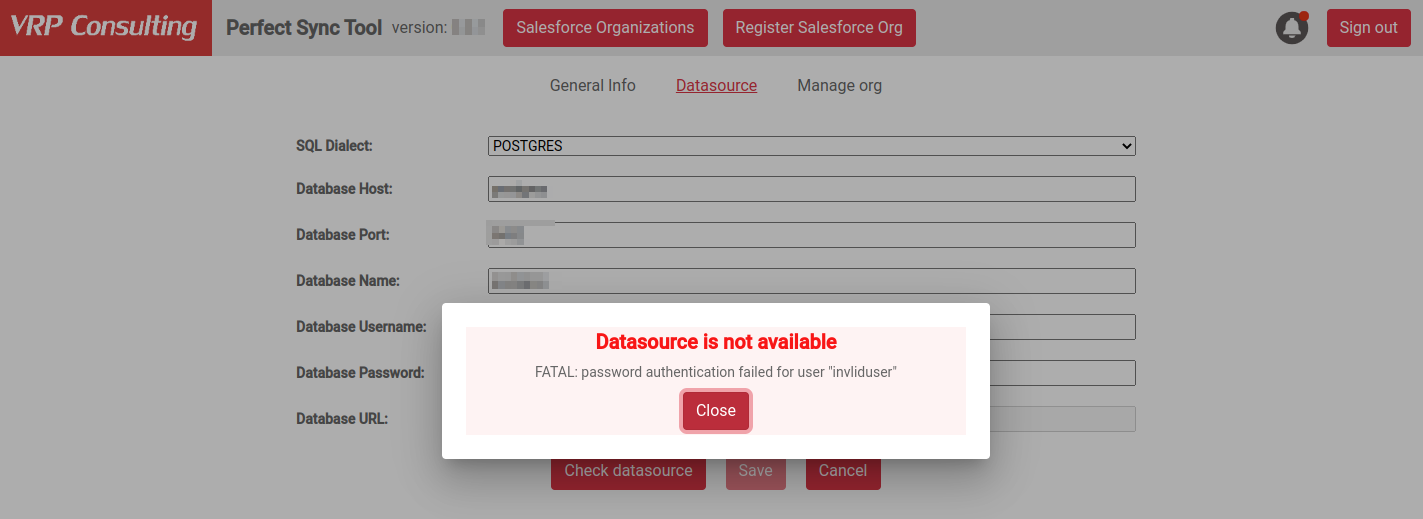
To validate the provided credentials and settings, click the Check datasource button. If all the settings are correct and the add-on establishes a connection to your database instance, you get a success message:
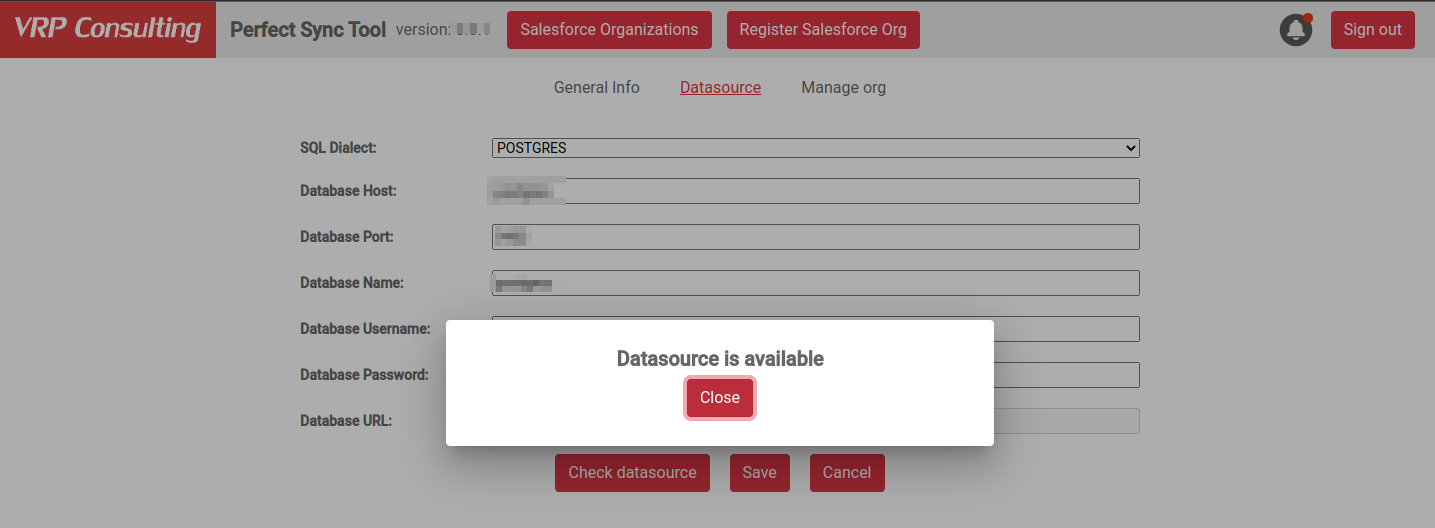
Click Save after the datasource passes the validation.
If the validation was unsuccessful, you get an error of the failed configuration. Correct the provided settings or database configuration and try again.
After you configure the database, a database schema and a database system user are created in this database. Datenator uses this user and schema to track changes and perform the sync.
Don’t use the database system user for any other application.
To check that the creation of the database schema was successful, click the Settings button of the registered org and check the DB Schema generated field. If the creation was successful, you see a Yes. Otherwise, you see a message describing a failure.
All new tables for the synchronization are created inside this newly created schema.
Salesforce Org Metadata
Before you can start syncing data, you must download the Salesforce org metadata. Click the Download button in the Metadata column of the registered org on the main Datenator page.
If you changed the org metadata for an existing configuration, click the Update button so Datenator has the same metadata. Otherwise, you can’t sync all the objects and fields or it could lead to unexpected errors.
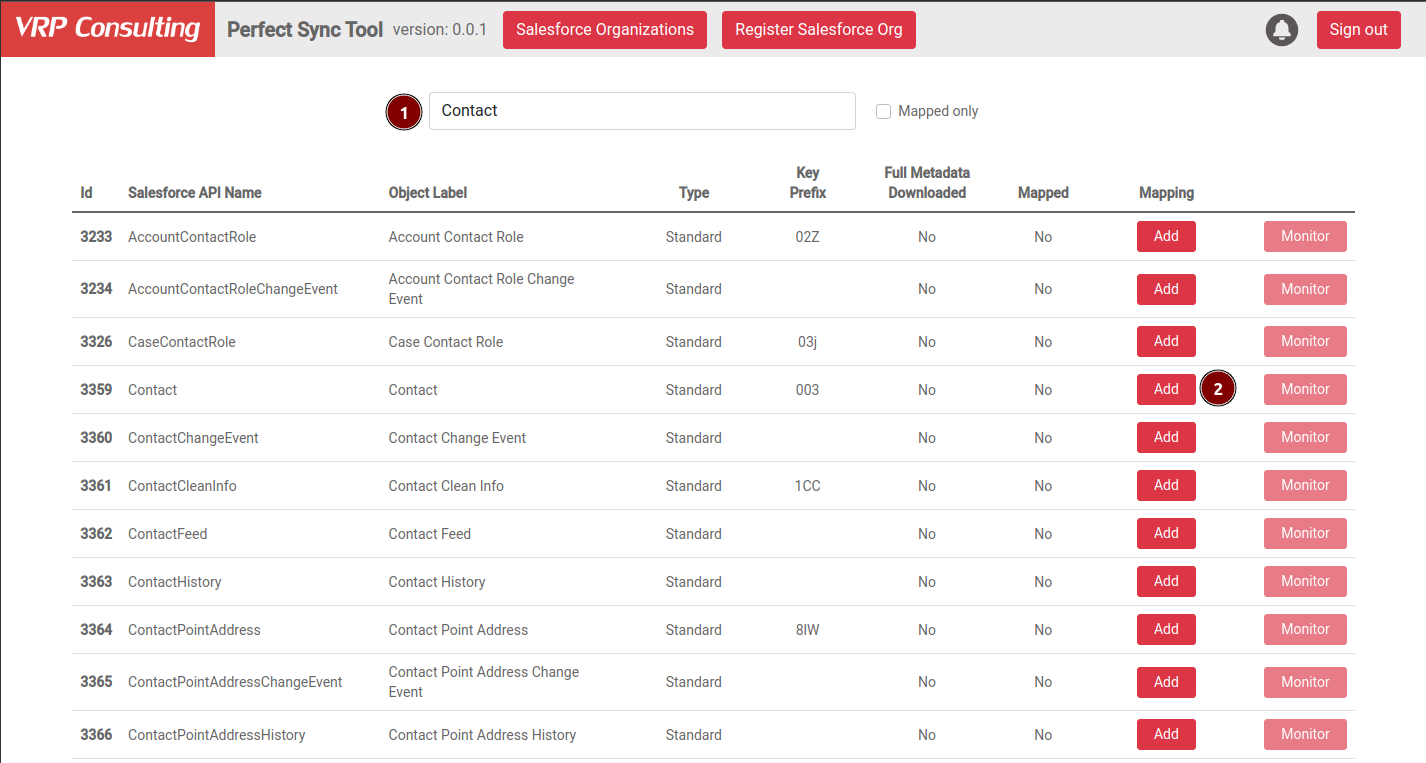
Configuring Sync
After you download the org metadata and configure the database settings, click the Objects button of the registered org on the main Datenator page to view the available Salesforce objects. On the Objects page:
- Use the filter to find the objects you need.
- Click
Addto create a mapping for this object.
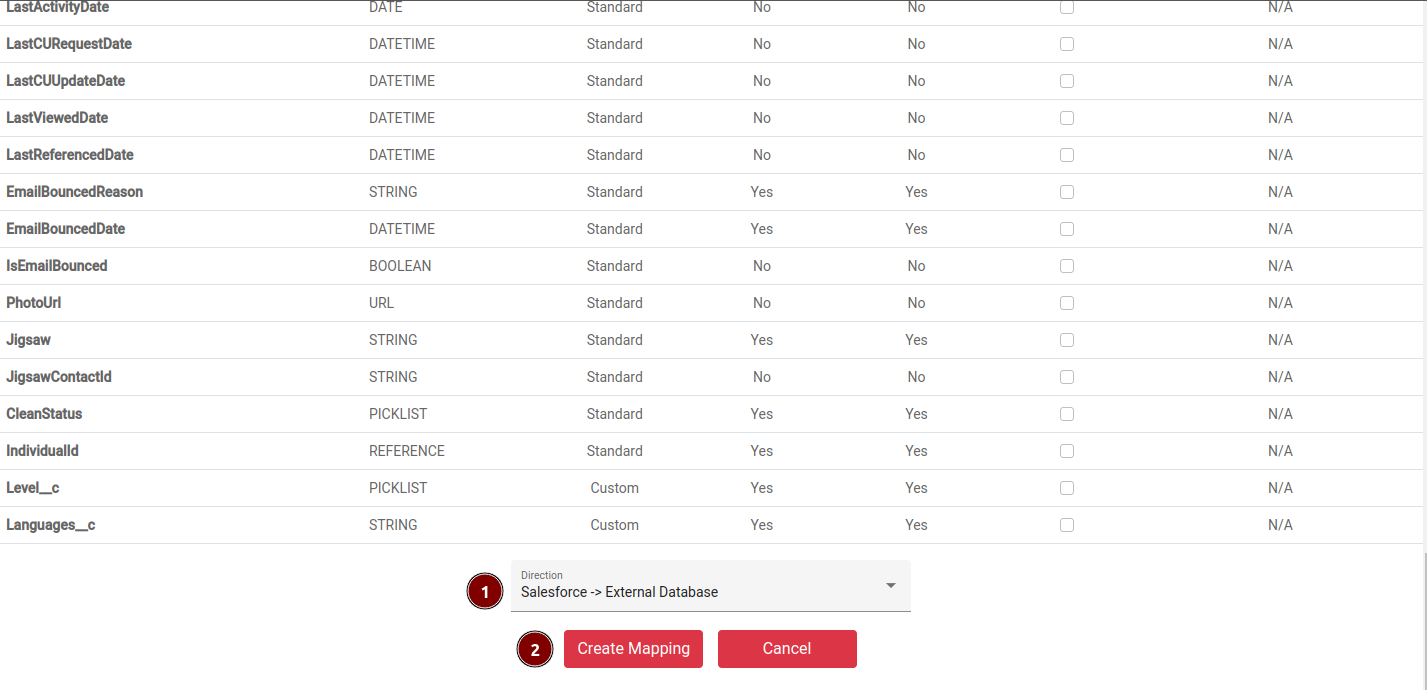
In the mapping configuration for the object:
- Select the necessary fields you want to synchronize and select the synchronization direction (Salesforce to Database, Database to Salesforce, Bidirectional).
- Save all changes by clicking
Create Mapping.
Some fields are required and can’t be deselected.
When you save the mapping, two new database tables are created: the main data table for synchronized records and the system events table for tracking record changes. In addition, triggers for the data table are created to fill in the events table later.
To check that the creation of the database schema was successful, click Objects again of the registered org. Find the created object mapping, and click Update. If DB Objects Generated shows Yes, then the system created the required tables and triggers successfully.
In the Object Mapping Information section, you see the mapping configuration for the object.
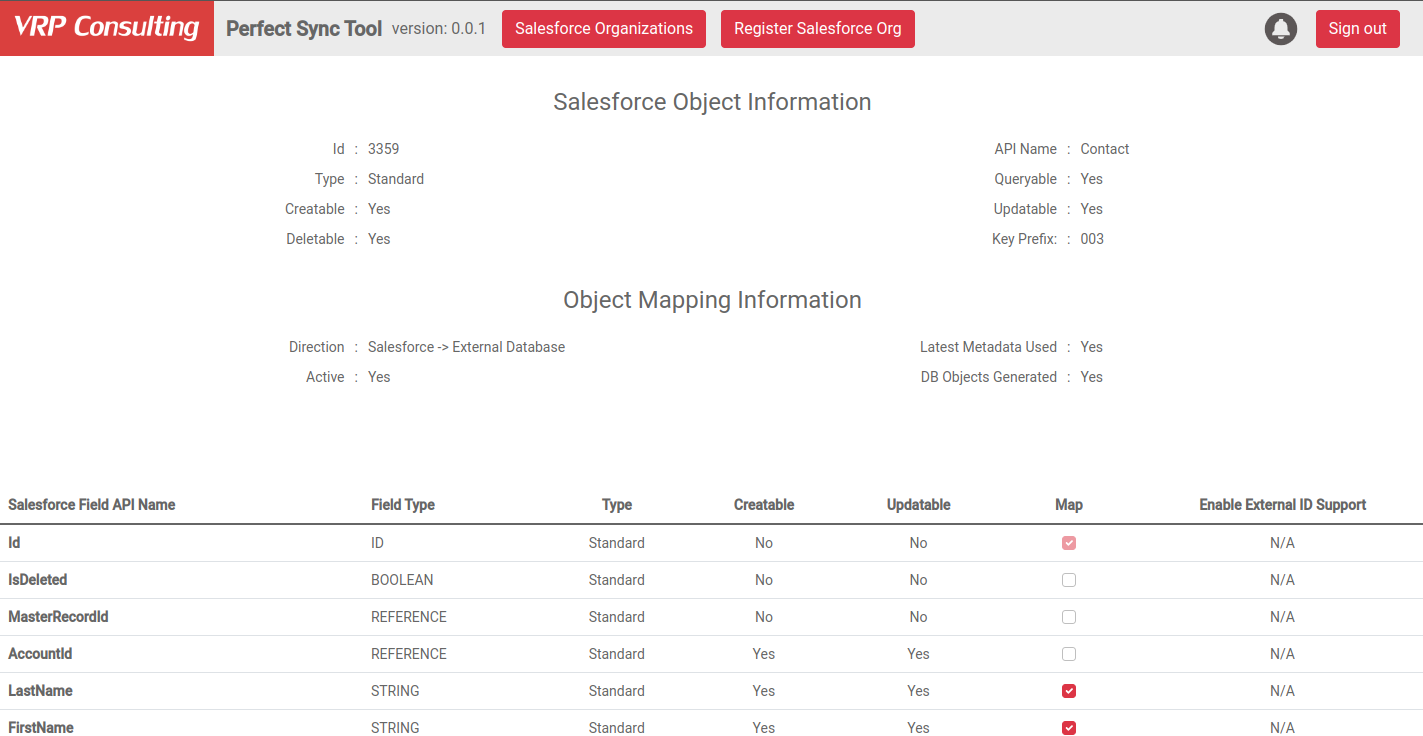
Be careful when updating the mapping configuration. These changes propagate to the underlying database table schema, so data loss is possible.
Additional Org Configuration
On the settings page for the org, go to the Manage org tab. Here you can find additional settings for the org:
- Configure polling frequency: allows you to control maximum lag between your Salesforce org and relational database.
- Refresh org credentials: perform authorization steps again to grant a new refresh token for the add-on.
- Run Salesforce org schema check: verify that no additional changes were made to Salesforce metadata that could break the sync.
- Delete org: delete all the information related to this org from the add-on and remove the schema from the target database.
- Enable/Disable synchronization: you can temporarily disable synchronization without configuration loss. When it’s enabled, all the changes that happened when the sync was disabled are propagated.
If you want to keep a copy of your data, create a backup or copy the automatically generated schema before deleting the org from Datenator.
Additionally, you can find your org API limits usage at the top of the page.
Migrating Between Plans
Application owners must carefully manage the migration timing to ensure proper application function during the migration process.
Use the heroku addons:upgrade command to migrate to a new plan.
$ heroku addons:upgrade perfect-sync-tool:newplan
-----> Upgrading perfect-sync-tool:newplan to example-app.. done, v18 ($49/mo)
       Your plan has been updated to: perfect-sync-tool:newplan
Removing the Add-on
Remove Datenator via the CLI:
This action destroys all associated data and you can’t undo it!
All metadata, mapping information, and sync configuration are wiped too.
$ heroku addons:destroy perfect-sync-tool
-----> Removing perfect-sync-tool from example-app... done, v20 (free)
Removing the add-on from the Heroku application doesn’t remove anything from your Salesforce org. It does remove the automatically generated schema and generated system user from your relational database.
If you want to keep a copy of your data, create a backup or copy the automatically generated schema before deleting Datenator from your Heroku app.
Add-on Implementation Details
Datenator works with 2 sources: a relational database and a Salesforce org.
Salesforce Org
For a Salesforce org, it’s common to use REST or SOAP API to work with the data. Datenator has an internal mechanism to switch between API types based on data volumes for syncing. If there are only a few record updates on the Salesforce org, then Datenator uses REST API. You can find your org’s API limits usage in the Settings page of the registered org in Datenator.
Relational Database
For relational databases, there’s more complex logic involved with data changes. First of all, Datenator creates tables in the relational database based on mapping configurations. It creates a trigger for the data table to capture all changes to the table along with the user who changed it. To properly detect and record changes, Datenator creates their user in the schema. That means you must grant the required permissions for the user specified in the database settings for the org.
All changes in the data table are recorded in a separate events table created for each data table. In the events table, Datenator records all the changes and processes them on the predefined schedule. You can configure this schedule using the Polling Interval setting for the org.
Support
Submit all Datenator support and runtime issues via one of the Heroku Support channels. You can add product_support@vrpconsulting.com in the copy for urgent issues. Any non-support-related issues or product feedback are welcome at product_support@vrpconsulting.com.