Table of Contents [expand]
Last updated October 06, 2023
This add-on is operated by Probe.ly Solucoes de Ciberseguranca SA
Developer-friendly automated Web Application and API vulnerability scanner
Probely is a vulnerability scanner add-on that automates your security testing.
Probely performs continuous scanning of your web applications and APIs and lets you efficiently manage the lifecycle of the vulnerabilities it finds. It also provides guidance on how to fix any identified vulnerabilities (including snippets of code or configuration).
Because it is a developer-centric product, Probely’s vulnerability guidance is tailored to developers and relevant to the technologies you use. With Probely, you can with different scanning profiles. This means that you can scan your testing environment with more aggressive and intrusive scans, and you can run safer scans against your production app. Integrations for Slack and Jira are also available.
In addition to its web interface, Probely provides all features through an API. By using it, developers can fully integrate their security testing with their CI/CD pipelines. To learn more about using the API, visit the Probely developers page.
Plans
There are two plans available:
Pro Plan
- Scan your entire web app (once per week)
- Scan behind Login
- Customized headers and cookies
- Coverage report
- Integrations with Slack, Jira, CI/CD tools and others
- Get compliance & security reports
- Scan single-page apps
- Unlimited scans
API Pro Plan
- All Pro features
- Ability to specify an OpenAPI/Swagger schema or Postman Collection: Probely will scan the endpoints defined in that schema file.
Provisioning the add-on
Probely can be attached to a Heroku application via the CLI:
A list of all plans available can be found here.
$ heroku addons:create probely
-----> Adding probely to sharp-mountain-4005... done, v18 (free)
Dashboard
For more information on the features available within the Probely dashboard, please see the docs at Probely’s help site.
The Probely dashboard allows you to access essential stats and information about the security of your target, configure settings, view detailed results and findings, manage vulnerabilities, and start or schedule scans.
The dashboard gives you an overview of your target’s security status. There are 6 different sections of the dashboard that will help you oversee your security testing process with Probely:
- Risk trend
- Average time to fix
- Severity trend
- Top 5 vulnerabilities
- Next scheduled scans
- Previous scans
Sections that aren’t self-explanatory are covered in more detail below.
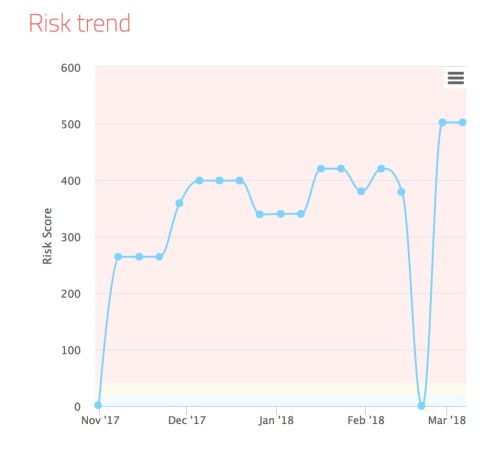
Risk trend
This section displays a graph that shows the change in your risk score over time. The risk score is a value that is calculated from the number of active vulnerabilities, their types, and their severity. This value is most useful for performing comparisons between different periods of time. This way, you’ll have an overall idea of how your current risk level compares to previous periods.
Average time to fix
This section indicates how much time you take, on average, to fix a certain type of vulnerability. This helps you understand when you have high-severity vulnerabilities that remain open for a long time.
Severity trend
Probely divides vulnerabilities into 3 different severity categories based on a combination of:
- The damage they might cause if exploited
- Their chance of being exploited
- Their difficulty to exploit (low, medium, or high)
The severity trend shows the change in the number of vulnerabilities from each category over time. A good first priority is to reduce the red line (high severity) to zero, and then work your way to fixing the remaining vulnerabilities from there.
Settings
The settings on Probely’s dashboard can be used to configure Probely in a way that works best for you and your website. You can use the setting to configure both scanners and integrations.
Scanner settings
Target authentication
If your app is protected by either Basic Authentication or form-based authentication, you can configure Probely to access your app with it.
For form-based authentication, you need to specify the URL of the form (it can be in a different domain than your app) and the name of the fields (attribute name) required for login, with the matching values (attribute value). Usually these are the username and password fields.
Add site to target
Here you can add extra hosts that are required by your app. This is most commonly necessary if your app is a Single Page Application (SPA) that uses an API hosted on a different domain (for instance, api.yourdomainhere).
You can add this domain to the list, and Probely’s crawler will honour any request there, triggered by your app. Probely will not scan that domain, we just use it in the spider so we can discover more content in the app.
Allow list
Here you can add relative paths that Probely’s crawler should visit even if they are not linked to.
Reject list
Here you can add absolute URLs that Probely’s crawler should NOT visit. You can use * as a wildcard.
Scan profile
A scan profile is a set of pre-defined options that affect what is scanned and how. Depending on your subscription, you can choose between the following profiles:
- Lightning
- Safe
- Normal
- Full
For API targets (plan API Pro) you scan choose between the following profiles:
- API Full
- API Normal
Each profile scans your website with a different level of thoroughness. You can learn more about the differences between scanning profiles here.
Custom Header
Set a custom header that needs to be sent in all requests. For instance, an Authorization header.
Custom cookie
Set a custom cookie that needs to be sent in all requests.
Integration settings
The Integrations tab allows you to configure integrations with Slack (available now) and Jira (coming soon), and to use the Probely API to integrate with your tools (such as CI).
To integrate the API with your tools, create a new API key by naming it and clicking the Generate new key button. You can learn more about using the API on our developers page.
You can configure Probely to notify a Slack channel when certain events occur, such as when a new scan starts or a new vulnerability is found. To do that through the dashboard, you can enter your Slack channel’s URL and choose what do you want to be notified about.
Vulnerability manager
Probely’s dashboard also includes a vulnerability manager. Use it to perform actions such as:
- Initiate a retest
- Assign a vulnerability to a user in your company
- Label a vulnerability
- Declare a vulnerability invalid or accept its associated risk
Retesting
Retesting is an easy and quick way to check if you properly fixed a specific vulnerability. After you are done fixing a vulnerability and run a retest, Probely will scan only for that specific security issue and show you if it’s properly fixed. If it is, the vulnerability automatically gets a value of fixed, and the fix is recorded in its history log.
Assign to a user
If you use Probely as part of a team, this action is extremely useful for tracking responsibility. You can assign vulnerabilities to a specific user in your company, which will help you organize your work better as a team. Simply go under the Action section of a vulnerability in your findings, scroll over Assign, and chose the person you would like to assign the vulnerability to.
Labeling
Using Probely, you can also label vulnerabilities. This way you will recognize vulnerabilities more easily. To label a vulnerability, go to its page (click on it in the Findings page), click Edit on the label’s tab, and write your label.
Declaring a vulnerability invalid/accepting the risk of a vulnerability
If you believe a security issue to be a false positive, or if it’s otherwise not relevant for you, you can declare it invalid. Probely will analyze the issue and try to not flag similar vulnerabilities.
Also, if a vulnerability is of low risk for you and it is not beneficial for you to fix it, you can always just accept the risk.
Filtering
In the Findings page you can filter vulnerabilities by their values or the action you’ve taken on them. You can filter them by severity, the person they are assigned to, by their current state (fixed, not fixed, accepted risk, invalid), or by the label you gave them. You can also search for vulnerabilities using the search bar right next to the filters.
A vulnerability’s page
By clicking on a certain vulnerability in the findings, you access its page. The vulnerability page provides you with a short description of the vulnerability and some other valuable information. There you can find tailored instructions on how to fix the vulnerability, the evidence that Probely found, the request that we made to expose the vulnerability, and the response of your app. That way fixing the vulnerability will be a lot easier for you since you get a full overview of the whole process. You can also add a note to yourself or your team in the activity log.
Scanning
You can run and schedule scans under the Scan section of the dashboard. There you can also see your scheduled and recent scans. For each scan, you can get the PDF report by clicking on the PDF file logo to the far right. Using the dashboard you can only schedule reoccurring scans on a monthly, weekly or daily basis. In order to schedule reoccurring scans in a more detailed time period (e.g. every 3 weeks) you can use the API.
Accessing the dashboard
You can access the dashboard via the CLI:
$ heroku addons:open probely
Opening probely for sharp-mountain-4005
or by visiting the Heroku Dashboard and selecting the application in question. Select Probely from the Add-ons menu.
Troubleshooting
In case something doesn’t work as expected, please contact Support
Removing the add-on
You can remove Probely via the CLI:
This will destroy all associated data and cannot be undone!
$ heroku addons:destroy probely
-----> Removing probely from sharp-mountain-4005... done, v20 (free)
Support
All Probely support and runtime issues should be submitted via one of the Heroku Support channels. Any non-support related issues or product feedback is welcome at hello@probely.com, or using our Intercom chat on our website.