Last updated February 12, 2025
Heroku apps include a Procfile that specifies the commands that are executed by the app on startup. You can use a Procfile to declare a variety of process types, including:
- Your app’s web server
- Multiple types of worker processes
- A singleton process, such as a clock
- Tasks to run before a new release is deployed
Each dyno in your app belongs to one of the declared process types, and it executes the startup command associated with that process type.
Learn more about the process model.
Procfile naming and location
The Procfile is always a simple text file that is named Procfile without a file extension. For example, Procfile.txt is not valid.
The Procfile must live in your app’s root directory. It does not function if placed anywhere else.
Procfile format
A Procfile declares its process types on individual lines, each with the following format:
<process type>: <command>
<process type>is an alphanumeric name for your command, such asweb,worker,urgentworker,clock, and so on.<command>indicates the command that every dyno of the process type should execute on startup, such asrake jobs: work.
The web process type
A Heroku app’s web process type is special: it’s the only process type that can receive external HTTP traffic from Heroku’s routers. If your app includes a web server, you should declare it as your app’s web process.
For example, the Procfile for a Rails web app might include the following process type:
web: bundle exec rails server -p $PORT
In this case, every web dyno executes bundle exec rails server -p $PORT, which starts up a web server.
A Clojure app’s web process type might look like this:
web: lein run -m demo.web $PORT
You can refer to your app’s config vars, most usefully $PORT, in the commands you specify.
This might be the web process type for an executable Java JAR file, such as when using Spring Boot:
web: java -jar target/myapp-1.0.0.jar
The release process type
The release process type is used to specify the command to run during your app’s release phase.
Other process types
No process types besides web and release have special properties.
For many simple apps, a single web process type can suffice. For more complex apps, and to adhere to the recommended approach of more explicitly declaring of your application’s required runtime processes, you may wish to define additional process types. For example, Rails applications are supplied with an additional process type of this sort:
worker: bundle exec rake jobs:work
Developing locally
It’s important when developing and debugging an application that the local development environment is executed in the same manner as the remote environments. This ensures that incompatibilities and hard to find bugs are caught before deploying to production and treats the application as a holistic unit instead of a series of individual commands working independently.
Use the Heroku Local command-line tool to run your app locally. For more information see the Heroku Local article.
Deploying to Heroku
A Procfile is not technically required to deploy simple apps written in most Heroku-supported languages—the platform automatically detects the language and creates a default web process type to boot the application server. However, creating an explicit Procfile is recommended for greater control and flexibility over your app.
For Heroku to use your Procfile, add the Procfile to the root directory of your application, then push to Heroku:
$ git add .
$ git commit -m "Procfile"
$ git push heroku master
...
-----> Procfile declares process types: web, worker
       Compiled slug size is 10.4MB
-----> Launching... done
       http://strong-stone-297.herokuapp.com deployed to Heroku

To git@heroku.com:strong-stone-297.git
 * [new branch]      master -> master
Use heroku ps to determine the number of dynos that are executing. The list indicates the process type in the left column, and the command corresponding to that process type in the right column:
$ heroku ps
=== web: `bundle exec rails server -p $PORT`
web.1: up for 2m
Use heroku logs to view an aggregated list of log messages from all dynos across all process types.
$ heroku logs
2011-04-26T01:24:20-07:00 heroku[slugc]: Slug compilation finished
2011-04-26T01:24:22+00:00 heroku[web.1]: Running process with command: `bundle exec rails server mongrel -p 46999`
2011-04-25T18:24:22-07:00 heroku[web.1]: State changed from created to starting
2011-04-25T18:24:29-07:00 heroku[web.1]: State changed from starting to up
2011-04-26T01:24:29+00:00 app[web.1]: => Booting Mongrel
2011-04-26T01:24:29+00:00 app[web.1]: => Rails 3.0.5 application starting in production on http://0.0.0.0:46999
2011-04-26T01:24:29+00:00 app[web.1]: => Call with -d to detach
2011-04-26T01:24:29+00:00 app[web.1]: => Ctrl-C to shutdown server
Scaling a process type
Heroku runs one web dyno for you automatically, but other process types don’t start by default. To launch a worker, you need to scale it up to one dyno:
$ heroku ps:scale worker=1
Scaling worker processes... done, now running 1
You can also scale the size of a dyno:
$ heroku ps:resize worker=standard-2x
Resizing dynos and restarting specified processes... done
worker dynos now standard-2x
Check ps to see the new process type running, for example:
$ heroku ps
=== web: `bundle exec rails server -p $PORT`
web.1: up for 2m

=== worker: `env QUEUE=* bundle exec rake resque:work`
worker.1: up for 5s
Use heroku logs --ps worker to view just the messages from the worker process type:
$ heroku logs --ps worker
2011-04-25T18:33:25-07:00 heroku[worker.1]: State changed from created to starting
2011-04-26T01:33:26+00:00 heroku[worker.1]: Running process with command: `env QUEUE=* bundle exec rake resque:work`
2011-04-25T18:33:29-07:00 heroku[worker.1]: State changed from starting to up
2011-04-26T01:33:29+00:00 app[worker.1]: (in /app)
The output we see here matches our local output, interleaved with system messages from Heroku’s system components such as the router and dyno manager.
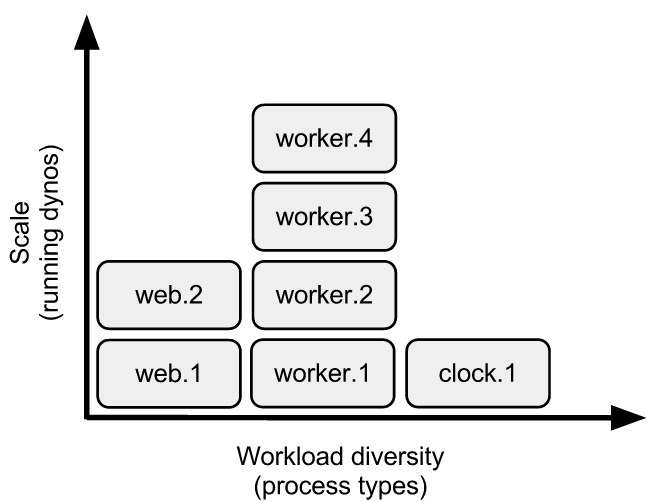
You can scale up higher with the same command. For example, two web dynos and four worker dynos:
$ heroku ps:scale web=2 worker=4
Scaling web processes... done, now running 2
Scaling worker processes... done, now running 4

$ heroku ps
=== web: `bundle exec rails server -p $PORT`
web.1: up for 7m
web.2: up for 2s

=== worker: `env QUEUE=* bundle exec rake resque:work`
worker.1: up for 7m
worker.2: up for 3s
worker.3: up for 2s
worker.4: up for 3s
More process type examples
The Procfile model of running processes types is extremely flexible. You can run any number of dynos with whatever arbitrary commands you want, and scale each independently.
For example, using Ruby you could run two types of queue workers, each consuming different queues, as well as a release phase command:
release:       ./release-tasks.sh
worker:        env QUEUE=* bundle exec rake resque:work
urgentworker:  env QUEUE=urgent bundle exec rake resque:work
These can then be scaled independently.
$ heroku ps:scale worker=1 urgentworker=5
Procfile and heroku.yml
If you are using heroku.yml as your build manifest, a Procfile is not required. The commands you specify in the run section of heroku.yml should use the same format as a Procfile (except release).
Further reading
- Applying the Unix Process Model to Web Apps
- Release phase enables you to run tasks before a new release is deployed to production