Last updated July 10, 2025
SSO is available only for Heroku Teams and Heroku Enterprise customers.
Heroku Teams and Heroku Enterprise Teams support identity federation by implementing the SAML standard. With this feature, you can manage access to your team using your existing identity management solution. In this integration, Heroku is a service provider, and is the consuming entity that requests and receives assertions from the Identity Provider (IdP).
There are 2 parts to the configuration. You set up your team with information about your IdP. You also must set up your IdP to accept requests and respond to Heroku as the service provider relying on the IdP for authentication.
As the integration is standards-based, different IdPs need and provide the same configuration details, but the actual procedures to set and get them differ. In this article, we explain the configuration using Salesforce Identity as the IdP.
Bootstrapping
When creating your teams, only some users are added as admins. As an admin, you must first log in with your Heroku username and password and then configure identity federation. After setting up your team for identity federation, users who successfully authenticate through the identity provider are automatically added as members. Admins on Enterprise teams can grant users more permissions on specific apps using app permissions. Non-Enterprise team users have static app permissions.
Setting Up Your Heroku Enterprise or Heroku Teams
Required Configuration Information
Each team is set up as an independent service provider. You need the following information from your identity provider to set up a team as a relying party.
Login Redirect URL: This URL is the one your identity provider uses to receive redirects for authentication. When users try to log in to their team or access any resource owned by the team, they get redirected to this URL.
X509 IdP certificate: Heroku uses this certificate to validate the authenticity of assertions sent to it by the IdP. This certificate represents the public key of the key pair the IdP uses to sign assertions sent to Heroku.
Getting Required Configuration From Your Salesforce Org
Identity federation is based on the SAML 2.0 standard and you can set it up with many different identity providers. Salesforce Identity is used only as an example to demonstrate end-to-end setup.
Existing customers with Salesforce Enterprise Edition and above already have Salesforce Identity as part of their Salesforce org. First, log into your Salesforce org and click Setup on the top menu bar.
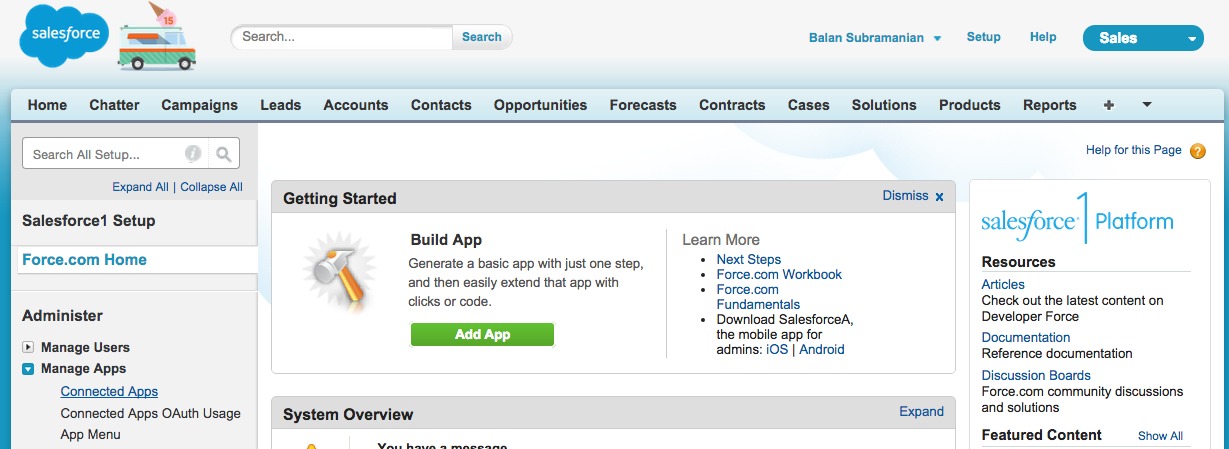
Ensure that your Salesforce org is set up to be an identity provider. As pre-requisites, your org must have a custom domain set up in Administer > Domain Management > My Domain. You must have also created a certificate in Administer > Security Controls > Certificate and Key Management.
Now pick Identity Provider under Security Controls. If the identity provider is not enabled, click the Enable Identity Provider button and use the certificate you created to set up the identity provider.
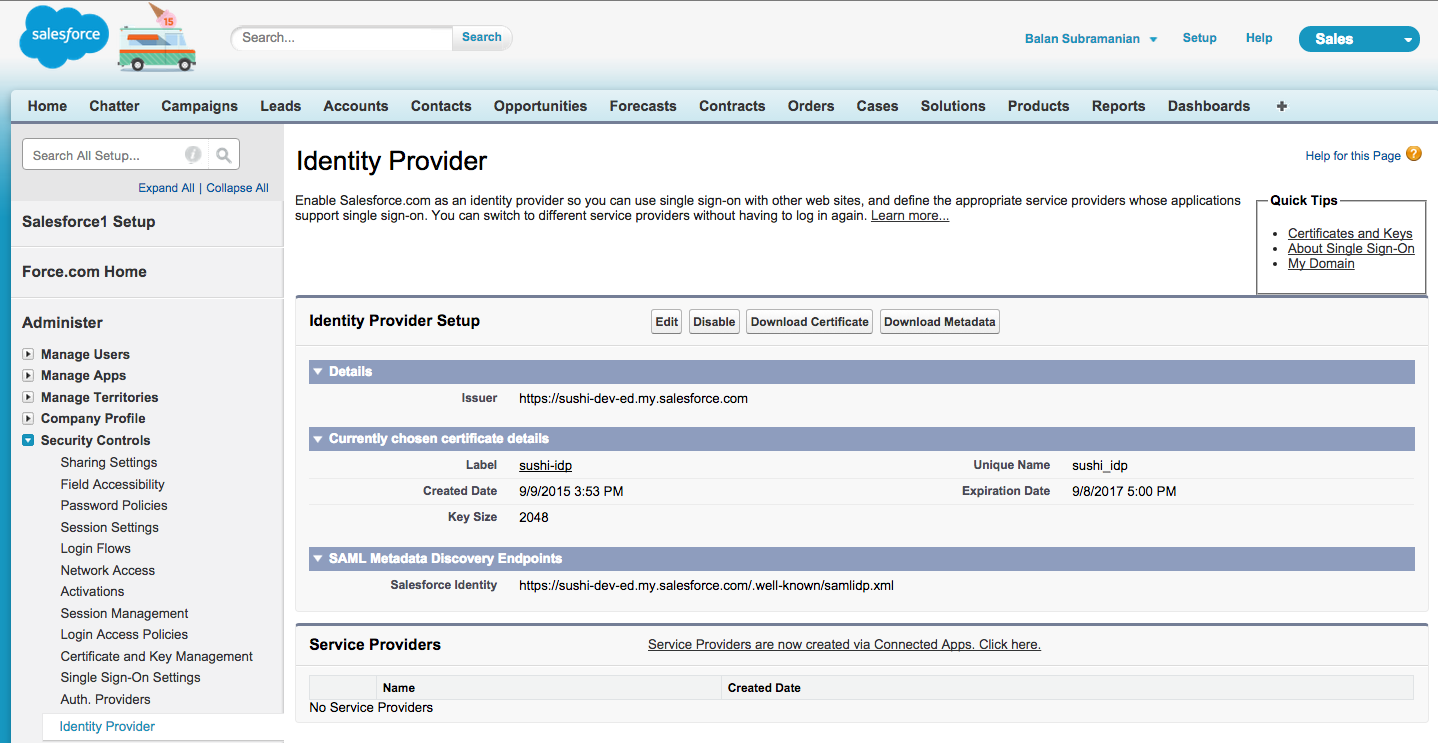
Click on the Download Metadata button to download the IdP metadata as an XML file. This file contains all the configuration details outlined previously. Here is a sample file:
<?xml version="1.0" encoding="UTF-8"?><md:EntityDescriptor xmlns:md="urn:oasis:names:tc:SAML:2.0:metadata" xmlns:ds="http://www.w3.org/2000/09/xmldsig#" entityID="https://sushi-dev-ed.my.salesforce.com" validUntil="2025-09-09T23:17:44.942Z">
   <md:IDPSSODescriptor protocolSupportEnumeration="urn:oasis:names:tc:SAML:2.0:protocol">
      <md:KeyDescriptor use="signing">
         <ds:KeyInfo>
            <ds:X509Data>
               <ds:X509Certificate>MIIEZDCCA0ygAwIBAgIOAU+0UEpTAAAAAECZ07YwDQYJKoZIhvcNAQELBQAwejESMBAGA1UEAwwJc3VzaGlfaWRwMRgwFgYDVQQLDA8wMEQ2MTAwMDAwMDZ0UGQxFzAVBgNVBAoMDlNhbGVzZm9yY2UuY29tMRYwFAYDVQQHDA1TYW4gRnJhbmNpc2NvMQswCQYDVQQIDAJDQTEMMAoGA1UEBhMDVVNBMB4XDTE1MDkwOTIyNTMyNFoXDTE3MDkwOTEyMDAwMFowejESMBAGA1UEAwwJc3VzaGlfaWRwMRgwFgYDVQQLDA8wMEQ2MTAwMDAwMDZ0UGQxFzAVBgNVBAoMDlNhbGVzZm9yY2UuY29tMRYwFAYDVQQHDA1TYW4gRnJhbmNpc2NvMQswCQYDVQQIDAJDQTEMMAoGA1UEBhMDVVNBMIIBIjANBgkqhkiG9w0BAQEFAAOCAQ8AMIIBCgKCAQEAoibkw0wAIvfuG9DZfDCpVrbizZSCrBzdHaCJ4II7/YXjH1M+tWp9L7vcXkegpPRWGlXOrYl+A6k96MSwdLU3d2HGJmrhz+Pur0rq4vpOD3cV4zh9fDtICacL0F9QLMOAsIT0ct1LgEh6usKvmNE1Z5DPfaZAaKAYdYepBDQMAT9ZIm1s4jqMzyQfAQBnVBOxIL6F9GU5Ki40yygRUc0YzbeKEqQR7WxfGACDCNXbm/0drN5Vi6YVtRrGQXIBSyAly72gOowoGBYNHhzsQEROxrKTKqdpjF4JcmMdU4qTI8++zNcJ6YZDdfx6p2+L6wWclv9tlkGsMcpC5yKuV+Pg7wIDAQABo4HnMIHkMB0GA1UdDgQWBBSO7PhFdpH72WQUpMXqmoqziOaClzAPBgNVHRMBAf8EBTADAQH/MIGxBgNVHSMEgakwgaaAFI7s+EV2kfvZZBSkxeqairOI5oKXoX6kfDB6MRIwEAYDVQQDDAlzdXNoaV9pZHAxGDAWBgNVBAsMDzAwRDYxMDAwMDAwNnRQZDEXMBUGA1UECgwOU2FsZXNmb3JjZS5jb20xFjAUBgNVBAcMDVNhbiBGcmFuY2lzY28xCzAJBgNVBAgMAkNBMQwwCgYDVQQGEwNVU0GCDgFPtFBKUwAAAABAmdO2MA0GCSqGSIb3DQEBCwUAA4IBAQCALrk9rW+YGd1h6dBBNMP3IwYnmOFHz1e2pVzehu7PZlkZbKmQOvHObj/OCsUxvGiooTMDLUGHZdCKHLoM6+O5MPFGYGPzJuU/+jyD7OSzYsA+k29B6AY2J9eWFifdjlmgLHql2xgL+BFVhINE3xTcn/DXAwm0hj02TWK3xv1ArqX0IH6/s7pGtREfLMQA1Amo7m2SqHo9i0sF5/cinfn+xGJTrzc7PnUwmVcLxx2r5m6+DJ5GnChvwLQoUa33K+OXckiVyEwVPokpb4RGMbugWuBU7AEINrqSl7PzYhvkVZKVztNTrc3MiceIGJCcYpJpB7fviYW+KZoz8T5WlXc3</ds:X509Certificate>
            </ds:X509Data>
         </ds:KeyInfo>
      </md:KeyDescriptor>
      <md:NameIDFormat>urn:oasis:names:tc:SAML:1.1:nameid-format:unspecified</md:NameIDFormat>
      <md:SingleSignOnService Binding="urn:oasis:names:tc:SAML:2.0:bindings:HTTP-POST" Location="https://sushi-dev-ed.my.salesforce.com/idp/endpoint/HttpPost"/>
      <md:SingleSignOnService Binding="urn:oasis:names:tc:SAML:2.0:bindings:HTTP-Redirect" Location="https://sushi-dev-ed.my.salesforce.com/idp/endpoint/HttpRedirect"/>
   </md:IDPSSODescriptor>
</md:EntityDescriptor>
The SingleSignOnService element with the urn:oasis:names:tc:SAML:2.0:bindings:HTTP-Redirect binding represents the Login Redirect URL.
Remember to use the HTTP-Redirect URL and not the HTTP-POST URL.
You can also download the certificate separately by clicking the Download Certificate button. This method is recommended because it preserves the formatting and you can cut and paste the contents of the downloaded file into the team’s settings page in Heroku.
Setup
After gathering required configuration information, go to the Settings tab for your team in the Heroku dashboard.
Under the Identity Federation section, click the button to set up configuration. Cut and paste the Login Redirect URL (e.g. https://balansubr-dev-ed.my.salesforce.com/idp/endpoint/HttpRedirect). The IdP certificate in the metadata file you downloaded must be formatted before you can add it to the configuration. Instead, use the certificate file you downloaded. Ppen it in a text editor and cut and paste the contents into the IdP certificate text area.
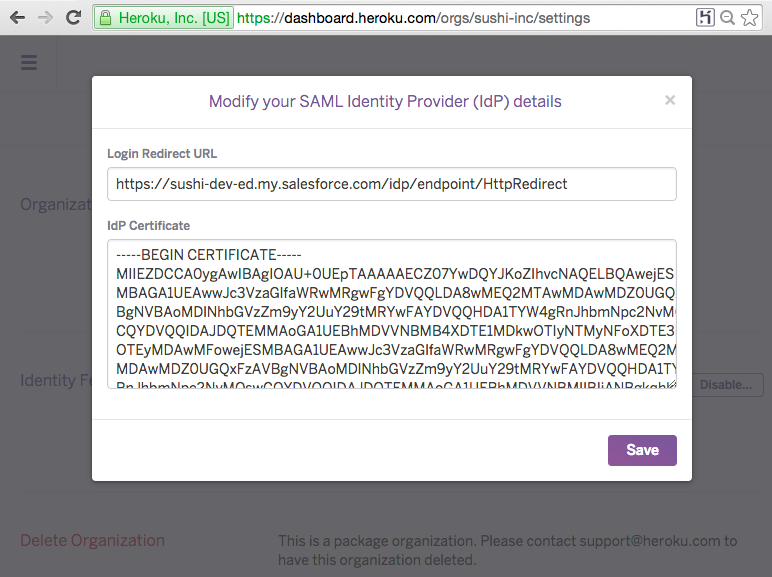
After Heroku validates your saved configuration, setup is complete. You can now see the specific URL that your users use to log into your team through the IdP.

Setting Up Your Identity Provider
Required Configuration Information
Typically, identity providers require the following info to register a new service provider. You can construct the required URLs from the Heroku Login URL displayed for teams configured for identity federation.
Start URL: The URL used to log in. It looks like
https://sso.heroku.com/saml/<your team name>/init. This URL is typically used for IdP-driven login scenarios where the user clicks on a link in an internal portal to access Heroku.Entity ID: The unique identifier that Heroku sends to the IdP when it redirects users for authentication. Every team gets its own Entity ID and it takes the form
https://sso.heroku.com/saml/<your team name>.ACS (Assertion Consumer Service) URL: The IdP uses this URL to post assertions. It takes the form
https://sso.heroku.com/saml/<your team name>/finalize.Issuer: The entity that’s issuing assertions. In Salesforce orgs, the issuer defaults to the domain URL of the Salesforce org. You can leave it unchanged.
Name ID format: The format that the service provider (Heroku) and the IdP use to uniquely represent a user record. Heroku uses
urn:oasis:names:tc:SAML:1.1:nameid-format:emailAddress, which is the email address of the user as recorded in the IdP. Heroku uses the email address to create unique internal user records for users who successfully authenticate with the IdP.Subject Type: This field indicates how to describe the identity of the user in assertions. Heroku requires this field to be the username as recorded in the IdP.
Request signature certificate (optional): The certificate that the IdP uses to verify authentication requests coming from the service provider. Heroku doesn’t sign authentication requests.
Setting Up Your Salesforce Org as the IdP for Your Team
In this section, you configure your team as a relying service provider by setting it up as a connected app. Log into your Salesforce org and go to the Admin setup page by clicking Setup on the top menu bar.
Identity federation is based on the SAML 2.0 standard and you can set it up with many different identity providers. Salesforce Identity is used only as an example to demonstrate end-to-end setup.

Registering Your Team as a Service Provider
Click Identity Provider under Security Controls.
In the Service Providers section, click the link creates a new connected app to represent a service provider. You can also get to this page by picking Create > Apps under Build on the sidebar and then picking New in the Connected Apps section.

On the New Connected App page, enter the information about the service provider, which is your Heroku team in this case. All SAML-related configuration goes under the Web App Settings section. Ensure that you have checked the Enable SAML checkbox.
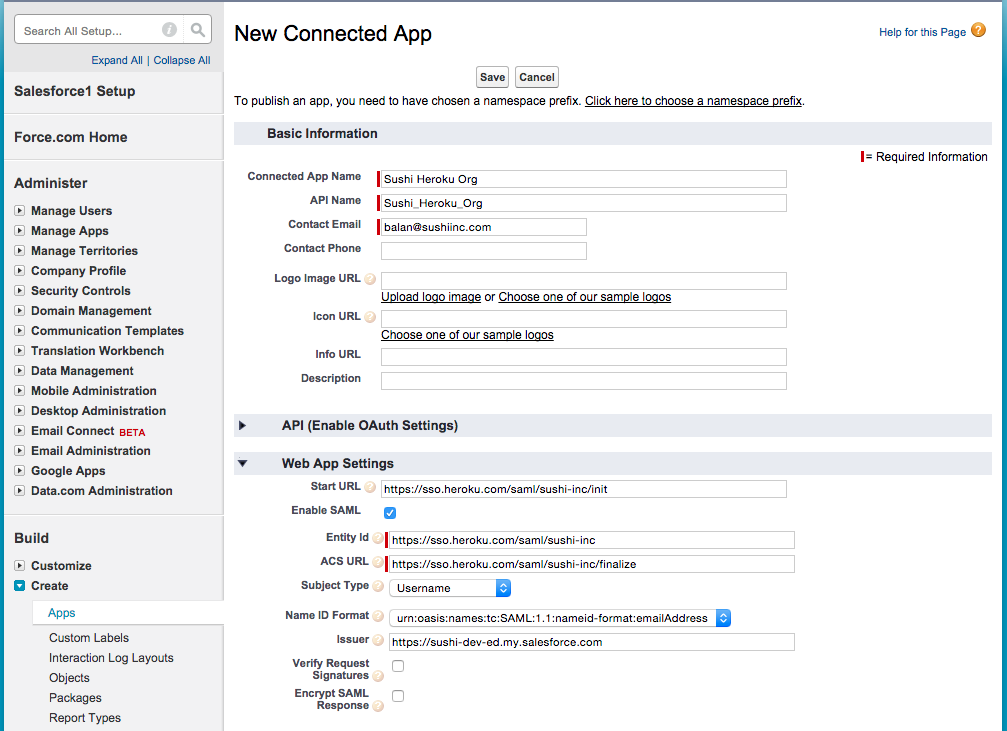
You can you set up the IdP to verify request signatures and encrypt SAML responses. Leave these checkboxes unchecked. Click Save and Heroku is now set up as a service provider. All login requests to your team now redirect to your Salesforce org. If you have multiple teams on Heroku, you must set each up as a separate connected app because each team has its own, unique SAML configuration.
Enabling Access to the Team on User Profiles
You must also add the connected app to the profiles assigned to your users. Only users whose assigned profiles are configured to allow access to the connected app representing the team can successfully authenticate with the IdP.
- Under
Manage Users, clickProfiles. - Click
Editnext to the profile you assign to your developers and other users who need access to the team. - In the Connected App Access section, make sure that the connected app that corresponds to your team is checked. You can enable the same connected app on different profiles.
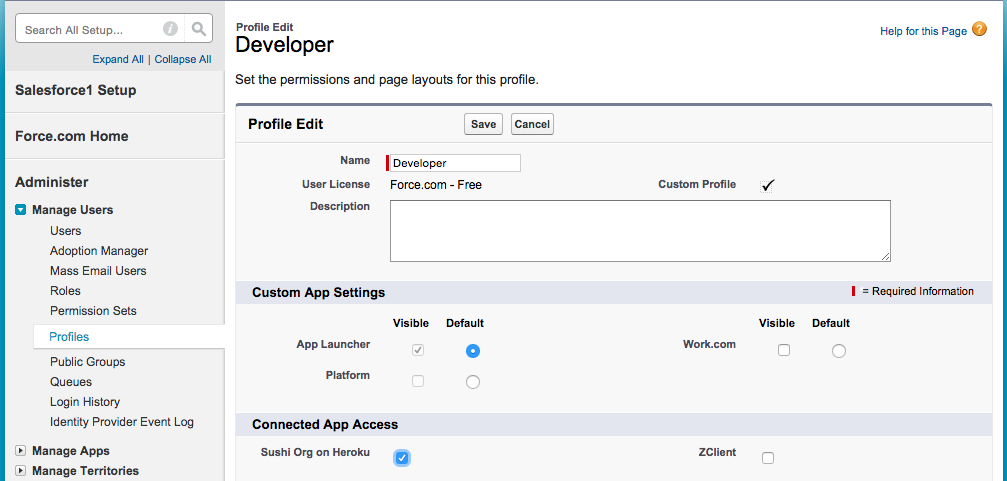
The team you just added as a connected app also shows up on the app launcher. When a logged-in user clicks on it, they log into the Heroku dashboard for the team without having to provide their username and password again.
Managing Users in an Identity Federated Team
Identity federated teams behave differently in how users are provisioned and managed.
Existing Users
You can enable identity federation on your existing teams on Heroku. Share the Heroku login URL for the team with current members and instruct them to log in through that URL.
The first time an existing team user, including admins, log in through the IdP, they permanently switch over to being federated users. They can no longer log on with their Heroku usernames and passwords. This switchover automatically happens for users whose email address provided by the IdP matches the email address they use to log into Heroku directly. Note that they can still log into Heroku using their email address and Heroku password and access their personal apps, but they can’t access their team unless they log in through the IdP.
New Users
After setting up identity federation on both Heroku and your IdP, share this URL to intended users of your team, or place it in a shared area such as single sign-on portal. Users who successfully log in through the IdP are automatically added as to your team.
To restrict which users have access to the team, use your identity provider-specific features to enforce that. For example, if you use Salesforce Identity, you can assign different profiles to different users and decide who gets access to the team on Heroku, via the connected app configured for the team.
Mixed Mode
By default, a team set up for identity federation can have members who log on through the IdP and members who log on directly with their Heroku usernames and passwords. This option enables you to support users such as temporary contractors who don’t have user records in your IdP.
To allow access only through the IdP, emove all non-federated users from your team. The team’s Access tab shows which users are federated. It shows you who logs in through the IdP and those who use their Heroku usernames and passwords. For the latter set of users, their MFA status is also presented.
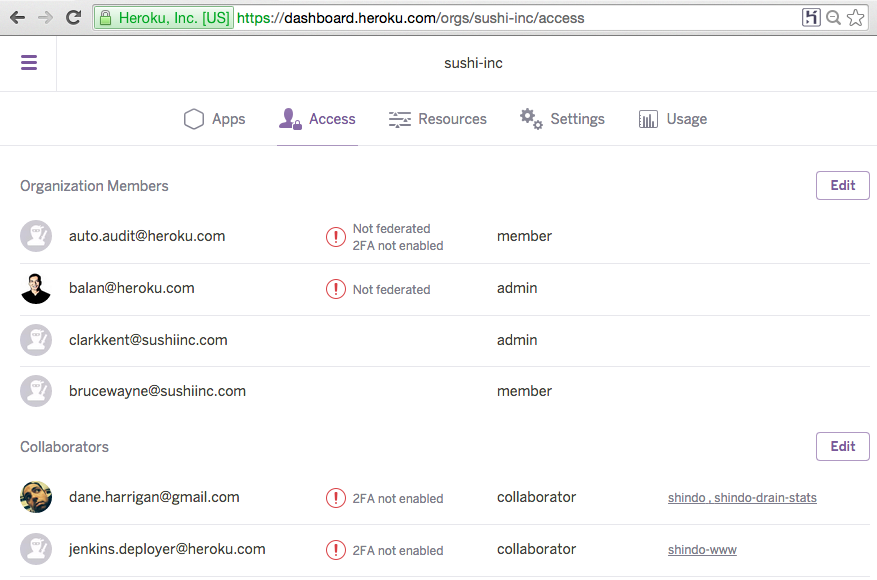
If you remove all non-federated users, in the event of IdP unavailability, nobody can access your team. To prevent this scenario, add a special admin user and leave that user non-federated. If needed, you can log in as this user and disable identity federation for the team until you resolve IdP-related issues.