Deep-dive on the Next Gen Platform. Join the Webinar!

Skip Navigation
Show nav
Dev Center
  • Get Started
  • Documentation
  • Changelog
  • Search
  • Get Started
    • Node.js
    • Ruby on Rails
    • Ruby
    • Python
    • Java
    • PHP
    • Go
    • Scala
    • Clojure
    • .NET
  • Documentation
  • Changelog
  • More
    Additional Resources
    • Home
    • Elements
    • Products
    • Pricing
    • Careers
    • Help
    • Status
    • Events
    • Podcasts
    • Compliance Center
    Heroku Blog

    Visit the Heroku Blog

    Find news and updates from Heroku in the blog.

    Visit Blog
  • Log inorSign up
Hide categories

Categories

  • Heroku Architecture
    • Compute (Dynos)
      • Dyno Management
      • Dyno Concepts
      • Dyno Behavior
      • Dyno Reference
      • Dyno Troubleshooting
    • Stacks (operating system images)
    • Networking & DNS
    • Platform Policies
    • Platform Principles
  • Developer Tools
    • Command Line
    • Heroku VS Code Extension
  • Deployment
    • Deploying with Git
    • Deploying with Docker
    • Deployment Integrations
  • Continuous Delivery & Integration (Heroku Flow)
    • Continuous Integration
  • Language Support
    • Node.js
      • Working with Node.js
      • Troubleshooting Node.js Apps
      • Node.js Behavior in Heroku
    • Ruby
      • Rails Support
      • Working with Bundler
      • Working with Ruby
      • Ruby Behavior in Heroku
      • Troubleshooting Ruby Apps
    • Python
      • Working with Python
      • Background Jobs in Python
      • Python Behavior in Heroku
      • Working with Django
    • Java
      • Java Behavior in Heroku
      • Working with Java
      • Working with Maven
      • Working with Spring Boot
      • Troubleshooting Java Apps
    • PHP
      • PHP Behavior in Heroku
      • Working with PHP
    • Go
      • Go Dependency Management
    • Scala
    • Clojure
    • .NET
      • Working with .NET
  • Databases & Data Management
    • Heroku Postgres
      • Postgres Basics
      • Postgres Getting Started
      • Postgres Performance
      • Postgres Data Transfer & Preservation
      • Postgres Availability
      • Postgres Special Topics
      • Migrating to Heroku Postgres
    • Heroku Key-Value Store
    • Apache Kafka on Heroku
    • Other Data Stores
  • AI
    • Working with AI
  • Monitoring & Metrics
    • Logging
  • App Performance
  • Add-ons
    • All Add-ons
  • Collaboration
  • Security
    • App Security
    • Identities & Authentication
      • Single Sign-on (SSO)
    • Private Spaces
      • Infrastructure Networking
    • Compliance
  • Heroku Enterprise
    • Enterprise Accounts
    • Enterprise Teams
    • Heroku Connect (Salesforce sync)
      • Heroku Connect Administration
      • Heroku Connect Reference
      • Heroku Connect Troubleshooting
  • Patterns & Best Practices
  • Extending Heroku
    • Platform API
    • App Webhooks
    • Heroku Labs
    • Building Add-ons
      • Add-on Development Tasks
      • Add-on APIs
      • Add-on Guidelines & Requirements
    • Building CLI Plugins
    • Developing Buildpacks
    • Dev Center
  • Accounts & Billing
  • Troubleshooting & Support
  • Integrating with Salesforce
  • Security
  • Identities & Authentication
  • Single Sign-on (SSO)
  • Using Single Sign-On (SSO) Services with Heroku, for Administrators

Using Single Sign-On (SSO) Services with Heroku, for Administrators

English — 日本語に切り替える

Last updated May 30, 2024

Table of Contents

  • Prerequisites for SSO with Heroku
  • Identity Providers with Built-in SSO support for Heroku
  • SSO Setup for Other SAML 2.0-Compliant IdPs
  • Providing Multiple IdP Certificates
  • End-User Account Creation and Removal

SSO is available only for Heroku Teams and Heroku Enterprise customers.

Heroku integrates with your existing identity provider (IdP) to enable single sign-on (SSO) using the same credentials and login experience as your other SSO-enabled service providers, such as Slack and Dropbox.

Using SSO, an employee logs into Heroku using your identity provider’s interface instead of the Heroku login page. The employee’s browser redirects to Heroku to authenticate. With SSO enabled, Heroku’s own login mechanism is disabled, meaning that authentication security shifts to your IdP, and coordinated with your other service providers.

Heroku doesn’t notify your employees when SSO is set up, changed, or deactivated for your organization. Make sure to communicate these changes.

When enabling SSO, include the Using Single Sign-on (SSO) Services with Heroku, for End Users article in your rollout communications.

Prerequisites for SSO with Heroku

  • Your company’s identity provider (IdP) must support the SAML 2.0 standard.
  • You must have administrative permissions on the IdP.
  • You must enforce multi-factor authentication (MFA) at the IdP-level.

Identity Providers with Built-in SSO support for Heroku

The following major IdPs provide built-in support for Heroku. To set up SSO for these IdPs, follow the instructions on the vendor’s site.

  • Auth0
  • Azure
  • Google Cloud Identity
  • Okta
  • OneLogin
  • Ping Federate
  • Ping Identity (administrator login required, then search ‘Heroku’ in application catalog)
  • Salesforce Identity

To set up SSO with Microsoft Active Directory, use the SAML 2.0 instructions below.

SSO Setup for Other SAML 2.0-Compliant IdPs

Most SAML 2.0-compliant identity providers require the same information about a service provider to set up SSO. In the case of Heroku, relevant values are available in the Settings tab of the Heroku Team you want to enable SSO for:

SSO set-up information in settings dialog

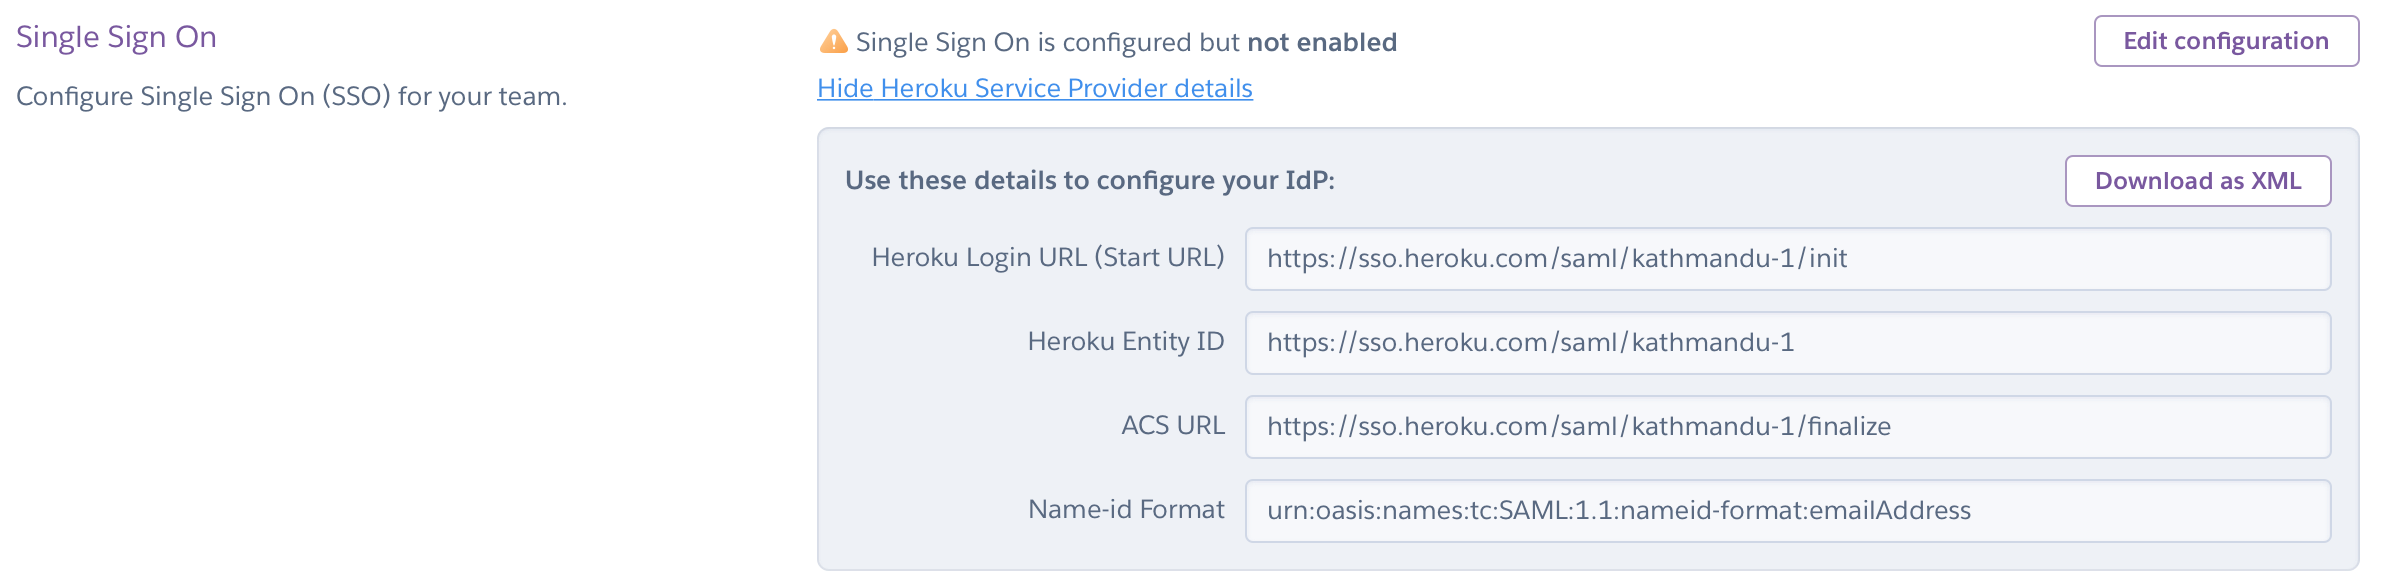
You must have admin permissions on a team to see this information and to enable SSO.

SSO enabled on a Heroku Organization

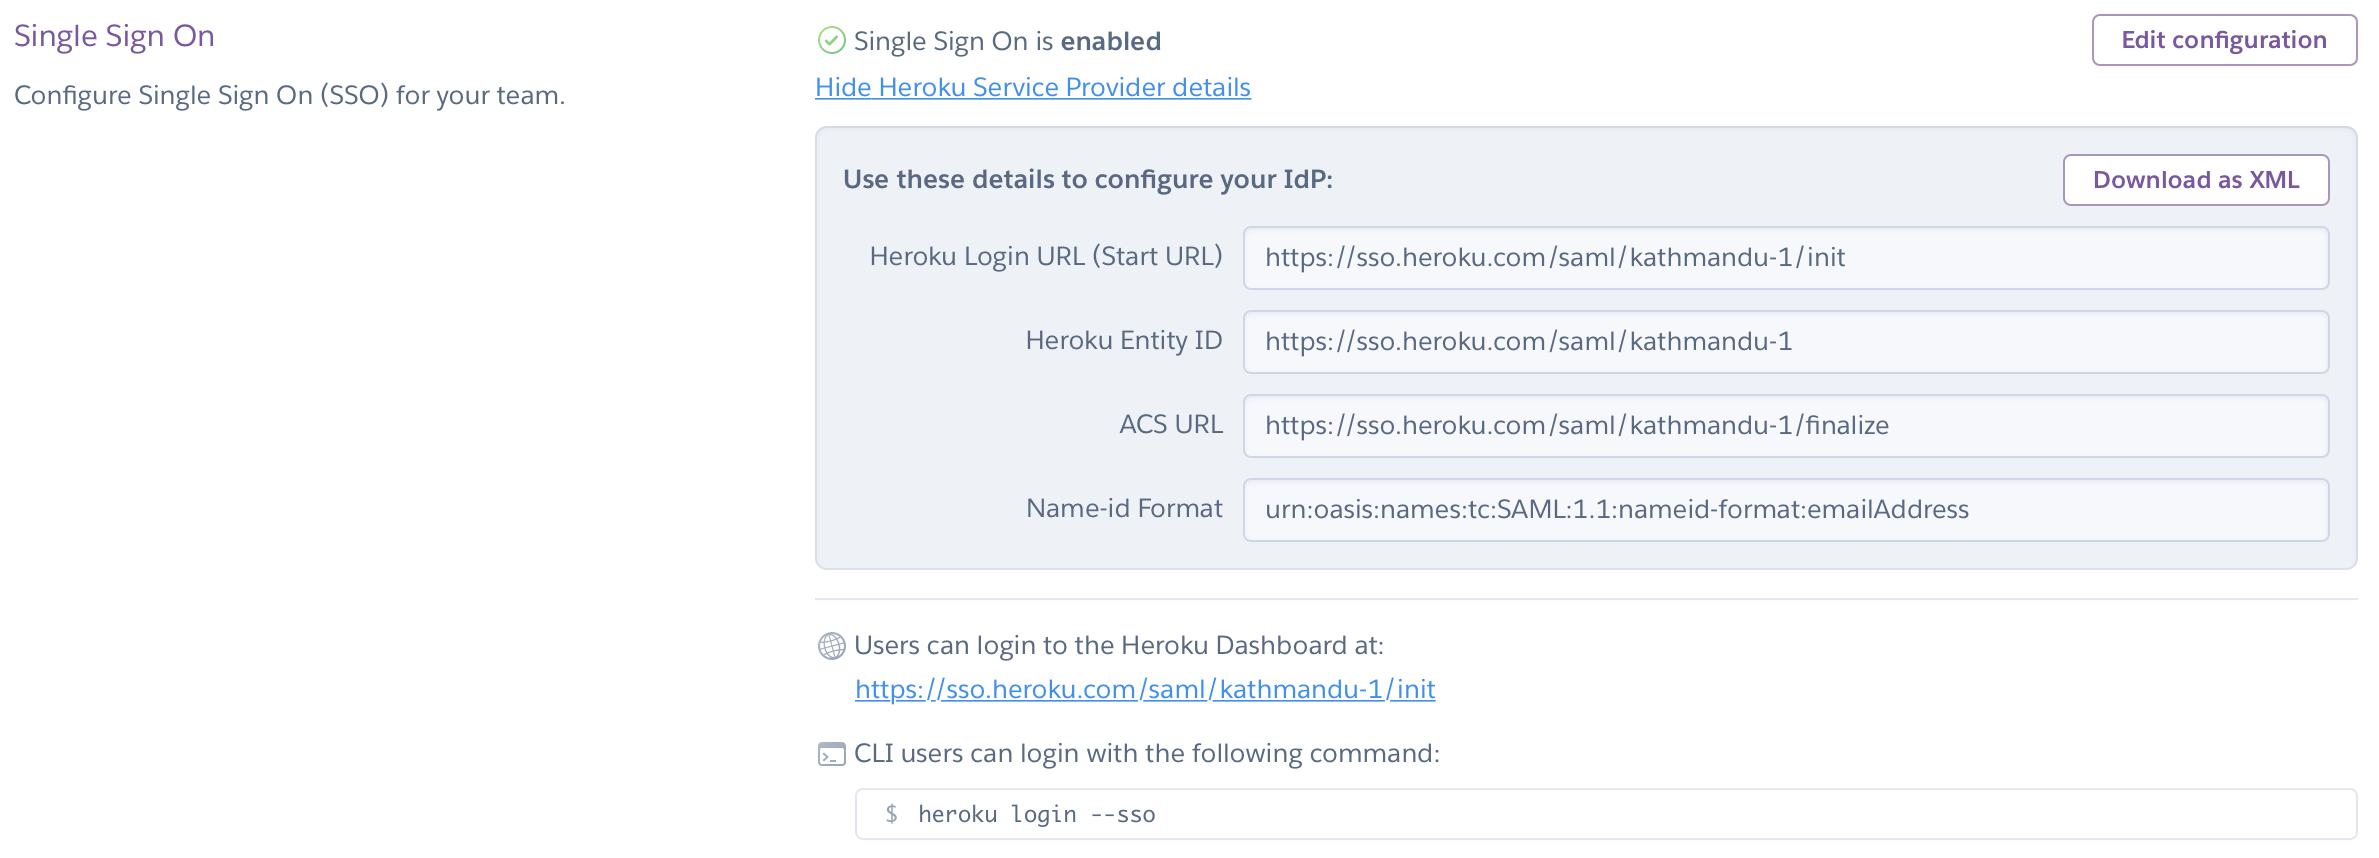
After configuring SSO on your IdP, you can upload or enter metadata manually. When setup is successful, administrators see a confirmation dialog, and the URL of the SSO login for end users displays. Share this URL with your organization.

Providing Multiple IdP Certificates

To enable zero downtime with SSO certificate changes, you can add up to three SSO certificates for teams. We accept SAML assertions signed under any of the non-expired SSO certificates, making it possible to seamlessly switch to a new identity provider certificate without downtime.

multicert

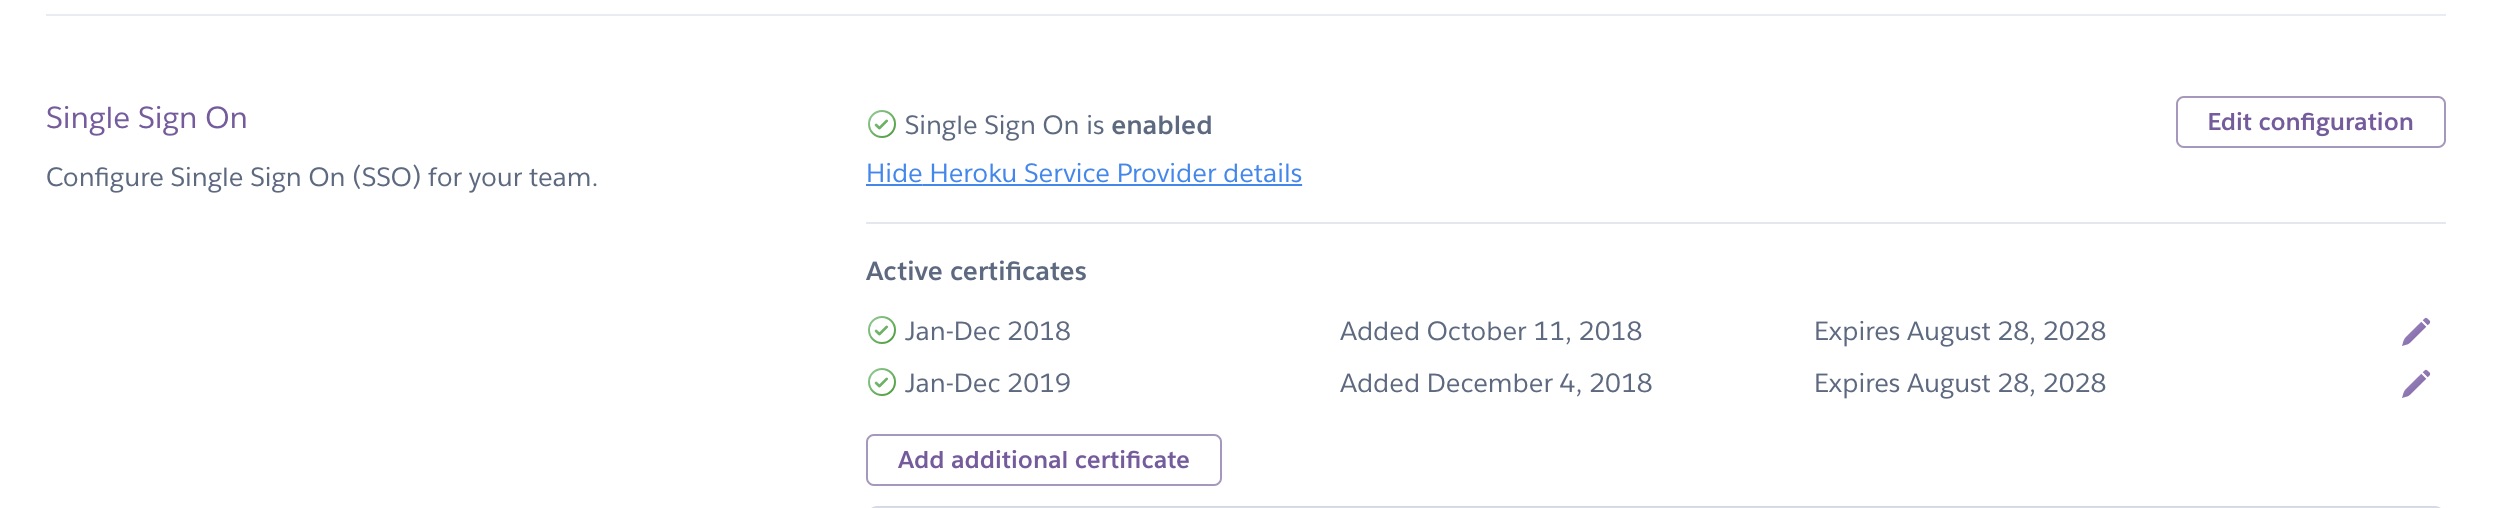
Heroku also sends email notifications to users with the admin permissions of an SSO-enabled team at 30 days, 7 days, and one day before a certificate expires. This notification gives admins a chance to update expiring certificates and avoid user lockout.

For improved security, configure your IdP to sign both SAML response and assertion using SHA-256 if the IdP supports it.

End-User Account Creation and Removal

Creating End-User Accounts

To add end users, create accounts for those users in your IdP. The first time a user logs in to Heroku via the IdP, a Heroku account gets created via automatic IdP provisioning. The user’s access to the team’s resources and settings depends on the default role to assign new users, as specified by an admin in the team’s Settings tab:

SSO default role in settings tab

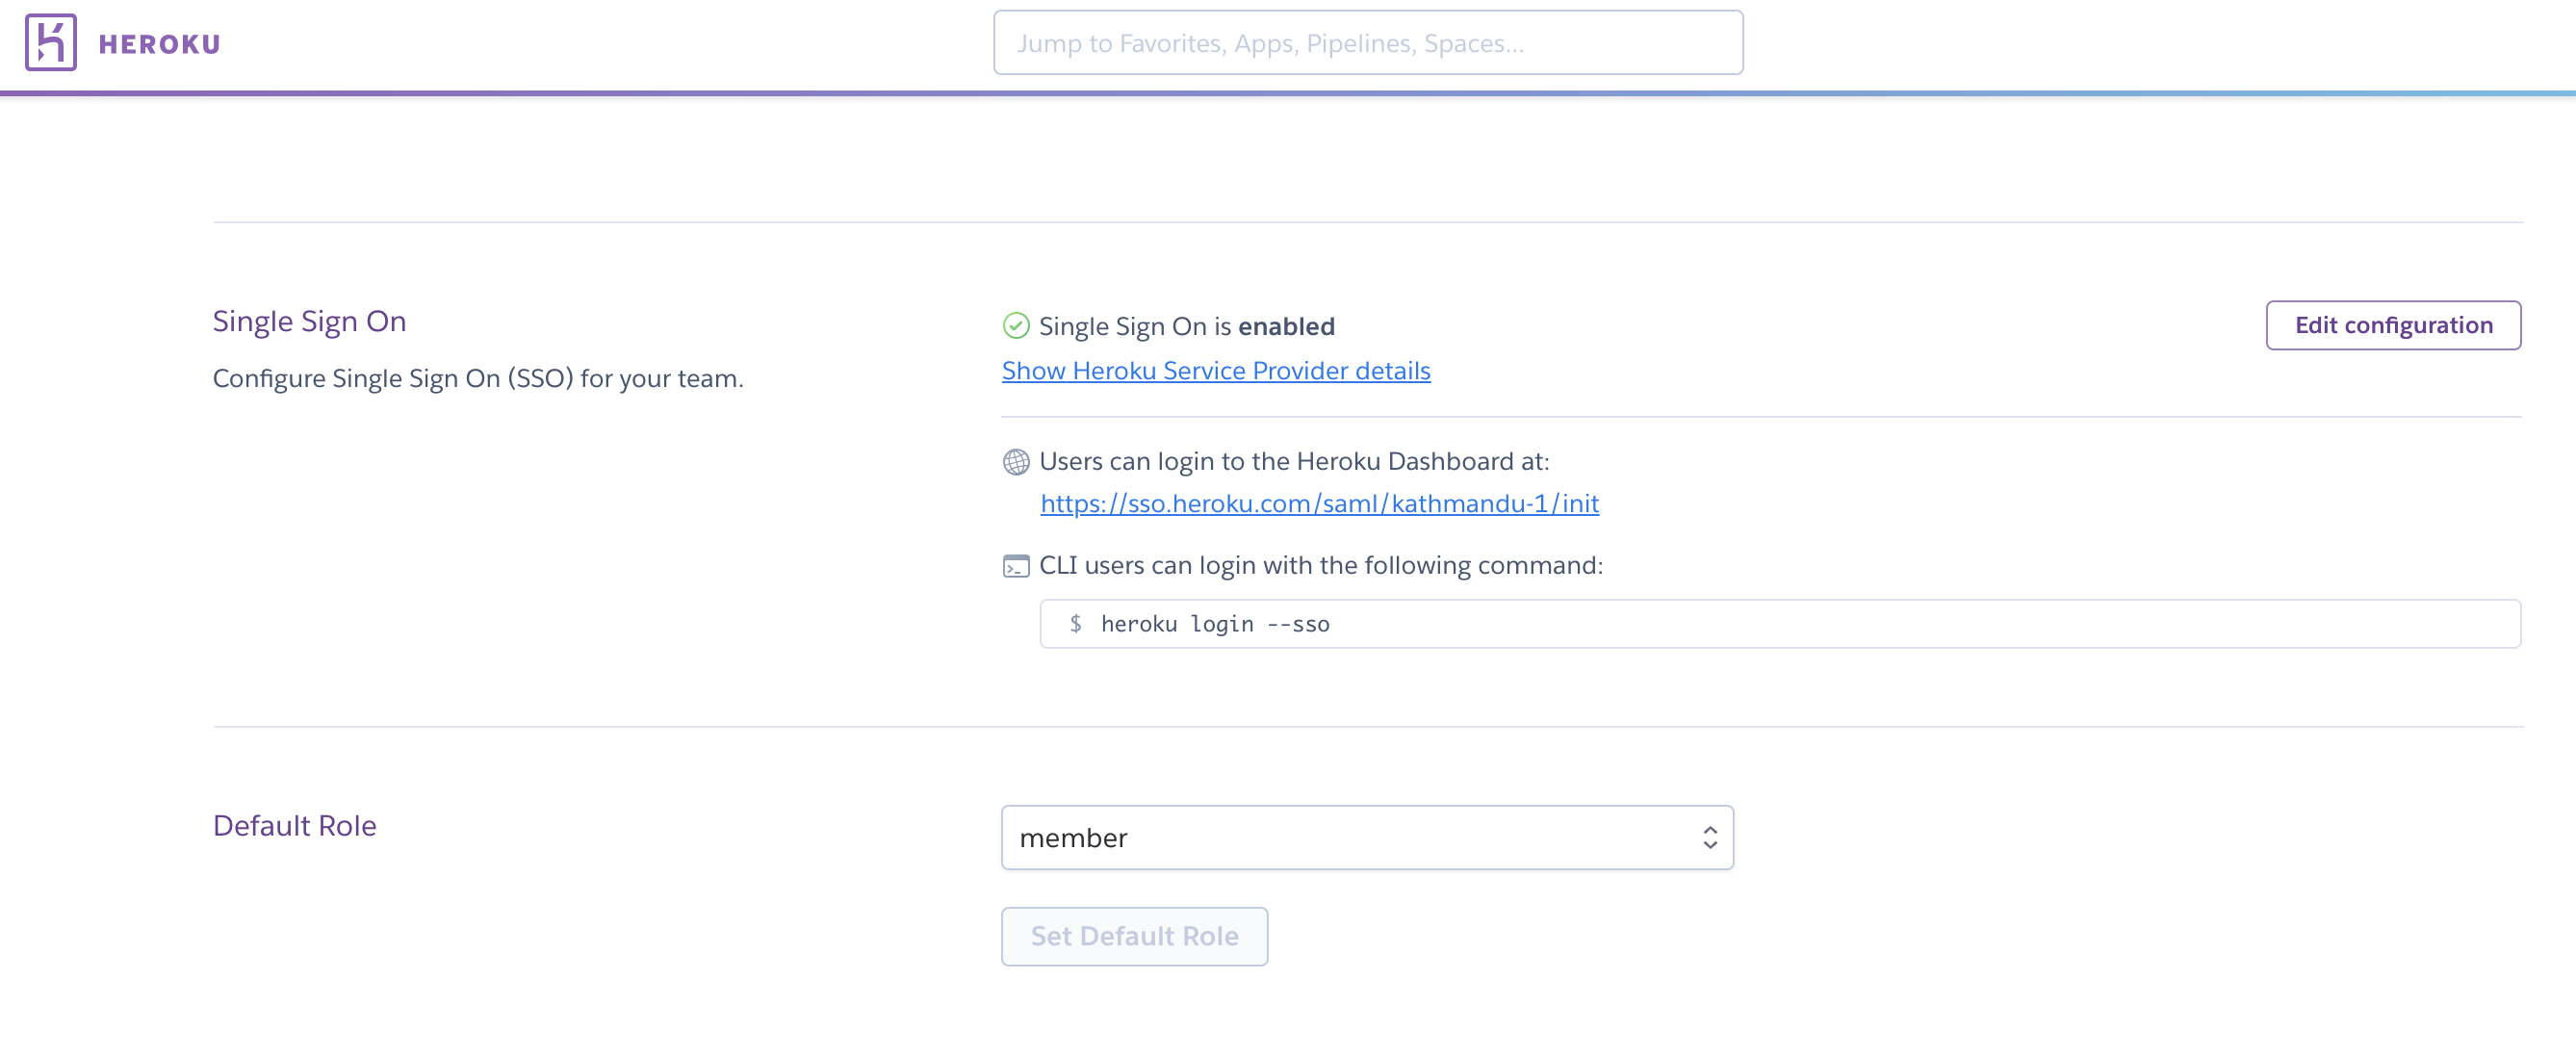
The default role for new users is member unless the admin changes this setting.

After the account provisions, the end user receives a verification email and must click the included acknowledgment link.

Create an admin user account directly with Heroku, not via the IdP, so you can still access Heroku if the IdP isn’t working properly.


Create an integrations user account directly with Heroku, not through the IdP, in case you need to set up integrations that require a Heroku API key.

Removing End-User Accounts

Removing an end user from your IdP prevents the user from logging in to their corresponding Heroku account, but it doesn’t remove the account from Heroku. To ensure against possible API access to team resources before API keys time out, remove the end user’s account from the team associated with the IdP.

To remove an end-user account from Heroku that was created via automatic IdP provisioning, the Identity Administrator can contact Heroku Support.

Keep reading

  • Single Sign-on (SSO)

Feedback

Log in to submit feedback.

Using Single Sign-on (SSO) Services with Heroku, for End Users Using Single Sign-on (SSO) Services with Heroku, for End Users

Information & Support

  • Getting Started
  • Documentation
  • Changelog
  • Compliance Center
  • Training & Education
  • Blog
  • Support Channels
  • Status

Language Reference

  • Node.js
  • Ruby
  • Java
  • PHP
  • Python
  • Go
  • Scala
  • Clojure
  • .NET

Other Resources

  • Careers
  • Elements
  • Products
  • Pricing
  • RSS
    • Dev Center Articles
    • Dev Center Changelog
    • Heroku Blog
    • Heroku News Blog
    • Heroku Engineering Blog
  • Twitter
    • Dev Center Articles
    • Dev Center Changelog
    • Heroku
    • Heroku Status
  • Github
  • LinkedIn
  • © 2025 Salesforce, Inc. All rights reserved. Various trademarks held by their respective owners. Salesforce Tower, 415 Mission Street, 3rd Floor, San Francisco, CA 94105, United States
  • heroku.com
  • Legal
  • Terms of Service
  • Privacy Information
  • Responsible Disclosure
  • Trust
  • Contact
  • Cookie Preferences
  • Your Privacy Choices