Last updated April 11, 2025
This add-on is operated by Xplenty Corp
Extract, Transform & Load Data to Heroku & Salesforce, Fast.
Xplenty is a data integration service that harnesses the power of Hadoop to provide an easy-to-use, scalable ETL service that makes it a snap to prepare your structured and semi-structured data for analytics.
With Xplenty, you can process data generated from Heroku apps as well as any other data store. Heroku runtime metrics can also be processed and analysed on Xplenty in conjunction with using log services add-ons. Xplenty can join data from multiple sources, including Heroku Postgres, MySQL and MongoDB, and provides a wide range of out-of-the-box data transformation tasks, from simple sorting and aggregation to sophisticated functions and data manipulations.
When finished, place your transformed data in analytics stores such as AWS Redshift, SAP HANA, or back in your favorite relational database, cloud storage or NoSQL data store.
Provisioning the add-on
Xplenty can be attached to a Heroku application via the CLI:
$ heroku addons:create xplenty
-----> Adding xplenty to sharp-mountain-4005... done, v18 (free)
A list of all plans available can be found here.
Once the Xplenty add-on is added the XPLENTY_API_KEY and XPLENTY_ACCOUNT_ID config variables become available in the app configuration.
Use the Heroku config command to view your app’s config variables.
$ heroku config | grep XPLENTY
XPLENTY_API_KEY    => 5Yyps5gGteftuTRCjF1u
XPLENTY_ACCOUNT_ID => myaccount
Xplenty is accessible via a REST API and has easy integration options for many languages and frameworks. Follow Xplenty API specification for further documentation.
Integration
Xplenty doesn’t need to integrate at a code-level and thus isn’t tied to a particular language. It can be used with any app hosted on Heroku, be it Ruby, Node.js, Clojure, Java, Python, or Scala, as long as it makes use of a PostgreSQL, MySQL database or NoSQL data store. To make it peace of cake to start processing your own data, we provide an easy way to import your Heroku applications data store connections so you won’t need to do it manually
You can directly import Heroku connections without having to create and define the connections in Xplenty. Just invoke Xplenty’s Import from Heroku option and select the application connections from a list of Heroku connections.
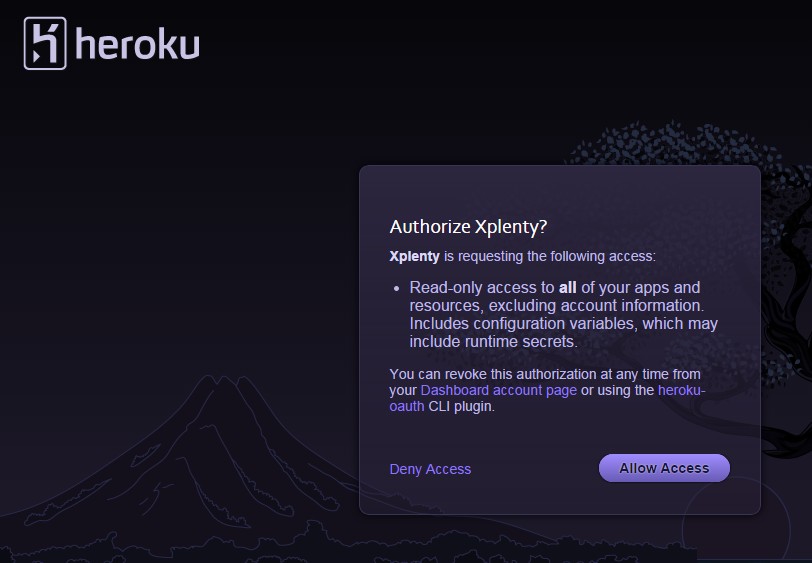
If you have not previously authorized Xplenty access to your Heroku applications, you will receive this prompt to authorize the access. (Note that you can revoke that authorization from the Heroku application at any time).
Once you’ve completed the previous section you’re all set to use the Xplenty interface.
Xplenty interface
The interface can be accessed via the CLI.
$ heroku addons:open xplenty
or by visiting the Heroku Dashboard and selecting the application in question. Select Xplenty from the Add-ons menu.
Understanding Xplenty terminology
Xplenty is all about making data processing easy and scalable. Before beginning to use Xplenty, here’s a brief overview of the basic terms used on the platform
Clusters
An Xplenty cluster is a Hadoop cluster - a group of machines (nodes) that is allocated exclusively to your account’s users. You can create one or more clusters, and you can run one or more jobs on each cluster. A cluster that you’ve created remains allocated to your account until you request to terminate the cluster.
Packages
Packages define the data flow using components that specify the data to process, the data manipulation to perform, and the output destinations. Once you define a package, you can verify it, and, as in any development lifecycle, fix any errors and re-verify until the package is ready to run as a job on a cluster.
Jobs
An Xplenty job is a process that is responsible for running a specific package on a Hadoop cluster. The job is a batch process that processes a finite amount of data and then terminates. Several jobs can run the same package simultaneously. When you run a new job, you select the name of the package whose workflow the job should perform, and the cluster on which to run.
Creating and executing a data flow with Xplenty
In order to start processing data with Xplenty, from the management portal, head to the connections section, located under your account settings, and define connections that will contain access information required to connect to your various data stores. The access information is stored securely and can only be used by your account’s members.
You can define cloud storage connections, to connects to your AWS S3 storage, Rackspace CloudFiles or IBM Softlayer Object Storage, or you can define connections to connect with your cloud database: Heroku Postgres, MongoDB, MySQL, AWS Redshift and many more.
Once connections are defined, head to the packages section, and create a package. Here you’ll define your data flow, where you can use a large set of out-of-the-box transformations to apply your business logic to your data.
To execute the package, go to the clusters section, and create a new cluster which will serve as the processing engine for your jobs. Once a cluster is created, you’ll be able to execute a package on it.
Migrating between plans
Use the heroku addons:upgrade command to migrate to a new plan.
$ heroku addons:upgrade xplenty:newplan
-----> Upgrading xplenty:free to sharp-mountain-4005... done
       Your plan has been updated to: xplenty:basic
Removing the add-on
Xplenty can be removed via the CLI.
This will destroy all associated data and cannot be undone!
$ heroku addons:destroy xplenty
-----> Removing xplenty from sharp-mountain-4005... done, v20 (free)
Support
All Xplenty support and runtime issues should be submitted via one of the Heroku Support channels. Any non-support related issues or product feedback is welcome at xplenty customer feedback.