Last updated May 22, 2023
Instaclustr provides a cloud hosted, fully managed Apache Cassandra NoSQL database. Cassandra is a distributed database that can store huge amounts of data, whilst providing linear scalability, continuous availability and low latency data access.
To learn more about Apache Cassandra visit: http://www.planetcassandra.org
Instaclustr provides a fully managed service that includes 24/7 support, monitoring and alerting, system patches and updates, daily backups, and automated system repairs. We are a team of Cassandra experts with hundreds of thousands of node-hours experience running Cassandra, and our performance-optimized Cassandra solutions power mission-critical always-on applications.
This article shows you how to get started with Instaclustr, from installing the add-on to connecting your app to the database and reading and writing some data.
In addition to the examples shown here, Cassandra also has supported client libraries for Node.js, Go, C#/.NET, C/C++, Clojure and PHP.
Provisioning the add-on
A list of all plans available can be found here. We recommend you select a plan based on the anticipated size of your database, unless your application requires high throughput (>20,000 operations/second). For higher throughput or other sizings feel free to have a chat to our support team.
Note that storage capacity and memory are derived from the values quoted by the infrastructure provider and are an approximation only. Storage capacity and memory available to Cassandra may be less, and a KeySpace replication factor of 2 or higher will reduce available storage capacity (although we strongly recommend RF3, see below)
The Instaclustr add-on can be attached to a Heroku application via the CLI. The default cluster name is cassandra. You may optionally specify the --cluster-name flag. This name will appear in the Instaclustr console and is the configured name of the Cassandra cluster. The name of the cluster cannot be changed after it is created.
heroku addons:create instaclustr:starter
This command initiates provisioning of your Cassandra cluster. It can take up to 10 minutes for all nodes to be created and properly configured and your config vars will be updated when your cluster is ready for use. The config vars include the public IP addresses of all the nodes in the cluster, a default superuser account and automatically generated password, and a certificate for use with encrypted communications (not available on all plans).
IC_CERTIFICATE:    -----BEGIN CERTIFICATE-----
...MIIFsTCCA5mgAwIBAgIBATANB.....
-----END CERTIFICATE-----
IC_CONTACT_POINTS: 52.20.142.100,52.20.58.68,52.20.110.44
IC_PASSWORD:       <PASSWORD>
IC_PORT:           9042
IC_USER:           iccassandra
It is highly recommended that you create a non-superuser account for your app rather than using the iccassandra account for general access. To do this, connect to your cluster and use the following CQL command. Alternatively, you can contact our support team to have this user created for you.
CREATE USER IF NOT EXISTS newuser WITH PASSWORD 'password';
Instaclustr does not store a copy of your password.
The following sections show you how to use your Instaclustr database with your Heroku app.
Using with Ruby
Prerequisites
You will need to have the Cassandra driver installed to connect to the database. Add the following dependency to your Gemfile:
# Instaclustr
gem 'cassandra-driver'
The first step is to read in the app config vars set by Instaclustr that provide the connection information. Not all plans have encryption enabled, but this code will work in both cases.
require 'bundler/setup'
require 'cassandra'
require 'tempfile'

# Disable authentication class checking
class Password < Cassandra::Auth::Providers::Password
    def create_authenticator(_)
        Authenticator.new(@username, @password)
    end
end

class SimpleStore
    def initialize()
        @cluster = nil
        @session = nil
        @hosts = ENV['IC_CONTACT_POINTS'].to_s.split(',')
        @user = ENV['IC_USER']
        @pass = ENV['IC_PASSWORD']
        @port = ENV['IC_PORT']
        @datacenter = 'US_EAST_1'  # 'EU_WEST_1' if your app is in eu
        @certificate = write_pem(ENV['IC_CERTIFICATE'])
    end

    def write_pem(data)
      # Save certificate if encryption is enabled on your plan.
        if data.include? "Not enabled"
            return nil
        end
        cert = Tempfile.new('cluster_ca_cert.pem')
        cert.write(data)
        cert.close()
        return cert.path
    end
Connecting to the cluster
Now you can connect using a Cassandra.cluster object which holds the connection to the cluster. The Cassandra driver will open a connection to a single node in the cluster to gain access to the database. It is not necessary to connect to all nodes individually as each node is aware of all others and communication between them is handled internally.
def connect()
  puts "Connecting to cluster."
  params = {
      hosts: @hosts,
      port: @port,
      datacenter: @datacenter,
      auth_provider: Password.new(@user, @pass)
  }
  if @certificate
    params[:server_cert] = @certificate
  end
  @cluster = Cassandra.cluster(params)
  @session = @cluster.connect
  puts "Cluster: #{@cluster.name}"
  @cluster.each_host do |host|
    puts "Host #{host.ip}: id = #{host.id} datacenter = #{host.datacenter} rack = #{host.rack}"
  end
end
The final step will print some metadata about each node to verify the connection was successful:
Connecting to cluster...
Cluster:
Host 52.20.110.211: id = 777c43fa-8f66-475c-a74a-17f02aad7d54 datacenter = US_EAST_1 rack = us-east-1a
Host 52.20.142.87: id = bf0dd27c-6e13-46b4-abe4-33736ee9ddb8 datacenter = US_EAST_1 rack = us-east-1e
Host 52.20.58.221: id = cbd80724-aa56-4f9f-92c3-dc0e47e3b1ec datacenter = US_EAST_1 rack = us-east-1d
Create a keyspace and table
Next, create your keyspace. In this example we will build a simple store app.
 @session.execute("CREATE KEYSPACE IF NOT EXISTS simplestore WITH replication " +
            "= {'class':'NetworkTopologyStrategy', 'US_EAST_1':3};")
A note on the recommended replication settings:
We normally recommend
NetworkTopologyStrategyas this ensures proper distribution across racks and is most easily upgraded if you add a second data centre.replication_factordetermines how many copies of each row are stored to ensure reliability and fault tolerance. A replication factor of 3 is the recommended setting and will ensure there is a copy of each row stored on every node in your cluster.
Finally, you need a table to insert data into.
  @session.execute("CREATE TABLE IF NOT EXISTS simplestore.items (" +
               "id uuid PRIMARY KEY," +
               "name text," +
               "category text," +
               "price float" +
            ");")
  @session.execute("CREATE TABLE IF NOT EXISTS simplestore.shopcarts (" +
               "id int," +
               "cart_id uuid," +
               "item_id uuid," +
               "item_name text," +
               "item_price float," +
               "quantity int, " +
               "PRIMARY KEY (cart_id, id)" +
            ");")
Cassandra uses the first part of the primary key as the partition key. This determines the node on which the row will be stored. All rows with the same partition key are stored on the same node, therefore you should choose a data type with high cardinality to ensure even distribution of data across the cluster. Using the right partition and primary keys is crucial to a well functioning Cassandra implementation, so we recommend you learn about these concepts if not familiar with them.
Inserting and retrieving data
Now that you have a keyspace and tables, you can start inserting some data into them.
def load_data()
  # Create items
  @session.execute(
      "INSERT INTO simplestore.items (id, item_name, category, price) " +
          "VALUES ( 756716f7-2e54-4715-9f00-91dcbea6cf50, 'SpeedFaster Running Shoes', 'Mens Running Shoes', 109.99);")
  @session.execute(
      "INSERT INTO simplestore.items (id, item_name, category, price) " +
          "VALUES ( 856716f7-2e54-4715-9f00-91dcbea6cf50, 'Sport Socks Black',  'Mens socks', 12.50 );")
  @session.execute(
      "INSERT INTO simplestore.items (id, item_name, category, price) " +
        "VALUES ( 956716f7-2e54-4715-9f00-91dcbea6cf50, 'TeamWheel Cycle Jersey', 'Cycle Clothing', 89.99);")

  # Populate shopping cart
  @session.execute(
      "INSERT INTO simplestore.shopcarts (id, cart_id, item_id, item_name, item_price, quantity) " +
        "VALUES (1, 3cc9ccb7-6221-4ccb-8387-f22b6a1b354d, 756716f7-2e54-4715-9f00-91dcbea6cf50, 'SpeedFaster Running Shoes', 109.99, 1);")
  @session.execute(
      "INSERT INTO simplestore.shopcarts (id, cart_id, item_id, item_name, item_price, quantity) " +
        "VALUES (2, 3cc9ccb7-6221-4ccb-8387-f22b6a1b354d, 856716f7-2e54-4715-9f00-91dcbea6cf50, 'Sport Socks Black', 25.00, 2);")
end
At checkout time, you can display the contents of the user’s cart with a total.
def query_schema()
        total_price = 0
        results = @session.execute(
            "SELECT item_id,item_name,item_price,quantity FROM simplestore.shopcarts " +
            "WHERE cart_id = 3cc9ccb7-6221-4ccb-8387-f22b6a1b354d;"
        )
        puts "%-37s\t%-20s\t%-20s\t%-20s\n%s" %
            ['item_id', 'item_name', 'item_price', 'quantity', '--------------------------------------+-----------------------+--------------------+--------------------']
        results.each do |row|
            puts "%-30s\t%-20s\t%-20s\t%-20s" % [ row['item_id'], row['item_name'], row['item_price'], row['quantity'] ]
            total_price += row['item_price'] * row['quantity']
        end
        puts "Total Cart Price: %s" % total_price
    end
Using with Java
Imports
Add the cassandra-driver-core package to your application. This package is available in maven:
<dependency>
    <groupId>com.datastax.cassandra</groupId>
    <artifactId>cassandra-driver-core</artifactId>
    <version><latest-version></version>
</dependency>
Connecting to the cluster
Using client-server encryption (SSL)
If you are on a Production or Production-light plan, your cluster is configured to use client to server encryption using SSL by default. You will need to add the cluster certificate to your SSLContext in order to connect.
Option A - Download .jks from Instaclustr console:
For convenience, Instaclustr provides a Java Key Store (JKS) file which you can use to initialize a TrustStoreFactory for an SSLContext.
You can download this file from the Instaclustr console by navigating to Clusters -> Cassandra -> Connection Details and Downloading the Cluster CA X.509 Certificates. The archive contains truststore.jks and a README file with instructions for use.
Option B - Import certificate from PEM to KeyStore: Alternatively, you can add the provided certificate to your default app keystore.
First save your certificate to a new file in your app repository.
heroku config:get IC_CERTIFICATE > instaclustr.pem
Next, import the certificate to a keystore and commit this to your repository by following the instructions provided by Heroku.
keytool -import -file instaclustr.pem -keystore truststore.jks -storepass instaclustr
Cluster connection
With the certificate in your truststore, you can connect the the cluster. If you are on a plan that does not have SSL enabled, you may omit the SSLContext method and .withSSL option to the Cluster.Builder.
Certain JVMs will require the installation of the Java Cryptography Extensions (JCE) Unlimited Strength Jurisdiction Policy Files. Without these policy files, connections will fail because, by default, the JVM does not support TLS_RSA_WITH_AES_256_CBC_SHA cyphers used by Cassandra. You can download them here.
final Session session;

System.out.println(Cipher.getMaxAllowedKeyLength("AES"));  // should print 2147483647

// init an SSLContext with the cluster CA certificate in its trust chain
final SSLContext sslContext;
{
    final KeyStore trustStore = KeyStore.getInstance("JKS");
    try (final InputStream stream = Files.newInputStream(Paths.get("truststore.jks"))) {
        trustStore.load(stream, "instaclustr".toCharArray());
    }

    final TrustManagerFactory trustManagerFactory = TrustManagerFactory.getInstance(TrustManagerFactory.getDefaultAlgorithm());
    trustManagerFactory.init(trustStore);

    sslContext = SSLContext.getInstance("TLS");
    sslContext.init(null, trustManagerFactory.getTrustManagers(), null);
}

final Cluster cluster = Cluster.builder()
        .addContactPoints(System.getenv().get("IC_CONTACT_POINTS").split(","))
        .withPort(Integer.parseInt(System.getenv().get("IC_PORT")))
        .withSSL(new SSLOptions(sslContext, SSLOptions.DEFAULT_SSL_CIPHER_SUITES))
        .withAuthProvider(new PlainTextAuthProvider(System.getenv().get("IC_USER"), System.getenv().get("IC_PASSWORD"))).build();

final Metadata metadata = cluster.getMetadata();
System.out.printf("Connected to cluster: %s\n", metadata.getClusterName());

for (final Host host : metadata.getAllHosts()) {
    System.out.printf("Datacenter: %s; Host: %s; Rack: %s\n", host.getDatacenter(), host.getAddress(), host.getRack());
}

final Session session = cluster.connect();
Create a keyspace and table
Now that you’ve successfully connected to the cluster, you can create your keyspace and tables. We will reuse the SimpleStore example.
session.execute("CREATE KEYSPACE IF NOT EXISTS simplestore WITH replication " +
        "= {'class':'NetworkTopologyStrategy', 'US_EAST_1':3};");

session.execute("CREATE TABLE IF NOT EXISTS simplestore.items (" +
        "id uuid PRIMARY KEY," +
        "name text," +
        "category text," +
        "price float" +
        ")");

session.execute("CREATE TABLE IF NOT EXISTS simplestore.shopcarts (" +
        "id int," +
        "cart_id uuid," +
        "item_id uuid," +
        "item_name text," +
        "item_price float," +
        "quantity int, " +
        "PRIMARY KEY (cart_id, id)" +
        ") WITH bloom_filter_fp_chance = 0.01 " +
        "AND compaction = {'min_threshold': '4', 'class': 'org.apache.cassandra.db.compaction.SizeTieredCompactionStrategy', 'max_threshold': '32','tombstone_threshold' : '0.1'} " +
        "AND compression = {'sstable_compression': 'org.apache.cassandra.io.compress.LZ4Compressor'} " +
        "AND gc_grace_seconds = 10 ");
This example also shows how to specify some common table properties such as compaction and compression options.
Inserting and retrieving data
Next, populate the tables with some data.
public void loadData() {
    session.execute(
            "INSERT INTO simplestore.items (id, item_name, category, price) " +
                    "VALUES ( 756716f7-2e54-4715-9f00-91dcbea6cf50, 'SpeedFaster Running Shoes', 'Mens Running Shoes', 109.99);");
    session.execute(
            "INSERT INTO simplestore.items (id, item_name, category, price) " +
                    "VALUES ( 856716f7-2e54-4715-9f00-91dcbea6cf50, 'Sport Socks Black',  'Mens socks', 12.50 );");
    session.execute(
            "INSERT INTO simplestore.items (id, item_name, category, price) " +
                    "VALUES ( 956716f7-2e54-4715-9f00-91dcbea6cf50, 'TeamWheel Cycle Jersey', 'Cycle Clothing', 89.99);");

    // Add items to a shopping cart
    session.execute(
            "INSERT INTO simplestore.shopcarts (id, cart_id, item_id, item_name, item_price, quantity) " +
                    "VALUES (1, 3cc9ccb7-6221-4ccb-8387-f22b6a1b354d, 756716f7-2e54-4715-9f00-91dcbea6cf50, 'SpeedFaster Running Shoes', 109.99, 1);");
    session.execute(
            "INSERT INTO simplestore.shopcarts (id, cart_id, item_id, item_name, item_price, quantity) " +
                    "VALUES (2, 3cc9ccb7-6221-4ccb-8387-f22b6a1b354d, 856716f7-2e54-4715-9f00-91dcbea6cf50, 'Sport Socks Black', 25.00, 2);");
}
Finally, when a user proceeds to the checkout you can display the contents of their cart:
float total_price = 0;
final ResultSet results = s.execute(
        "SELECT item_id,item_name,item_price,quantity FROM simplestore.shopcarts " +
                "WHERE cart_id = 3cc9ccb7-6221-4ccb-8387-f22b6a1b354d;");
System.out.println(String.format("%-37s\t%-20s\t%-20s\t%-20s\n%s",
        "item_id", "item_name", "item_price", "quantity",
        "--------------------------------------+-----------------------+--------------------+--------------------"));

for (Row row : results) {
    System.out.println(String.format("%-37s\t%-20s\t%-20s\t%-20s", row.getUUID("item_id"),
            row.getString("item_name"), row.getFloat("item_price"), row.getInt("quantity")));
    total_price += row.getFloat("item_price") * row.getInt("quantity");
}
System.out.println("Total price: " + String.valueOf(total_price));
}
Using with Python
Dependencies
Add the Cassandra driver to your requirements.txt file.
cassandra-driver==2.5.1
Connecting to the cluster
This example reads in the app config vars set by Instaclustr, makes a connection to one of the nodes then prints some metadata about the cluster to confirm that the connection was successful.
def __init__(self):
    self.session = None
    self.certificate = self.write_pem(os.environ['IC_CERTIFICATE'])
    params = {
        "contact_points": os.environ['IC_CONTACT_POINTS'].split(','),
        "port": os.environ['IC_PORT'],
        "load_balancing_policy": DCAwareRoundRobinPolicy(local_dc='US_EAST_1'),
        "auth_provider": PlainTextAuthProvider(
            os.environ['IC_USER'],
            os.environ['IC_PASSWORD'],
        )
    }
    if self.certificate:
        params["server_cert"] = self.certificate

    self.cluster = Cluster(**params)

@staticmethod
def write_pem(data):
    if "Not enabled" in data:
        return None
    name = tempfile.mkstemp(dir="/tmp")
    with open(name, 'w') as cert:
        cert.write(data)
    return name

def connect(self):
    print "Connecting to cluster"
    self.session = self.cluster.connect()
    print "Cluster: %s" % self.cluster.metadata.cluster_name
    for host in self.cluster.metadata.all_hosts():
        print (
            "Host {ip}: "
            "datacenter = {datacenter} "
            "rack = {rack}"
        ).format(
            ip=host.address,
            datacenter=host.datacenter,
            rack=host.rack,
        )
Create a keyspace and table
Create your keyspace and tables. The Java example above also shows how you might optionally specify some table properties.
def create_schema(self):
    self.session.execute("CREATE KEYSPACE IF NOT EXISTS simplestore WITH replication " +
                         "= {'class':'NetworkTopologyStrategy', 'US_EAST_1':3};")

    self.session.execute("CREATE TABLE IF NOT EXISTS simplestore.items (" +
                         "id uuid PRIMARY KEY," +
                         "name text," +
                         "category text," +
                         "price float" +
                         ");")
    self.session.execute("CREATE TABLE IF NOT EXISTS simplestore.shopcarts (" +
                         "id int," +
                         "cart_id uuid," +
                         "item_id uuid," +
                         "item_name text," +
                         "item_price float," +
                         "quantity int, " +
                         "PRIMARY KEY (cart_id, id)" +
                         ");")
Inserting and retrieving data
def load_data(self):
    # Create items
    self.session.execute(
        "INSERT INTO simplestore.items (id, item_name, category, price) " +
        "VALUES ( 756716f7-2e54-4715-9f00-91dcbea6cf50, 'SpeedFaster Running Shoes', 'Mens Running Shoes', 109.99);")
    self.session.execute(
        "INSERT INTO simplestore.items (id, item_name, category, price) " +
        "VALUES ( 856716f7-2e54-4715-9f00-91dcbea6cf50, 'Sport Socks Black',  'Mens socks', 12.50 );")
    self.session.execute(
        "INSERT INTO simplestore.items (id, item_name, category, price) " +
        "VALUES ( 956716f7-2e54-4715-9f00-91dcbea6cf50, 'TeamWheel Cycle Jersey', 'Cycle Clothing', 89.99);")

    # Add some items into a shopping cart.
    self.session.execute(
        "INSERT INTO simplestore.shopcarts (id, cart_id, item_id, item_name, item_price, quantity) " +
        "VALUES ( 1, 3cc9ccb7-6221-4ccb-8387-f22b6a1b354d, 756716f7-2e54-4715-9f00-91dcbea6cf50, 'SpeedFaster Running Shoes', 109.99, 1);")
    self.session.execute(
        "INSERT INTO simplestore.shopcarts (id, cart_id, item_id, item_name, item_price, quantity) " +
        "VALUES ( 2, 3cc9ccb7-6221-4ccb-8387-f22b6a1b354d, 856716f7-2e54-4715-9f00-91dcbea6cf50, 'Sport Socks Black', 25.00, 2);")
With tables populated, at checkout time you can display the contents of the shopping cart with a total:
def query_schema(self):
    total_price = 0
    results = self.session.execute(
        "SELECT item_id,item_name,item_price,quantity FROM simplestore.shopcarts  WHERE cart_id = 3cc9ccb7-6221-4ccb-8387-f22b6a1b354d;"
    )
    print "{:^37}\t{:^20}\t{:^20}\t{:^20}\n{}".format(
        'item_id',
        'item_name',
        'item_price',
        'quantity',
        '--------------------------------------+-----------------------+--------------------+--------------------'
    )
    for row in results:
        print "{:<30s}\t{:^20}\t{:^20}\t{:^20}".format(
            row.item_id,
            row.item_name,
            row.item_price,
            row.quantity,
        )
        total_price += float(row.item_price) * int(row.quantity)
    print "Total Cart Price: %s" % total_price
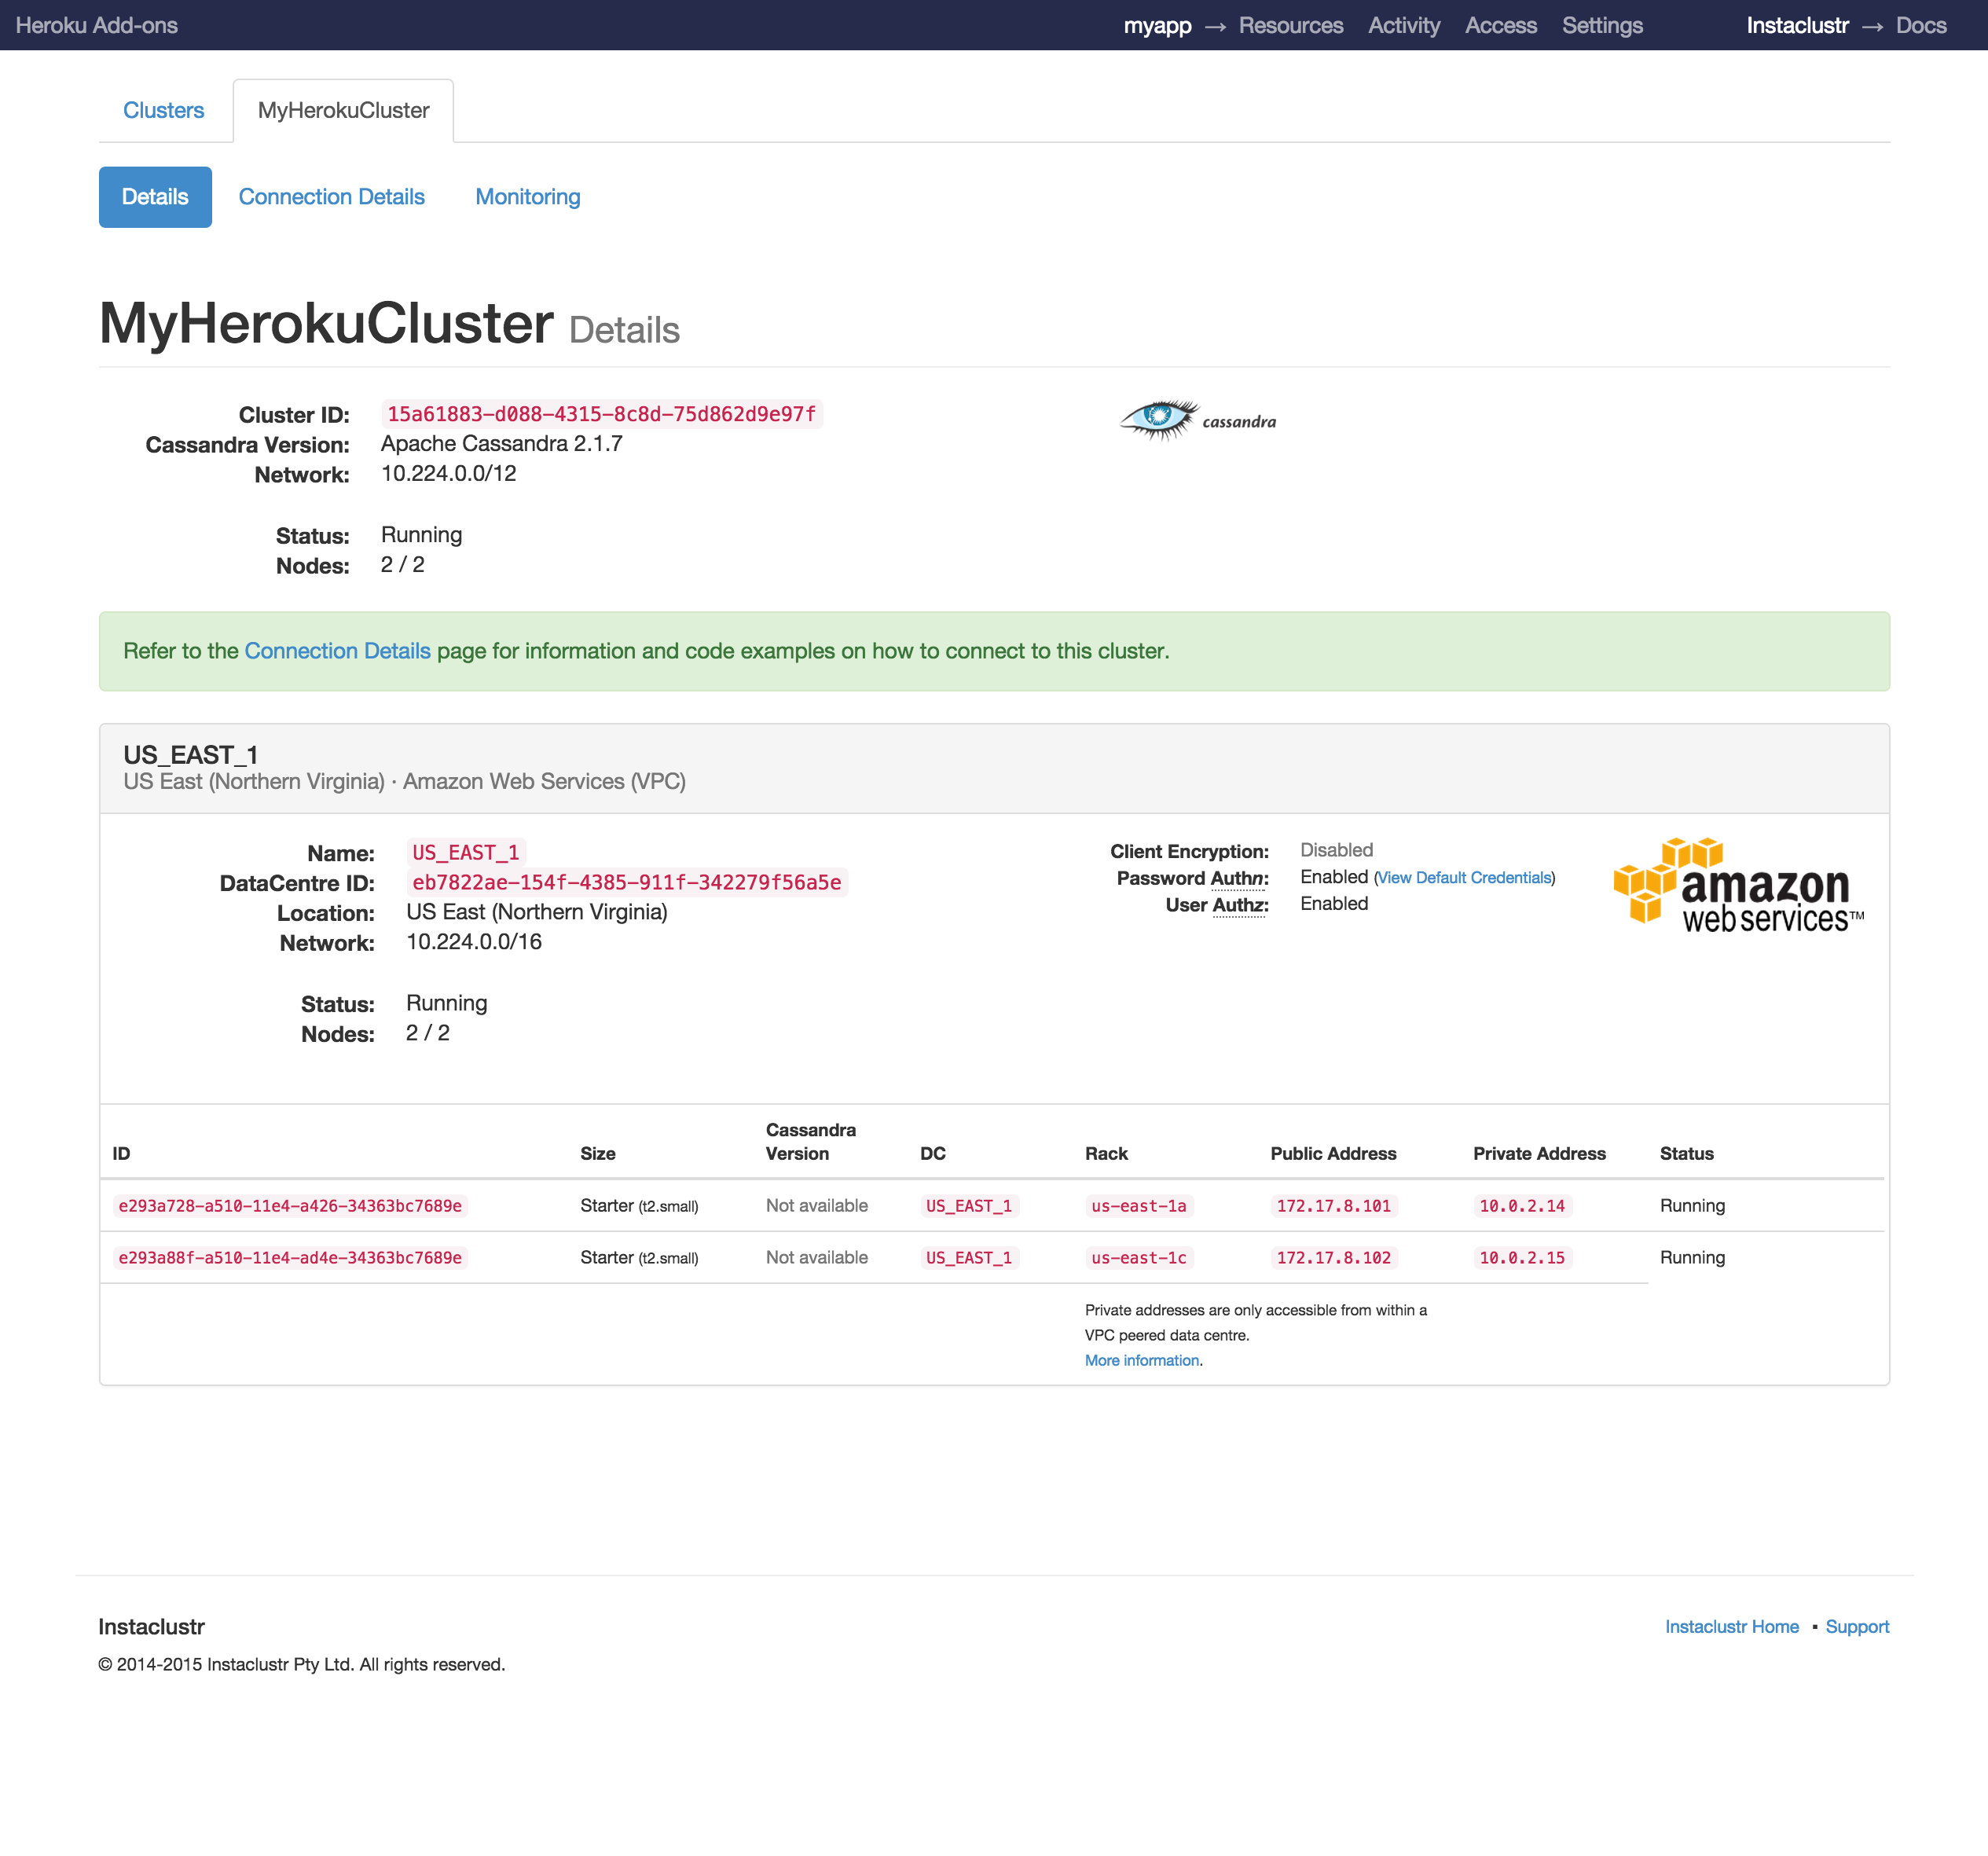
Dashboard
The Instaclustr dashboard gives you access to connection details and current status of your cluster, as well as real-time and historical monitoring statistics.
The Instaclustr dashboard can be launched from the CLI:
$ heroku addons:open instaclustr
Opening instaclustr for example
Alternatively, you can access the Instaclustr dashboard from the Heroku Dashboard by selecting Instaclustr from the list of installed Add-ons in your app.
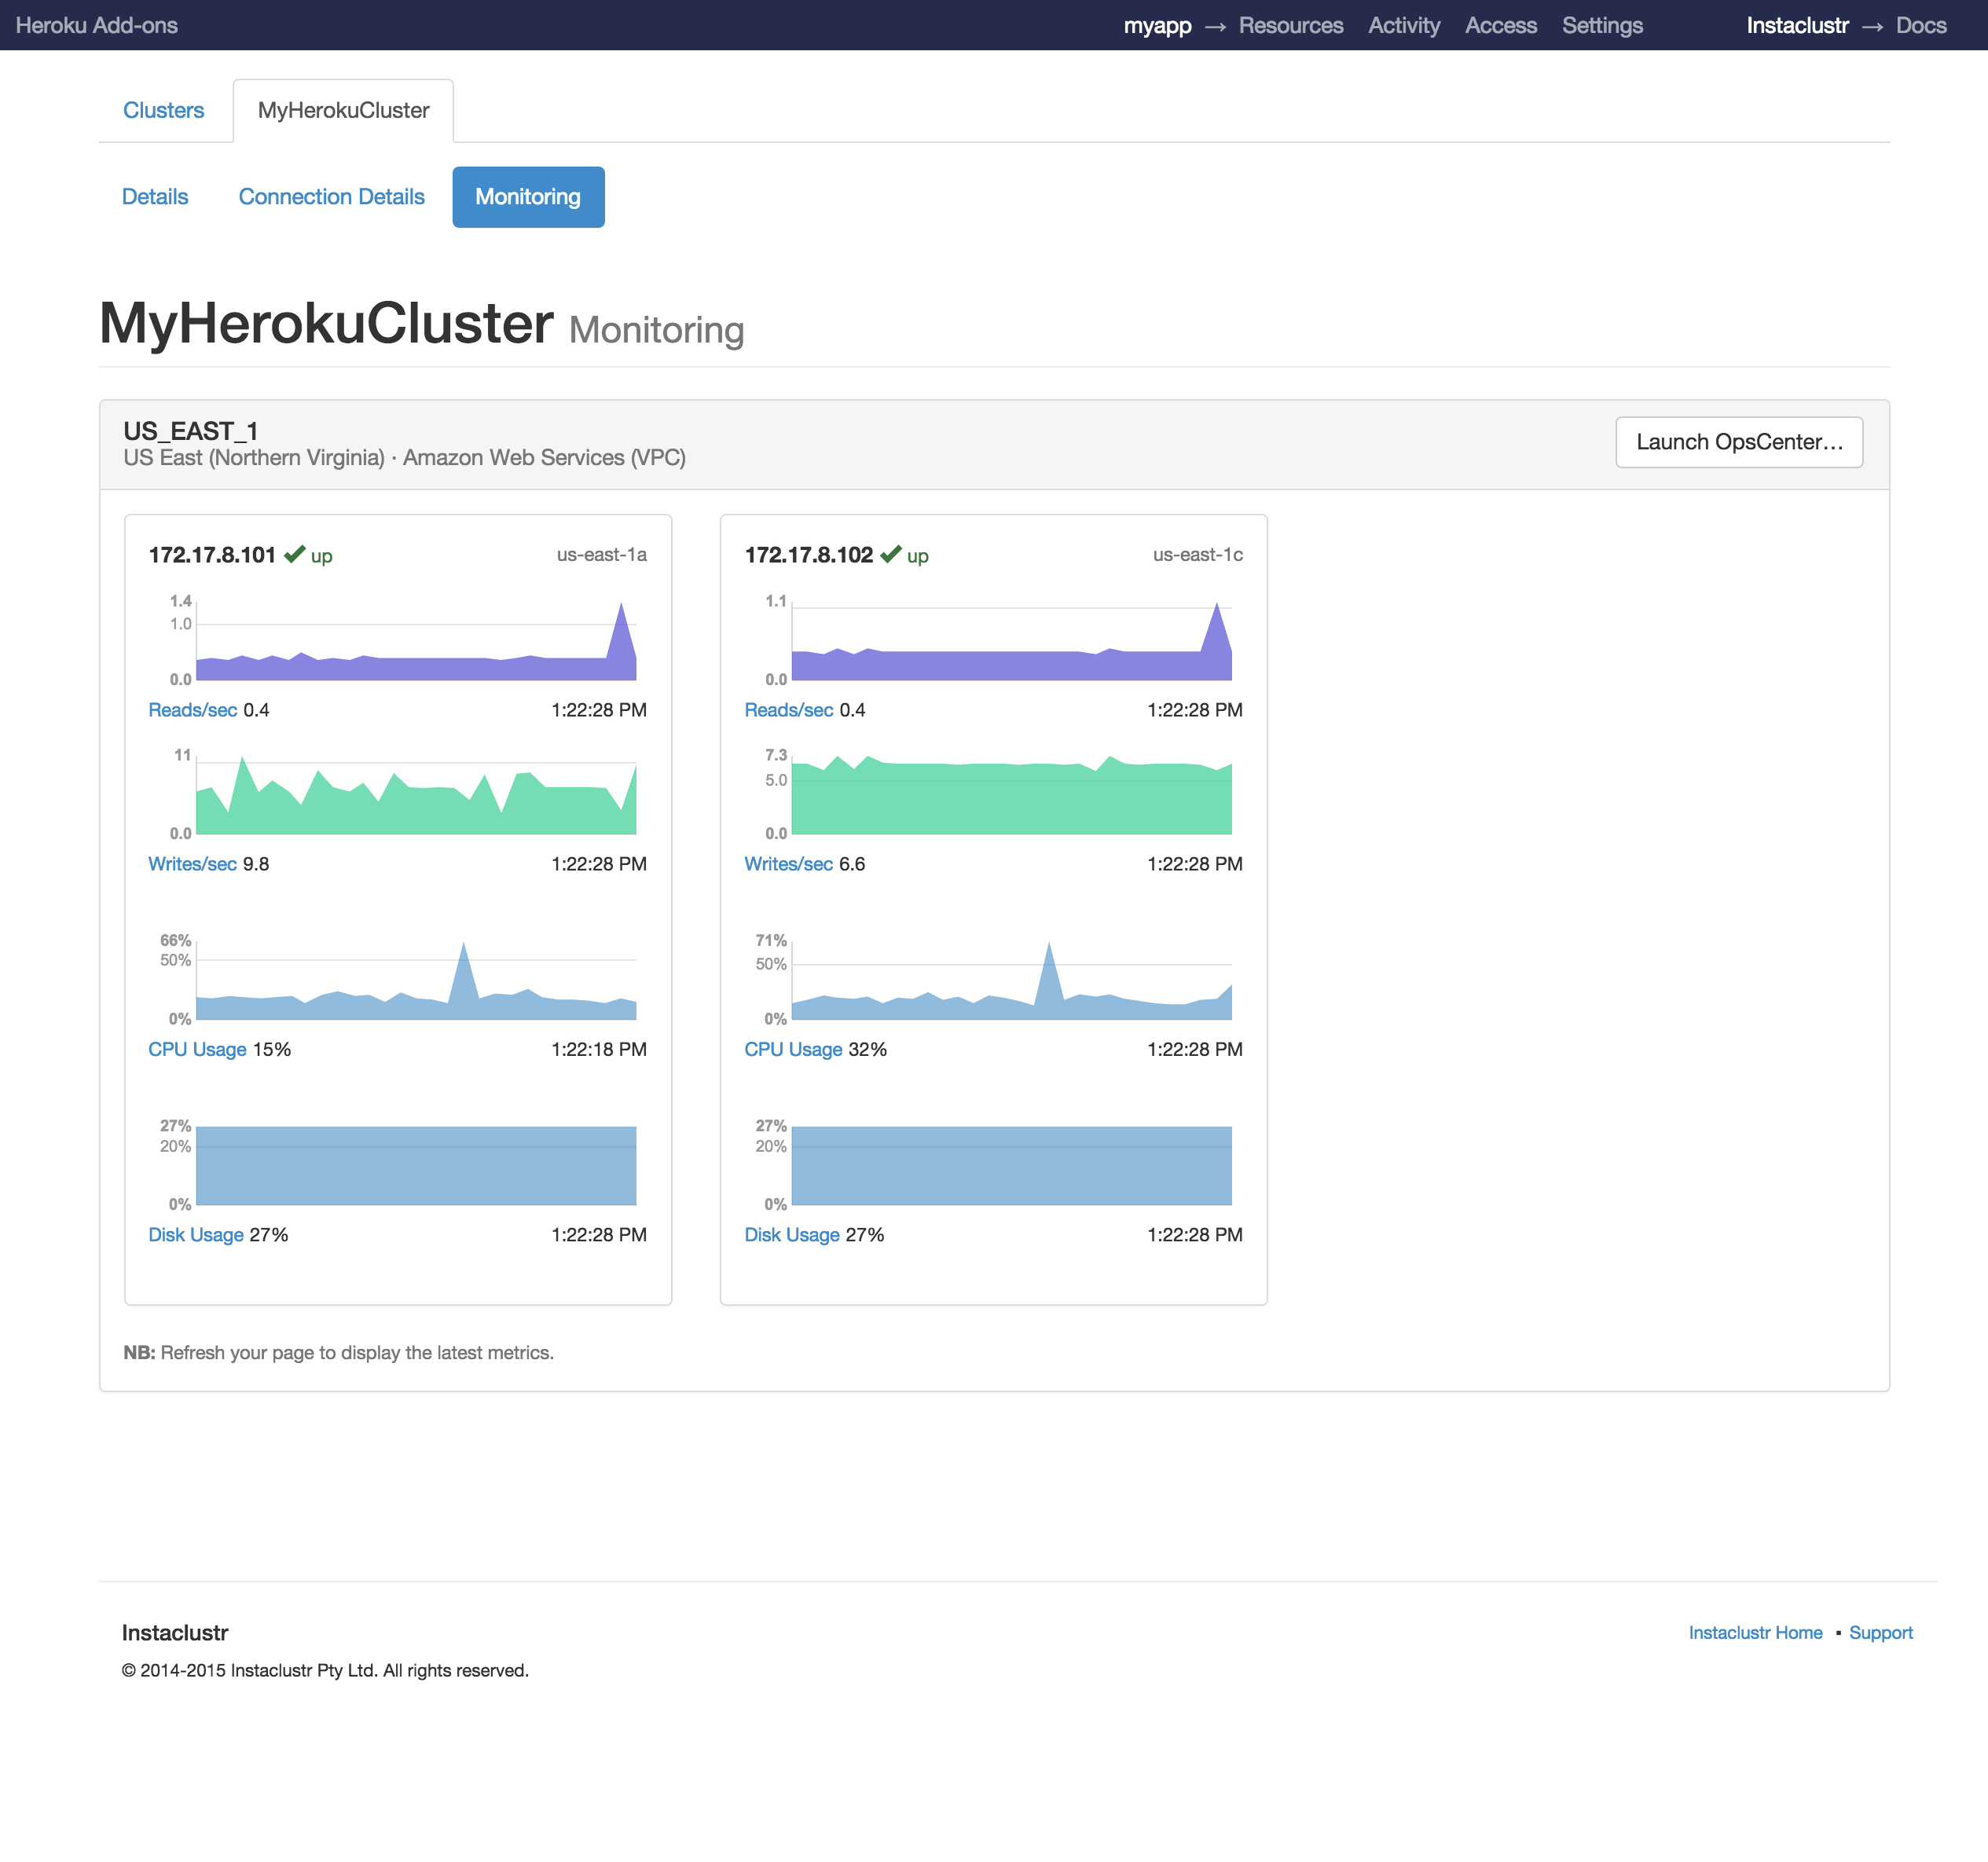
Monitoring
The Instaclustr dashboard gives you access to real-time information about the status and performance of your cluster. To access this feature select the ‘Monitoring’ tab from the Cluster Details page.
Troubleshooting
If you experience problems connecting to your cluster, first check the status from the Instaclustr dashboard. If all nodes are in RUNNING state and you are still unable to connect, contact Instaclustr support.
If you are unable to access the Instaclustr dashboard, check our status page for any announcements.
Migrating between plans
Changing between plans directly from Heroku is not currently supported. Contact Instaclustr support if you wish to resize your cluster.
Expanding your cluster
Apache Cassandra provides linear scalability, meaning you can double the throughput of the database by doubling the size of your cluster.
To increase the size of your cluster, contact Instaclustr support to discuss your requirements. Additional capacity can be added to your cluster in minutes after health checks are completed.
Instaclustr will advise you if your cluster is approaching capacity limits.
Removing the add-on
Instaclustr can be removed via the CLI or your app dashboard.
This will destroy all data and cannot be undone!
$ heroku addons:destroy instaclustr
-----> Removing instaclustr from example... done
Support
All Instaclustr support and runtime issues should be submitted via one of the Heroku Support channels. Any non-support related issues or product feedback is welcome at support@instaclustr.com.