Table of Contents [expand]
Last updated April 24, 2024
The Domain Name System (DNS) is the internet’s routing layer responsible for mapping human-readable domain names (for example, www.heroku.com) into machine-addressable IP addresses (for example, 198.51.100.1).
Amazon AWS’s DNS service is called Route 53 and is a highly available and scalable service. For users with existing AWS infrastructure components, it can be convenient to use Route 53 as your DNS provider.
This guide walks through the steps of setting up your Heroku app’s DNS configuration on Route 53.
Prerequisites
Before configuring your app’s DNS make sure you’ve used the Heroku CLI to attach your domain name to the application. This is necessary, including the third-party DNS changes, to properly route traffic for specific domains to the right application on Heroku.
If you haven’t done so yet, attach the correct domains to your app:
$ heroku domains:add example.com
$ heroku domains:add www.example.com
Be sure to specify all domains your application serves, including subdomains.
Overview
As with any DNS provider, configuring your Heroku app’s DNS involves the following steps:
- Create a CNAME record to map from
www.example.comto your DNS target for your own Custom Domain. - Establish a redirect from the root domain
example.comtowww.example.comto avoid the risks associated with root domains and A-records. - Set Route 53 servers as the nameservers for your domain.
Route 53 uses different terms than standard industry parlance so this guide has non-trivial variance from other guides.
Hosted Zone
A hosted zone is Route 53’s term for the collection of DNS records that make up a single domain’s configuration. You must create a hosted zone for each domain you wish to configure on Route 53.
Sign in to the AWS management console and select the Route 53 service. Click the Create hosted zone button and type the domain name you’re configuring.
Use the root domain name for the hosted zone (for example, example.com).
CNAME Records
New records, such as the www CNAME record, are added in Route 53 as a Record.
To create a Record:
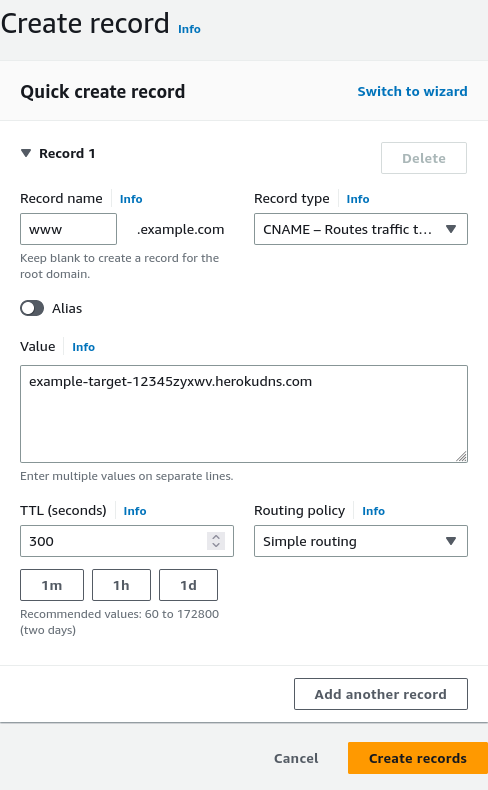
- Select the newly created hosted zone for your domain and click the
Create recordbutton. - The Create record window opens. In the Record name field, type the name
www(such as www.example.com). In the Record type field, select theCNAMEtype. In the Value field, type the custom domain’s DNS Target in the Value field.
$ heroku domains
=== sushi Heroku Domain

sushi-1234567890ab.herokuapp.com

=== sushi Custom Domains

 Domain Name      DNS Record Type DNS Target                              SNI Endpoint
 ──────────────── ─────────────── ─────────────────────────────────────── ─────────────
 www.example.com  CNAME           example-target-12345zyxwv.herokudns.com example-12345
Click the Create records button at the bottom of the form to save the www CNAME record mapping.
Naked/Root Domain
S3 doesn’t allow you to configure an SSL certificate, so you can’t easily use Route 53 to redirect your root domain in HTTPS. If you must this, consider using a DNS provider that offers CNAME/ALIAS records root domains. For more information, see the Custom domains Dev Center article, or this blog post, which shows how to set up an SSL naked domain redirect.
Route 53 supports Alias records, which use Amazon S3 static websites to dynamically resolve naked domains to their www counterparts using a 301 redirect. For example, example.com to www.example.com.
In order for the following bucket to appear when creating an Alias record in Route 53, you must name the bucket the exact same as the hosted zone. For example, if the hosted zone is example.com then the bucket is named example.com.
To create an Alias record:
- Go to your AWS management console, then open your S3 management console.
- Select the newly created bucket, but don’t open it. Click the
Propertiestab and open the “Static Website Hosting” section. - Click
Redirect all requests to another host nameand you see thatwww.example.comis pre-filled. If it isn’t, typewww.example.com. - Save the redirect settings, then open your Route 53 hosted zone for
example.com. - Create a record set. Leave the name blank. Select
Atype. Set alias toYesand selectexample.comfrom the S3 Website Endpoints section of the Alias Target dropdown. - Create the record set.
Your domain example.com now redirects to www.example.com in a scalable way. Using Route 53 and Amazon S3 you’ve set up a naked domain which, resolves to your Heroku app.
Activate Route 53
At this point, you’ve established the correct DNS configuration but no requests are using it. In order for Route 53 DNS to become active for your application you must tell your domain registrar (GoDaddy, DNSimple, NameCheap, 1&1, and so on) to use your hosted zone’s Route 53 nameservers.
Go back to the Hosted Zones list and select your new hosted zone. There’s a pre-populated Delegation Set section in the sidebar. These are the nameservers you must provide your domain registrar for Route 53 to resolve your app domain.
Refer to your registrar’s instructions for updating the nameservers.
Supply this Delegation Set to your registrar to activate Route 53 for your application. It can take up to 48 hours for nameservers to become fully active.