Last updated July 17, 2023
This add-on is operated by Trustifi
Trustifi gives you complete control of your email communications.
Trustifi is your comprehensive email tool-box:
- Easily send secured, tracked and encrypted emails using your address (or one of our dedicated addresses) - in order to maintain compliance (HIPAA, GDPR, PCI, etc.) and keep the data of your users/recipients secure and private.
- Secured and encrypted storage for your files - easy to access, upload and download.
- Dynamic templates - send highly customized emails with dynamic fields to fit your purpose and recipients.
- Most importantly - never lose your data. All info is kept secure and encrypted in our easy-to-use web app. All sent emails, attachments, contacts, and templates are accessible at any point.
Installing the Trustifi add-on
Installation through Heroku CLI
heroku addons:create trustifi --app your-app-name --wait
Installation through the Heroku Dashboard
- From your application’s “Resources” tab, scroll down to the “Add-ons” section and search for “Trustifi”:

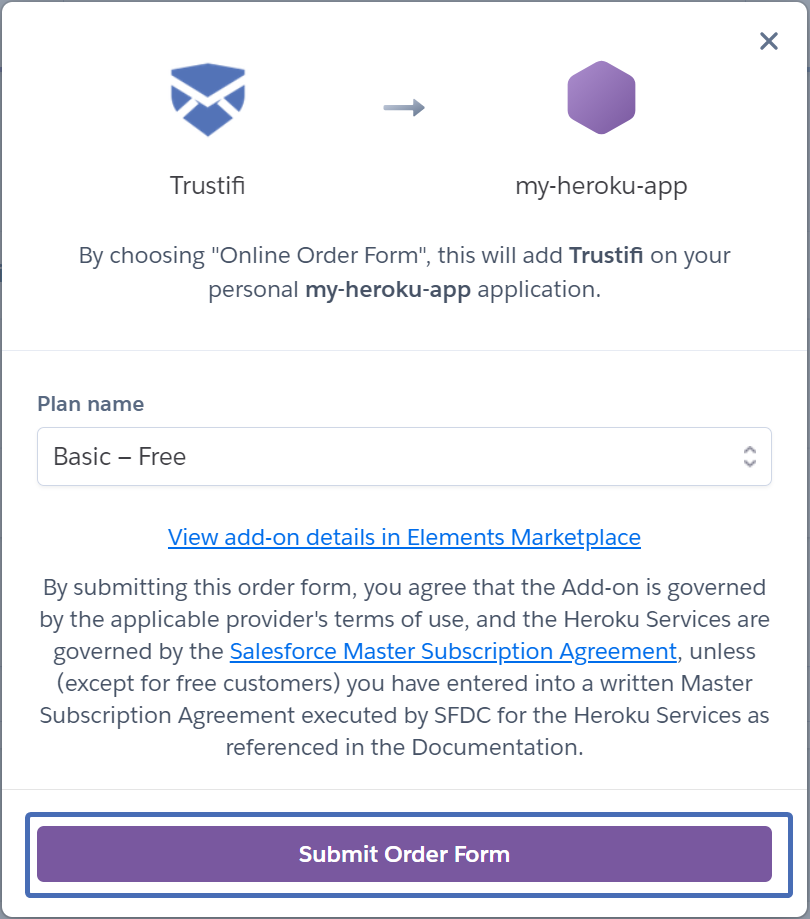
- A pop-up will open, choose the relevant plan from the list and click “Submit Order Form”:
After installation, Trustifi will automatically provide you with an email address that you can use immediately with the add-on. If you want to use your own email address instead, it will require a quick extra step of verifying your address.
Local setup
Environment setup
After you provision the add-on, it’s necessary to locally replicate its config vars so your development environment can operate against the service.
Use the Heroku Local command-line tool to configure, run and manage process types specified in your app’s Procfile. Heroku Local reads configuration variables from a .env file. To view all of your app’s config vars, type heroku config. Use the following command for each value that you want to add to your .env file:
$ heroku config:get TRUSTIFI_KEY --app your-app-name -s  >> .env
$ heroku config:get TRUSTIFI_SECRET --app your-app-name -s  >> .env
$ heroku config:get TRUSTIFI_URL --app your-app-name -s  >> .env
Credentials and other sensitive configuration values should not be committed to source-control. In Git exclude the .env file with: echo .env >> .gitignore.
For more information, see the Heroku Local article.
Using with cURL
The following code example will send an email using the Trustifi API to a single recipient.
$ heroku run bash

~ $ curl -k -L -X POST "$TRUSTIFI_URL/api/i/v1/email" \
-H "x-trustifi-key: $TRUSTIFI_KEY" \
-H "x-trustifi-secret: $TRUSTIFI_SECRET" \
-H "content-type: application/json" \
-d \
 "{
\"recipients\":[{
    \"email\":\"test@trustificorp.org\"
}],
\"title\":\"Title\",
\"html\":\"Body\"
}"
For more code samples, response samples and additional information, see https://api.trustifi.com/
Using with jQuery
The following code example will send an email using the Trustifi API to a single recipient.
let settings = {
  "url": TRUSTIFI_URL+"/api/i/v1/email",
  "method": "POST",
  "headers": {
    "x-trustifi-key": TRUSTIFI_KEY,
    "x-trustifi-secret": TRUSTIFI_SECRET,
    "content-type": "application/json"
  },
  "data": JSON.stringify({"recipients":[{"email":"test@trustificorp.org"}],"title":"Title","html":"Body"})
};

$.ajax(settings).done(function (response) {
  console.log(response);
});
For more code samples, response samples and additional information, see https://api.trustifi.com/
Using with Ruby
The following code example will send an email using the Trustifi API to a single recipient.
require "uri"
require "net/http"
require "json"

url = URI.parse(ENV['TRUSTIFI_URL'] + "/api/i/v1/email")
https = Net::HTTP.new(url.host, url.port)
https.use_ssl = true

request = Net::HTTP::Post.new(url)
request["x-trustifi-key"] = ENV['TRUSTIFI_KEY']
request["x-trustifi-secret"] = ENV['TRUSTIFI_SECRET']
request["content-type"] = "application/json"
request.body = "{\"recipients\": [{\"email\": \"test@trustificorp.org\"}],\"title\":\"Title\",\"html\":\"Body\"}"

response = https.request(request)
puts response.read_body
For more code samples, response samples and additional information, see https://api.trustifi.com/
Using with Python
The following code example will send an email using the Trustifi API to a single recipient.
import  requests, os

url = os.environ['TRUSTIFI_URL']+'/api/i/v1/email'

payload = "{\"recipients\":[{\"email\":\"test@trustificorp.org\"}],\"title\":\"Title\",\"html\":\"Body\"}"
headers = {
  'x-trustifi-key': os.environ['TRUSTIFI_KEY'],
  'x-trustifi-secret': os.environ['TRUSTIFI_SECRET'],
  'Content-Type': 'application/json'
}

response = requests.request('POST', url, headers = headers, data = payload)
print(response.json())
For more code samples, response samples and additional information, see https://api.trustifi.com/
Using with Node
The following code example will send an email using the Trustifi API to a single recipient.
const request = require('request');

request.post(process.env.TRUSTIFI_URL + '/api/i/v1/email', {
   headers: {
    'x-trustifi-key': process.env.TRUSTIFI_KEY,
    'x-trustifi-secret': process.env.TRUSTIFI_SECRET
  },
  json:{"recipients":[{"email":"test@trustificorp.org"}],"title":"Title","html":"Body"}
}, (err, res, body) => {
   console.log(body);
});
For more code samples, response samples and additional information, see https://api.trustifi.com/
Using with PHP
The following code example will send an email using the Trustifi API to a single recipient.
<?php
$curl = curl_init();
curl_setopt_array($curl, array(
    CURLOPT_URL => $_ENV['TRUSTIFI_URL'] . "/api/i/v1/email",
    CURLOPT_RETURNTRANSFER => true,
    CURLOPT_ENCODING => "",
    CURLOPT_MAXREDIRS => 10,
    CURLOPT_TIMEOUT => 0,
    CURLOPT_FOLLOWLOCATION => true,
    CURLOPT_HTTP_VERSION => CURL_HTTP_VERSION_1_1,
    CURLOPT_CUSTOMREQUEST => "POST",
    CURLOPT_POSTFIELDS =>"{\"recipients\":[{\"email\":\"test@trustificorp.org\"}],\"title\":\"Title\",\"html\":\"Body\"}",
    CURLOPT_HTTPHEADER => array(
        "x-trustifi-key: " . $_ENV['TRUSTIFI_KEY'],
        "x-trustifi-secret: " . $_ENV['TRUSTIFI_SECRET'],
        "content-type: application/json"
    )
));

$response = curl_exec($curl);
$err = curl_error($curl);
curl_close($curl);
if ($err) {
    echo "cURL Error #:" . $err;
} else {
    echo $response;
}
?>
For more code samples, response samples and additional information, see https://api.trustifi.com/
Using with Go
The following code example will send an email using the Trustifi API to a single recipient.
package main
import (
    "fmt"
    "strings"
    "net/http"
    "io/ioutil"
    "os"
)

func main() {
    url := os.Getenv("TRUSTIFI_URL") + "/api/i/v1/email"
    method := "POST"
    payload := strings.NewReader("{\"recipients\":[{\"email\":\"test@trustificorp.org\"}],\"title\":\"Title\",\"html\":\"Body\"}")
    client := &http.Client {}
    req, err := http.NewRequest(method, url, payload)
    req.Header.Add("x-trustifi-key", os.Getenv("TRUSTIFI_KEY"))
    req.Header.Add("x-trustifi-secret", os.Getenv("TRUSTIFI_SECRET"))
    req.Header.Add("Content-Type", "application/json")
    res, err := client.Do(req)
    if err != nil {
        panic(err)
    }
    defer res.Body.Close()
    body, _ := ioutil.ReadAll(res.Body)
    fmt.Println(string(body))
}
For more code samples, response samples and additional information, see https://api.trustifi.com/
Use templates with dynamic data
Trustifi allows you to create customized email templates that can be used for customer engagement. You can make use of dynamic fields (see explanation below) to personalize the emails to your company and recipients.
To view a more detailed guide about creating and using email templates click here - Customized templates guide
Creating a template
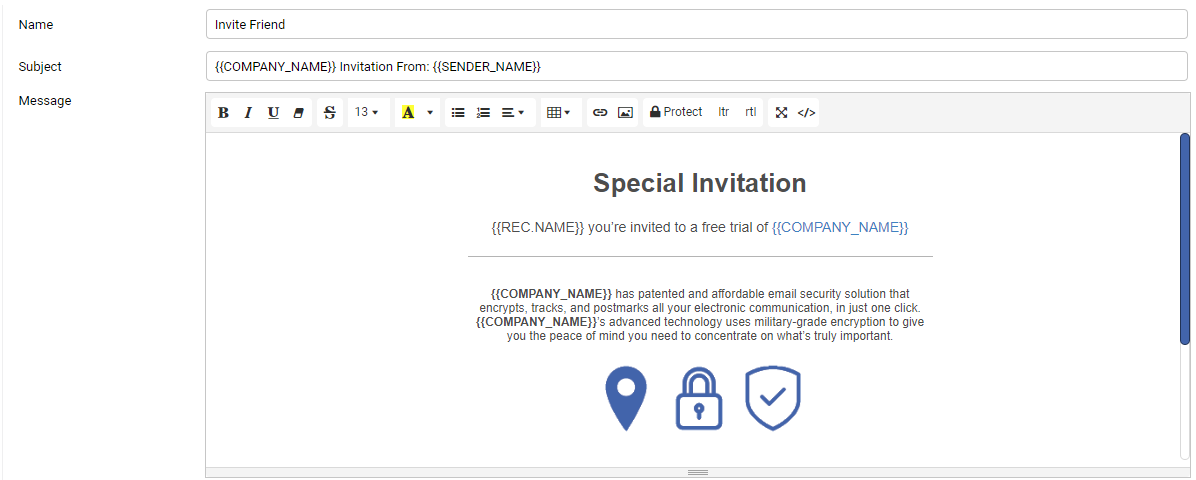
Below is an example of creating a Trustifi template - fields surrounded by curly braces are dynamic fields.
For example, {{REC.NAME}} will refer to the specific recipient of the email and {{SENDER_EMAIL}} will refer to the sender’s email address.
Dynamic fields can be used in the email’s body and subject.
const request = require('request');
var postData = {
"name": "my_template",
"title": "template title",
"html": "<p>Hello {{REC.NAME}}, this is an email from {{SENDER_EMAIL}}!</p><p>{{first_field}}</p><p>{{second_field}}<br></p>"
};
request.post(process.env.TRUSTIFI_URL+'/api/i/v1/template', {
headers: {
'x-trustifi-key': process.env.TRUSTIFI_KEY,
'x-trustifi-secret': process.env.TRUSTIFI_SECRET
},
json: postData
}, (err, res, body) => {
console.log(body);
})
Here’s a customized template in the Trustifi dashboard. Notice the dynamic fields (surrounded by curly braces); these fields will display the relevant information when the email arrives in the recipient’s inbox:
See our API documentation for a more detailed example.
Sending a template with dynamic fields
To send an email with a predefined template, you can refer to it by name in your “Compose email” (POST) request.
Custom dynamic fields can be declared here. In this example, {{first_field}} translates to “hello” and {{second_field}} translates to “world”.
const request = require('request');

var postData =  {
  "template": {
    "name": "my_template",
    "fields": {
      "first_field": "hello",
      "second_field": "world"
    },
  },
  "recipients": [{
    "email": "recipient@trustificorp.org"
  }]
};

request.post(process.env.TRUSTIFI_URL+'/api/i/v1/email', {
   headers: {
      'x-trustifi-key': process.env.TRUSTIFI_KEY,
      'x-trustifi-secret': process.env.TRUSTIFI_SECRET
   },
   json: postData
}, (err, res, body) => {
   console.log(body);
})
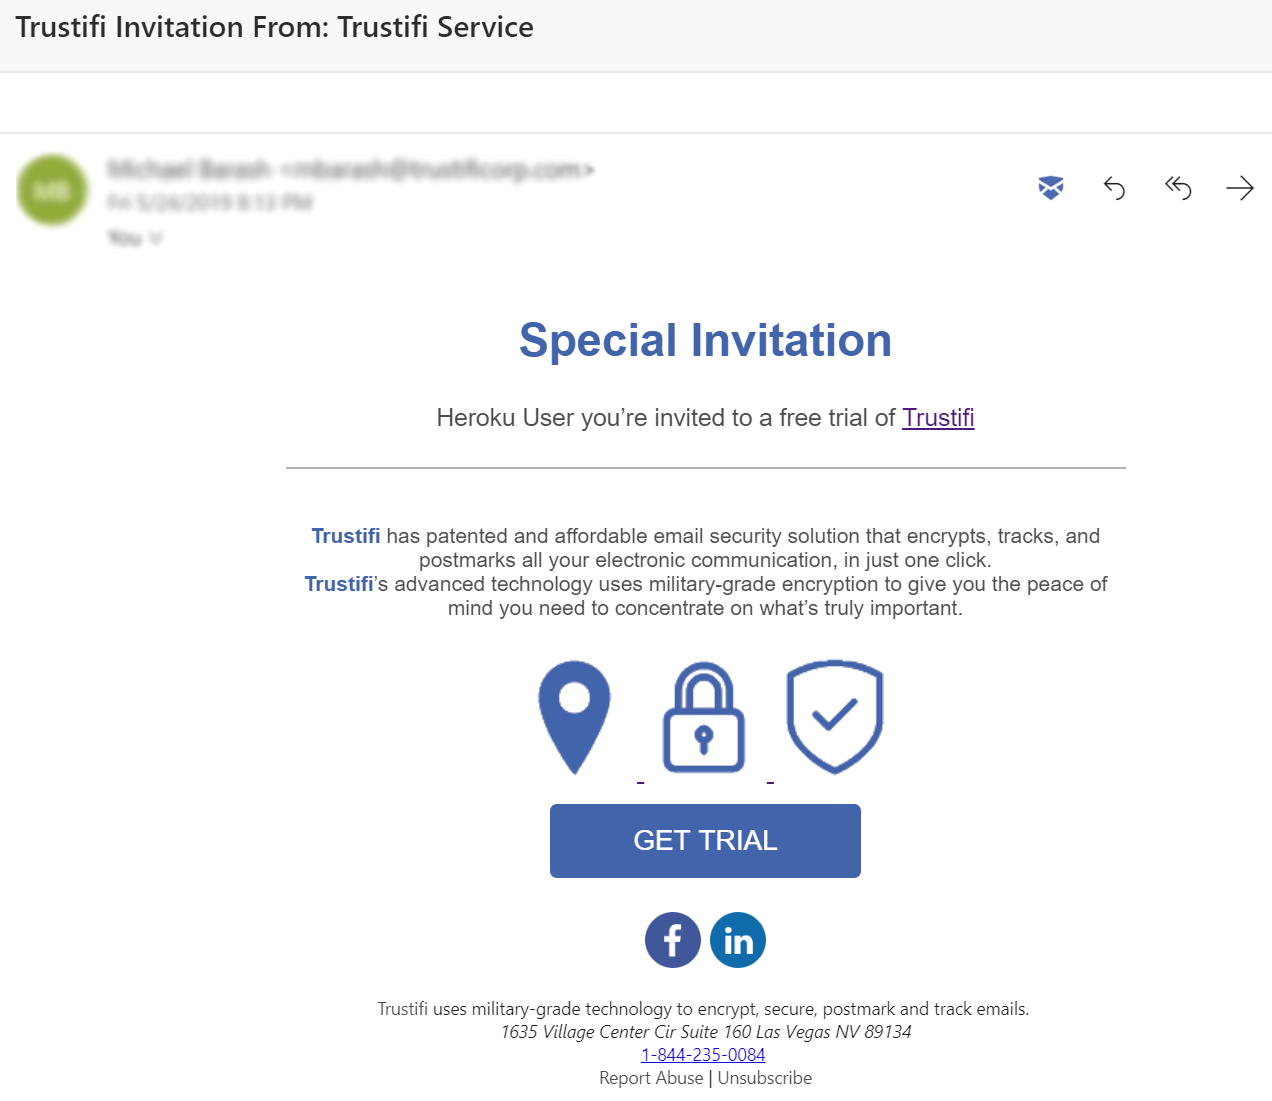
Here is how the same template from before would look once it arrives in the recipient’s inbox. Notice that the dynamic fields like {{REC.NAME}} display the relevant information:
See our API documentation for more information.
Dashboard
$ heroku addons:open trustifi --app your-app-name
You can also access the dashboard by visiting the Heroku Dashboard and selecting Trustifi from the Add-ons menu:

By clicking on the Trustifi add-on, you will be logged in to your account using Single Sign On
Features and capabilities of the Trustifi dashboard
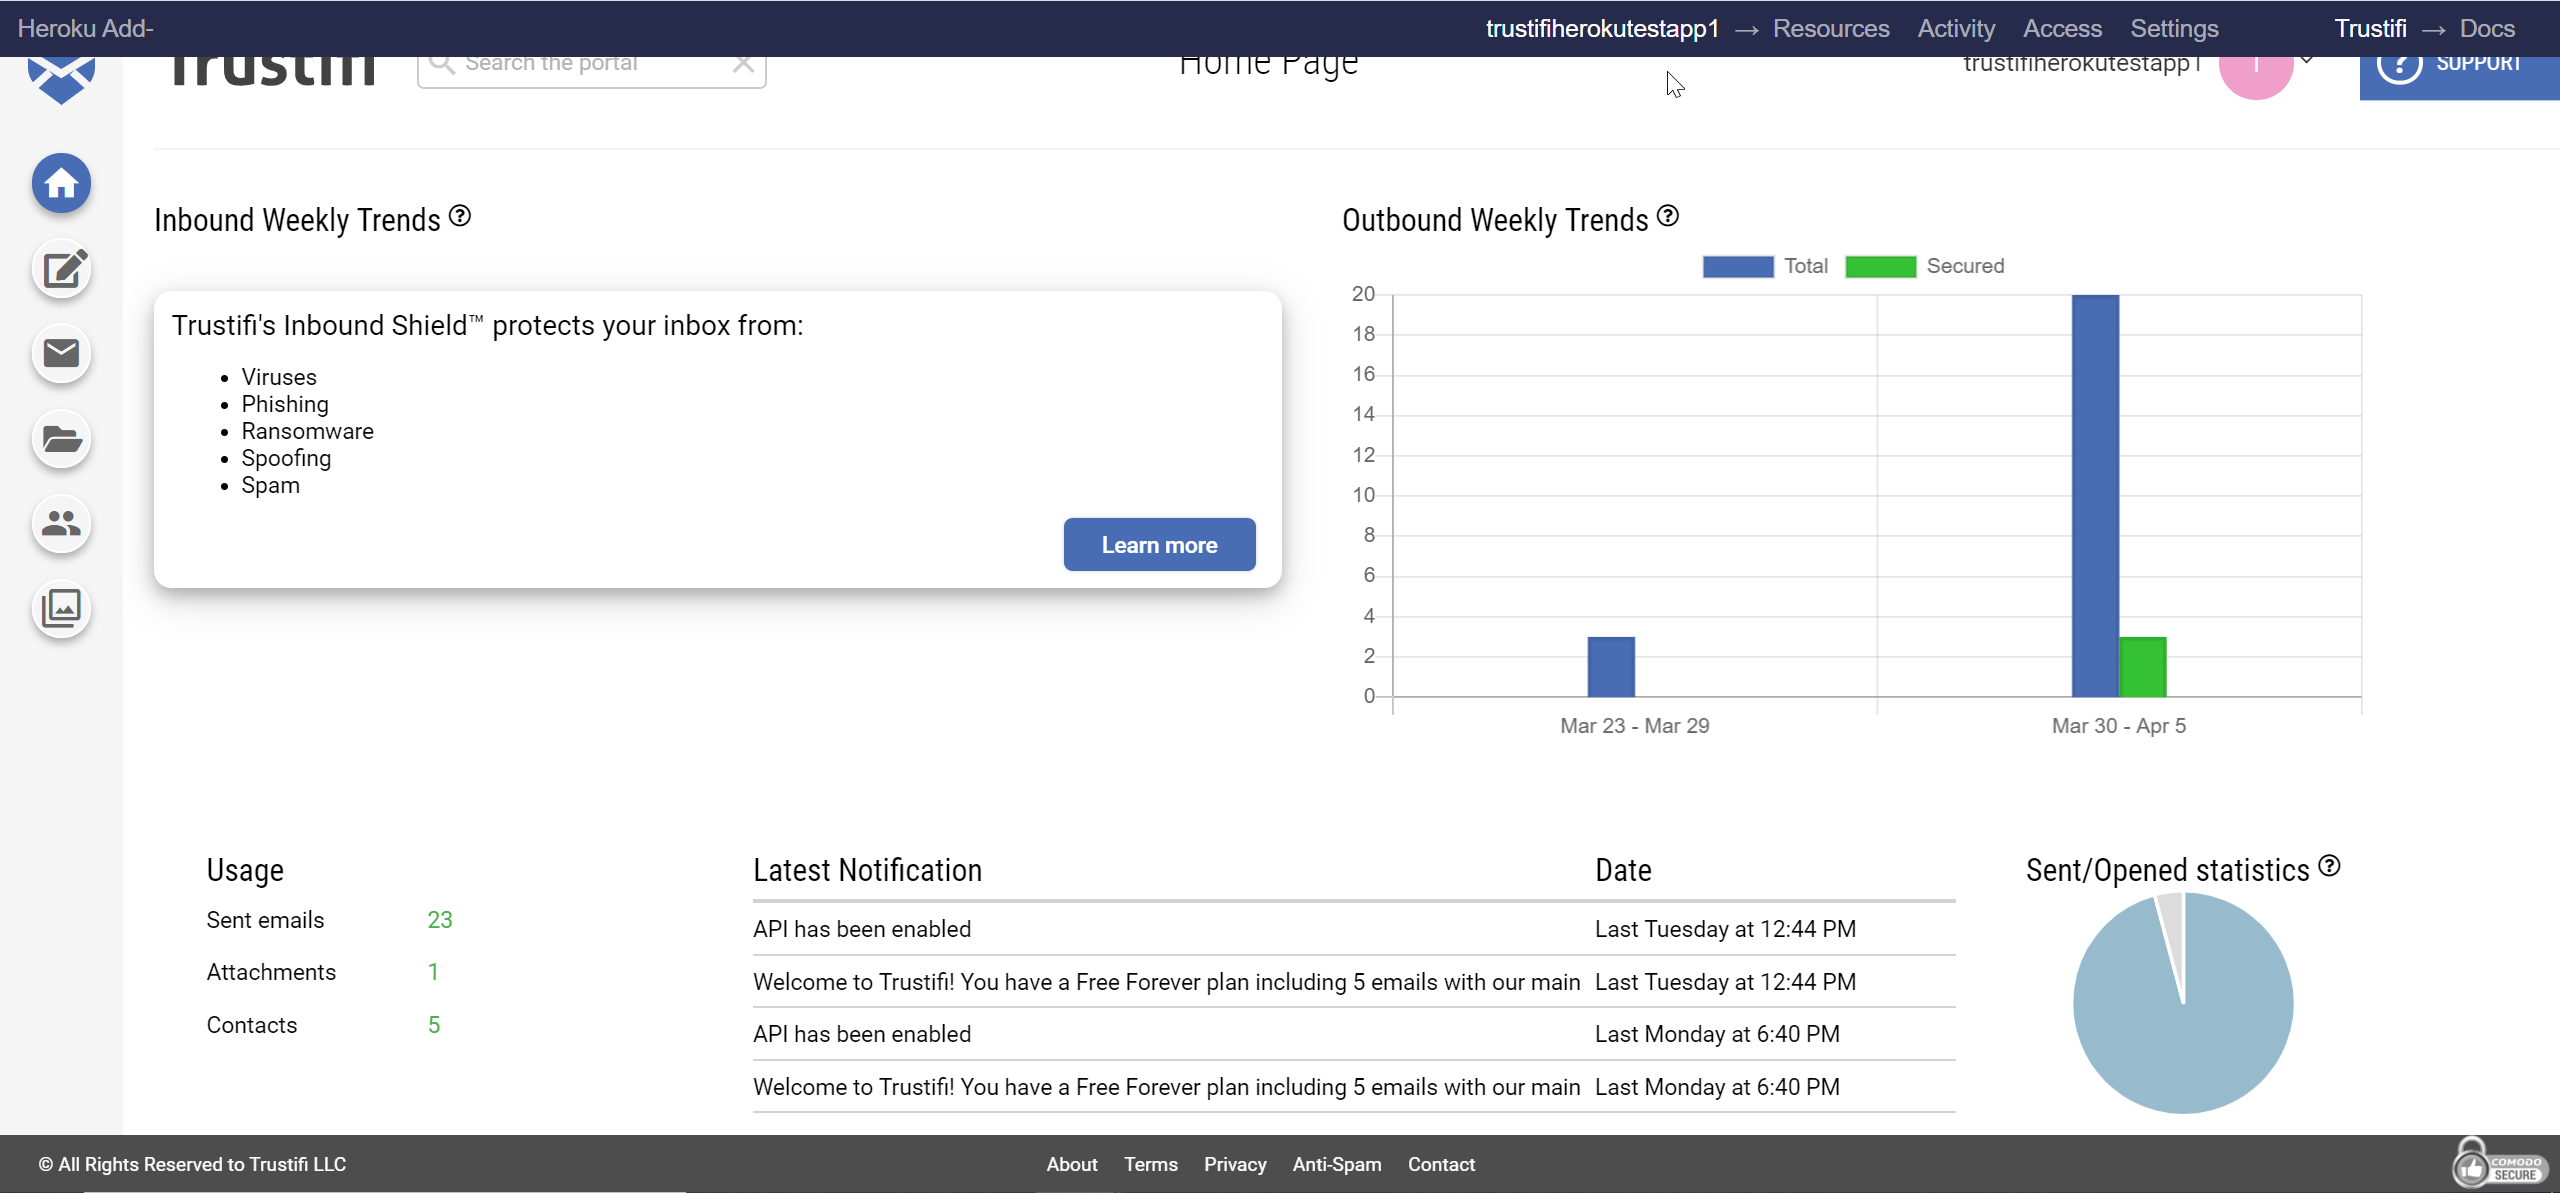
View tracking information for sent emails
- Who opened the email, where from, and with which device and browser?
- Were any of the links in the email body clicked?
- Were any of the email’s attachments downloaded?
- Did the recipient(s) pass or fail Multi-Factor-Authentication?
- Was the email printed?
- …and more.
![]()
Control sent emails
- Block recipients from accessing the email or block the email for everyone
- Recall the email to edit the the content after it was sent
- Set or change an expiration date for the email
- …and more.
Upload a custom logo
You can upload a custom logo from the “Settings” page. The logo will be used in all of your encrypted emails sent with Trustifi.
Add additional “from” addresses
You can add and verify additional email addresses to be used as the “from” address in your emails. Addresses can be added from the “Settings” page.

Email addresses must be verified before they can be used. To verify, click on the provided link in the email received from Trustifi Service.
Sending an email with a custom “from” address
After the email address has been verified, you may add the “from” object to your POST request and set the “email” field as the new email address:
const request = require('request');

var postData =  {
  "from":{
    "email": "your-app-name@heroku.trustifi.com"
  },
  "recipients": [{
    "email": "recipient@trustificorp.org"
  }],
  "template": {
    "name": "my_template",
    "fields": {
      "first_field": "hello",
      "second_field": "world"
    }
  }
};

request.post(process.env.TRUSTIFI_URL+'/api/i/v1/email', {
   headers: {
      'x-trustifi-key': process.env.TRUSTIFI_KEY,
      'x-trustifi-secret': process.env.TRUSTIFI_SECRET
   },
   json: postData
}, (err, res, body) => {
   console.log(body);
})
Secure attachments storage
Every attachment sent with Trustifi is saved in an encrypted database and can be accessed from the “Secure Storage” page of the dashboard.
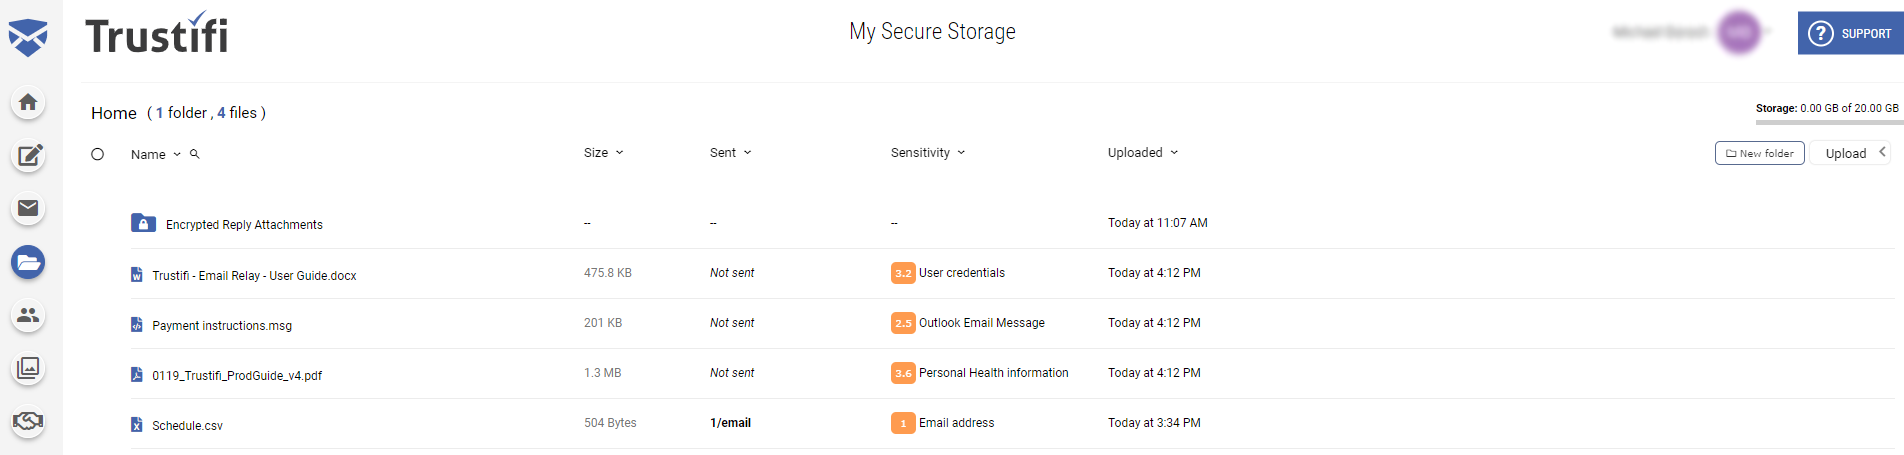
Information available for your attachments:
- When was it uploaded?
- Which email(s) contain this attachment?
- Does this attachment contain sensitive information?
- What kind of sensitive content does the attachment contain?
Here’s an example of uploading an attachment using the Trustifi add-on:
const request = require('request');

request.post(process.env.TRUSTIFI_URL+'/api/i/v1/attachment', {
   headers: {
      'x-trustifi-key': process.env.TRUSTIFI_KEY,
      'x-trustifi-secret': process.env.TRUSTIFI_SECRET
   },
   formData: {
      file: {
         value: "text content buffer",
         options: {contentType: "text/plain", filename: "filename.txt"}
      }
   }
}, (err, res, body) => {
   console.log(body);
})
For more information on the features available within the Trustifi dashboard, please see the documentation at Trustifi docs.
Troubleshooting
See https://api.trustifi.com for more information about correct usage and responses
Email address is not verified (error code 400 - bad request)
You must verify your email address by clicking on the provided link in the email sent from Trustifi Support.
User plan is blocked (error code 400 - bad request)
Contact support at heroku-support@trustificorp.com.
User plan is expired (error code 400 - bad request)
Can be solved by upgrading your plan.
Migrating between plans
Use the heroku addons:upgrade trustifi command to migrate to a new plan.
$ heroku addons:upgrade trustifi trustifi:newplan --app your-app-name
-----> Upgrading trustifi:newplan to sharp-mountain-4005... done, v18 ($49/mo)
       Your plan has been updated to: trustifi:newplan
A list of all plans available can be found here.
Removing the add-on
You can remove Trustifi via the CLI:
This will destroy all associated data and cannot be undone!
$ heroku addons:destroy trustifi --app your-app-name
-----> Destroying trustifi-cylindrical-60858 on app-name... done
GDPR
Information about GDPR can be found here: https://trustifi.com/gdpr.pdf
Support
All Trustifi support and runtime issues should be submitted via one of the Heroku Support channels. Any non-support related issues or product feedback is welcome at our support email.