Deep-dive on the Next Gen Platform. Join the Webinar!

Skip Navigation
Show nav
Dev Center
  • Get Started
  • Documentation
  • Changelog
  • Search
  • Get Started
    • Node.js
    • Ruby on Rails
    • Ruby
    • Python
    • Java
    • PHP
    • Go
    • Scala
    • Clojure
    • .NET
  • Documentation
  • Changelog
  • More
    Additional Resources
    • Home
    • Elements
    • Products
    • Pricing
    • Careers
    • Help
    • Status
    • Events
    • Podcasts
    • Compliance Center
    Heroku Blog

    Heroku Blog

    Find out what's new with Heroku on our blog.

    Visit Blog
  • Log inorSign up
Hide categories

Categories

  • Heroku Architecture
    • Compute (Dynos)
      • Dyno Management
      • Dyno Concepts
      • Dyno Behavior
      • Dyno Reference
      • Dyno Troubleshooting
    • Stacks (operating system images)
    • Networking & DNS
    • Platform Policies
    • Platform Principles
  • Developer Tools
    • Command Line
    • Heroku VS Code Extension
  • Deployment
    • Deploying with Git
    • Deploying with Docker
    • Deployment Integrations
  • Continuous Delivery & Integration (Heroku Flow)
    • Continuous Integration
  • Language Support
    • Node.js
      • Working with Node.js
      • Troubleshooting Node.js Apps
      • Node.js Behavior in Heroku
    • Ruby
      • Rails Support
      • Working with Bundler
      • Working with Ruby
      • Ruby Behavior in Heroku
      • Troubleshooting Ruby Apps
    • Python
      • Working with Python
      • Background Jobs in Python
      • Python Behavior in Heroku
      • Working with Django
    • Java
      • Java Behavior in Heroku
      • Working with Java
      • Working with Maven
      • Working with Spring Boot
      • Troubleshooting Java Apps
    • PHP
      • PHP Behavior in Heroku
      • Working with PHP
    • Go
      • Go Dependency Management
    • Scala
    • Clojure
    • .NET
      • Working with .NET
  • Databases & Data Management
    • Heroku Postgres
      • Postgres Basics
      • Postgres Getting Started
      • Postgres Performance
      • Postgres Data Transfer & Preservation
      • Postgres Availability
      • Postgres Special Topics
      • Migrating to Heroku Postgres
    • Heroku Key-Value Store
    • Apache Kafka on Heroku
    • Other Data Stores
  • AI
    • Working with AI
  • Monitoring & Metrics
    • Logging
  • App Performance
  • Add-ons
    • All Add-ons
  • Collaboration
  • Security
    • App Security
    • Identities & Authentication
      • Single Sign-on (SSO)
    • Private Spaces
      • Infrastructure Networking
    • Compliance
  • Heroku Enterprise
    • Enterprise Accounts
    • Enterprise Teams
    • Heroku Connect (Salesforce sync)
      • Heroku Connect Administration
      • Heroku Connect Reference
      • Heroku Connect Troubleshooting
  • Patterns & Best Practices
  • Extending Heroku
    • Platform API
    • App Webhooks
    • Heroku Labs
    • Building Add-ons
      • Add-on Development Tasks
      • Add-on APIs
      • Add-on Guidelines & Requirements
    • Building CLI Plugins
    • Developing Buildpacks
    • Dev Center
  • Accounts & Billing
  • Troubleshooting & Support
  • Integrating with Salesforce
  • Security
  • Identities & Authentication
  • Single Sign-on (SSO)
  • Set Up Salesforce Identity SSO with Heroku

Set Up Salesforce Identity SSO with Heroku

English — 日本語に切り替える

Last updated May 30, 2024

Table of Contents

  • Download Identity Provider Metadata from Salesforce
  • Set Up the Service Provider Side (Heroku)
  • Link Salesforce Identity to Heroku

SSO is available only for Heroku Teams and Heroku Enterprise customers.

Salesforce Identity can serve as the identity provider (IdP), to provide single sign-on (SSO) user login to Heroku via SAML.

Setting up Salesforce as an identity provider for Heroku takes a few steps involving Salesforce and Heroku web interfaces:

Download Identity Provider Metadata from Salesforce

If you already set up Salesforce as an identity provider, you can download the Identity Provider metadata file.

  1. Log into your Salesforce org as an admin.
  2. Go to Settings > Identity > Identity Provider.
  3. Download the metadata file.

If you must set up Salesforce as an identity provider or change the identity provider configuration, refer detailed instructions including prerequisites.

Set Up the Service Provider Side (Heroku)

  1. In the Heroku web interface, select the team or Enterprise account you want to set up SSO for.
  2. Go to the Settings tab.
  3. Click Setup SSO.
  4. Upload the IdP metadata file you downloaded from Salesforce.
  5. Toggle the Enable SSO switch to enable.

Link Salesforce Identity to Heroku

Three values display in the Heroku dashboard. Heroku dashboard SSO settings 
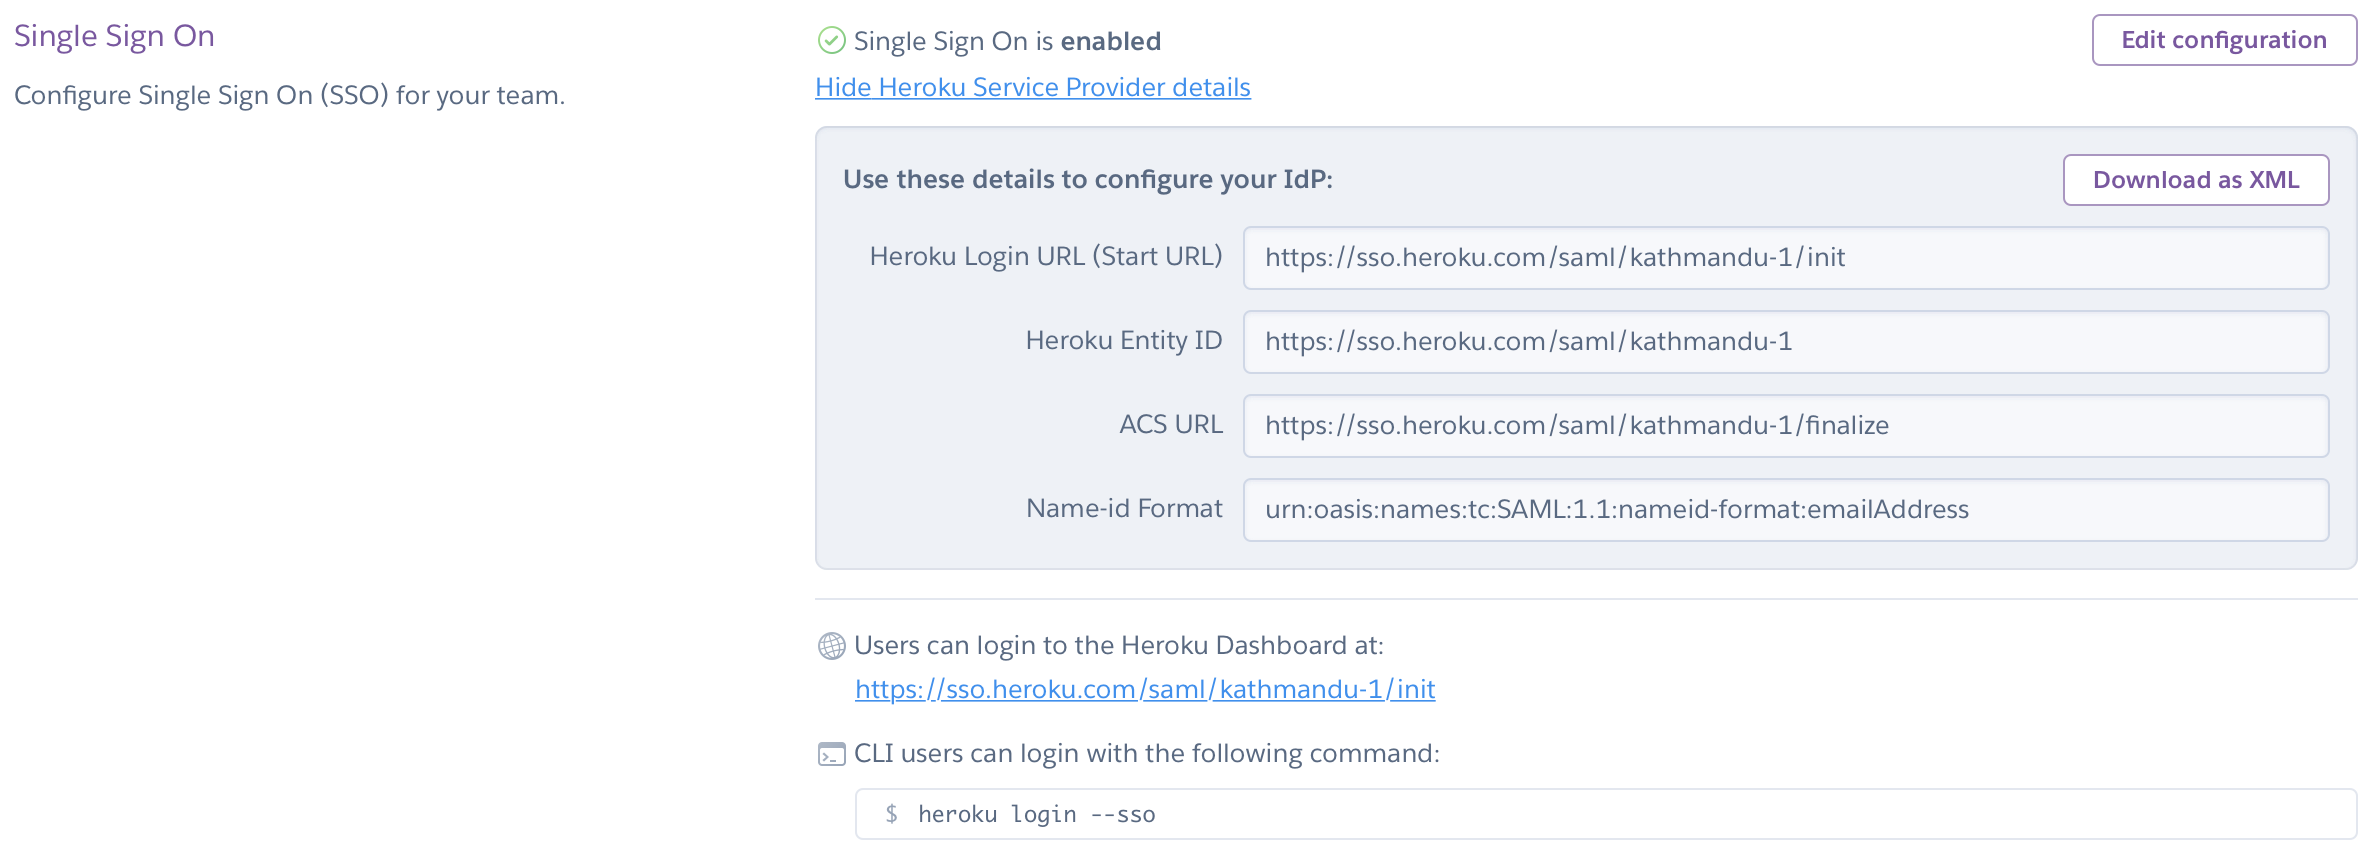
Use these values to create and set up a connected app on Salesforce in the following steps.

  1. In a separate browser tab, go to your Salesforce Admin homepage.
  2. Go to Settings > Identity > Identity Provider.
  3. Click the link under the Service Providers section to create a new connected app.
  4. Fill in the required “Connected App Name”, “API Name”, and “Contact E-mail” fields. Note the app name for the next step.
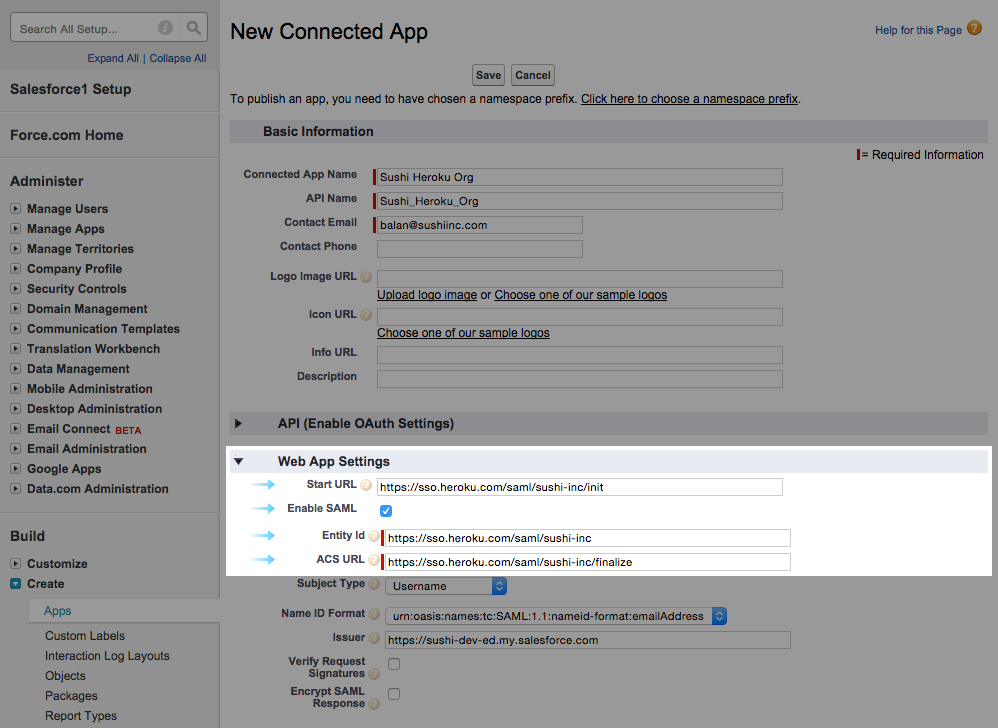
  5. In the Web App Settings area, click Enable SAML and paste the three values from the Heroku dashboard.
  6. Make sure that the “Name ID Format” pick list in the Salesforce interface is set to the format described in the Heroku SSO settings list.
  7. Set “Subject type” to “username”. (Make sure that this username represents each user’s actual e-mail address. Some Salesforce installations permit email-like usernames that don’t correspond to working e-mail addresses.)
  8. Click Save at the bottom of the page.

Salesforce SSO settings

Finally, grant users access to this connected app to enable SSO.

  1. Go to your Salesforce Admin homepage.
  2. Click Administer > Manage Users > Profiles.
  3. Click the Profile Name of the user profile.
  4. Click the Edit button.
  5. Scroll down to Connected App Access, and select the connected app you created on the previous page. Repeat this step for any other user profiles that should be also be granted SSO login for Heroku.
  6. Scroll to the bottom of the page and click Save.

Congratulations! The setup is complete. Heroku users can now log in using Salesforce credentials at the “Heroku Login URL” you configured.

Keep reading

  • Single Sign-on (SSO)

Feedback

Log in to submit feedback.

Using Single Sign-on (SSO) Services with Heroku, for End Users SSO for Heroku

Information & Support

  • Getting Started
  • Documentation
  • Changelog
  • Compliance Center
  • Training & Education
  • Blog
  • Support Channels
  • Status

Language Reference

  • Node.js
  • Ruby
  • Java
  • PHP
  • Python
  • Go
  • Scala
  • Clojure
  • .NET

Other Resources

  • Careers
  • Elements
  • Products
  • Pricing
  • RSS
    • Dev Center Articles
    • Dev Center Changelog
    • Heroku Blog
    • Heroku News Blog
    • Heroku Engineering Blog
  • Twitter
    • Dev Center Articles
    • Dev Center Changelog
    • Heroku
    • Heroku Status
  • Github
  • LinkedIn
  • © 2025 Salesforce, Inc. All rights reserved. Various trademarks held by their respective owners. Salesforce Tower, 415 Mission Street, 3rd Floor, San Francisco, CA 94105, United States
  • heroku.com
  • Legal
  • Terms of Service
  • Privacy Information
  • Responsible Disclosure
  • Trust
  • Contact
  • Cookie Preferences
  • Your Privacy Choices